External programming interface for accessing Engee
Engee provides developers of third-party applications with a programming interface (HTTP API) that allows a third-party application to log in to Engee and perform actions on behalf of the user in the Engee system.
To access the Engee HTTP API, a third-party application must be authorized on behalf of the user. Two equal authorization methods are supported:
-
Using standard OAuth 2.0;
-
Via a Personal Access Token (PAT) generated by the user in the Engee personal account.
In both cases, further interaction with the API is performed in the same way — using the header.
Authorization: Bearer <token>.
Authorization via OAuth 2.0
OAuth is used in cases where interactive user authorization is required (for example, when integrating web or desktop applications).
Preparation
The developer of the third-party application transmits the following information to the Engee developer:
-
redirect_uri— The URL in the third-party application to which the user will be redirected after authorization.
The developer Engee transmits to the developer of the third-party application:
-
client_id— application ID; -
client_secret— the application’s secret key; -
scope— a list of allowed APIs.
Authorization process
-
A third-party application redirects the user to
Authorize URL(https://engee.com/account/authorize) with the following query parameters:-
client_id— ID of the third-party application; -
redirect_uri— The user’s return URL; -
response_type— type of response (must becode); -
scope— authorized APIs; -
state— arbitrary data from a third-party application.Request example:
-
-
After confirming access, the user will be redirected to
redirect_uriwith parameters:-
code— authorization code; -
scope— authorized APIs; -
state— the value passed in the previous step.Example:
-
-
To receive the token, you must send
POST-request forToken URL(https://engee.com/account/api/oauth2/token) with the bodyapplication/x-www-form-urlencoded:-
grant_type=authorization_code; -
code— the code obtained in the previous step; -
client_id; -
client_secret; -
scope; -
redirect_uri.Request example:
curl -d grant_type=authorization_code \
     -d code=$code \
     -d client_id=$client_id \
     -d client_secret=$client_secret \
     -d "scope=user:id user:username profile:name profile:primary_email engee" \
     -d redirect_uri=$redirect_uri \
     https://engee.com/account/api/oauth2/token
-
The response returns:
-
access_token— used for authorization of requests; -
refresh_token— used to update the access token.
| The lifetime of the access token is 10 minutes, and the refresh token is 30 days. |
Authorization via Personal Access Token (PAT)
Personal Access Token (PAT) is designed for scenarios where interactive user authorization is not required (scripts, CI/CD, server integrations).
The PAT is manually created by the user in the Engee personal account and then used similar to the access token obtained via OAuth.
Getting a PAT
-
Open Engee’s personal account.
-
Go to the section Communication and Security → Personal access tokens.

-
Click Add a new token.
-
Specify:
-
Name of the token;
-
Description (optional);
-
Validity period;
-
Permissions (for example, Access to the Engee API).
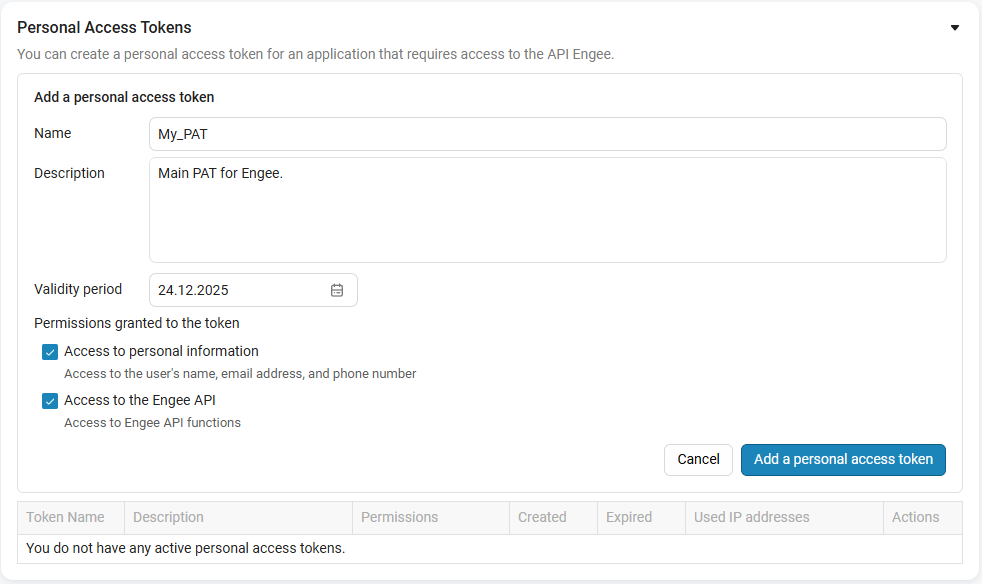
-
-
Click Add Personal Access Token.
-
Copy the generated token.
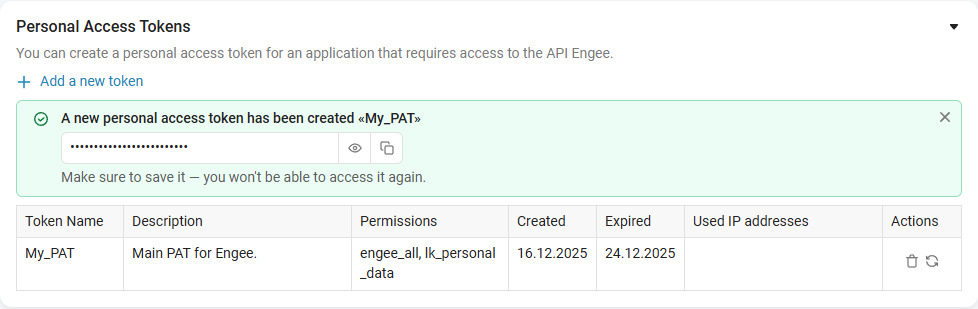
To copy, use the button
 , for viewing —
  .
.
|
Save the token immediately after creation. It is not possible to re-view it in the interface. |
Using PAT
Add a header to all HTTP requests to the Engee API:
Authorization: Bearer <PAT>Request example:
curl -H "Authorization: Bearer $pat" \
https://engee.com/account/api/engee/info|
Generate a Personal Access Token before starting the Engee session (before clicking the "Start" button in your personal account). If the session has already started, for the token to work correctly, you must:
Failure to comply with this condition may result in authorization errors. |
Interaction with Engee
In order for all APIs to interact with Engee, the system must be started by the user (the Start Engee button is pressed in the personal account). If it is not possible to press the start button, then you can also automate the start and stop of Engee (see the description of Engee control methods below).
The authorization header "Authorization: Bearer $token" must be added to all requests (the token was obtained via OAuth or created as a Personal Access Token).
API Methods
Prefix for all Management APIs Engee — https://engee.com.
Engee Management
GET /account/api/engee/info — getting information about the status of Engee. Response body:
{
  "username": "string",
  "serverName": "string",
  "serverId": "string",
  "url": "string",
  "serverStatus": "starting"|"running"|"stopping"|"stopped",
  "startingAt": "2025-02-10T10:24:31.328Z",
  "startedAt": "2025-02-10T10:24:31.328Z",
  "stoppingAt": "2025-02-10T10:24:31.328Z",
  "stoppedAt": "2025-02-10T10:24:31.328Z",
  "lastActivityAt": "2025-02-10T10:24:31.328Z",
  "inactivityTimeout": 0,
  "stopSessionAt": "2025-02-10T10:24:31.328Z",
  "clusterNamespace": {
    "minimalMode": true
  }
}
POST /account/api/engee/start — launch Engee (analogous to pressing the Start Engee button in your personal account). Response body (URL of the server being started):
{
'server': string
}
DELETE /account/api/engee/stop — stop Engee. Returns the response code 204.
The prefix for all other APIs has the form: https://engee.com/prod/user/$license-$nickname/. Each user has their own prefix, which must be taken from the Engee status response from the URL field.
|
Execution of arbitrary code
POST /external/command/eval
-
The simplest request (the request body is JSON).
The request must be sent with the header Content-Type: application/json.Request:
{
  "command": "3 + 5"
}
Returned data:
-
Status code: 200.
{
  "result": "8"
}
-
-
An error occurred when executing the source code. Request:
{
  "command": "unexisting_variable"
}
Returned data:
-
Status code: 400.
{
  "result_code": "command_error",
  "error": {
    "full_description": "UndefVarError: `unexisting_variable` not defined\n\nStacktrace:\n  [1] top-level scope\n    @ none:1\n  [2] eval(m::Module, e::Any)\n    @ Core ./boot.jl:370\n  [3] top-level scope\n    @ none:4\n  [4] eval\n    @ ./boot.jl:370 [inlined]\n  [5] eval_mask_code(code::String)\n    @ Main.Masks /app/IJulia/preload_cells/masks.jl:206\n  [6] eval_mask_codes(mask_codes::Vector{Main.Masks.MaskCode})\n    @ Main.Masks /app/IJulia/preload_cells/masks.jl:197\n  [7] |>\n    @ ./operators.jl:907 [inlined]\n  [8] evaluate_mask_codes(mask_codes::Vector{Dict{String, String}})\n    @ Main.Masks /app/IJulia/preload_cells/masks.jl:272\n  [9] |>\n    @ ./operators.jl:907 [inlined]\n [10] (::Workspaces.Servers.var\"#eval_mask_codes#157\"{typeof(Main.Masks.evaluate_mask_codes), Workspaces.Servers.var\"#convert_mask_result#156\"})(blocks::Vector{Dict{String, String}})\n    @ Workspaces.Servers /usr/local/julia-1.9.3/packages/Workspaces/2XYbD/src/servers/handlers.jl:539\n [11] request_pipeline(req::HTTP.Messages.Request, log_func::var\"#13#14\"{String}, req_params_func::Function, log_response_func::Workspaces.Servers.var\"#mask_log_and_response#159\"{Workspaces.Servers.var\"#result_to_response#158\"}, pipeline_stages::Workspaces.Servers.PipelineStages)\n    @ Workspaces.Servers /usr/local/julia-1.9.3/packages/Workspaces/2XYbD/src/servers/handlers_common.jl:282\n [12] required_body_request_pipeline\n    @ /usr/local/julia-1.9.3/packages/Workspaces/2XYbD/src/servers/handlers_common.jl:289 [inlined]\n [13] eval_mask_code_handler\n    @ /usr/local/julia-1.9.3/packages/Workspaces/2XYbD/src/servers/handlers.jl:556 [inlined]\n [14] (::Workspaces.Servers.var\"#eval_mask_code#186\"{var\"#13#14\"{String}, typeof(Main.Masks.evaluate_mask_codes)})(req::HTTP.Messages.Request)\n    @ Workspaces.Servers /usr/local/julia-1.9.3/packages/Workspaces/2XYbD/src/servers/Servers.jl:68\n [15] (::HTTP.Handlers.Router{typeof(HTTP.Handlers.default404), typeof(HTTP.Handlers.default405), Nothing})(req::HTTP.Messages.Request)\n    @ HTTP.Handlers /usr/local/julia-1.9.3/packages/HTTP/sJD5V/src/Handlers.jl:439\n [16] (::HTTP.Handlers.var\"#1#2\"{HTTP.Handlers.Router{typeof(HTTP.Handlers.default404), typeof(HTTP.Handlers.default405), Nothing}})(stream::HTTP.Streams.Stream{HTTP.Messages.Request, HTTP.Connections.Connection{Sockets.TCPSocket}})\n    @ HTTP.Handlers /usr/local/julia-1.9.3/packages/HTTP/sJD5V/src/Handlers.jl:58\n [17] #invokelatest#2\n    @ ./essentials.jl:819 [inlined]\n [18] invokelatest\n    @ ./essentials.jl:816 [inlined]\n [19] handle_connection(f::Function, c::HTTP.Connections.Connection{Sockets.TCPSocket}, listener::HTTP.Servers.Listener{Nothing, Sockets.TCPServer}, readtimeout::Int64, access_log::Nothing)\n    @ HTTP.Servers /usr/local/julia-1.9.3/packages/HTTP/sJD5V/src/Servers.jl:469\n [20] macro expansion\n    @ /usr/local/julia-1.9.3/packages/HTTP/sJD5V/src/Servers.jl:401 [inlined]\n [21] (::HTTP.Servers.var\"#16#17\"{HTTP.Handlers.var\"#1#2\"{HTTP.Handlers.Router{typeof(HTTP.Handlers.default404), typeof(HTTP.Handlers.default405), Nothing}}, HTTP.Servers.Listener{Nothing, Sockets.TCPServer}, Set{HTTP.Connections.Connection}, Int64, Nothing, ReentrantLock, Base.Semaphore, HTTP.Connections.Connection{Sockets.TCPSocket}})()\n    @ HTTP.Servers ./task.jl:514",
    "short_description": "UndefVarError(:unexisting_variable)",
    "type": "UndefVarError"
  }
}
here:
-
error.full_description— a full description of the error along with the stack trace. The output is similar to the error output to the terminal; -
error.short_description— exception without stack trace; -
error.type— type of error.
-
-
-
JSON file return. Request:
{
  "command": "using JSON\nJSON.json(\"a\"=>1)"
}
Returned data:
-
Status code: 200.
{
  "result": "{\"a\":1}"
}
-
Uploading files
POST /external/file/upload
The request is sent in the format multipart/form-data.
Field paths contains JSON in the following format:
{
  "sources": [
    "/user/some_dir"
  ]
}
here:
-
Each element inside
sourcesindicates the directory where the file will be uploaded.; -
Field
upload_filescontains the file that needs to be uploaded; -
Number of fields
upload_filesit must match the number of transferred directories.
Request example:
curl -X 'POST' \
  'https://engee.com/prod/user/$license-$user/external/file/upload' \
  -H 'Authorization: Bearer $access_token' \
  -H 'Content-Type: multipart/form-data' \
  -F 'paths={
  "sources": [
    "/user/some_directory"
  ]
}' \
-F 'upload_files=@2.png;type=image/png'-
If the directory where the file is uploaded does not exist, it will be created.;
-
All downloaded files must be located inside the directory.
/userotherwise, error 403 will be returned; -
If the file already exists, then a suffix will be added to its name.;
-
The file will be written to disk only after full download. If the download is interrupted, the file will not appear in the file system.
Downloading files
POST /external/file/download
Request:
{
  "sources": [
    "/user/some_file"
  ]
}
Answer:
-
If a single file is requested, the server returns a response.
multipart/form-datawith one attachment:-
Content-Type: multipart/form-data; boundary=… -
The response contains one part with the binary contents of the file.
-
The name of the downloaded file is passed in the header of the part
Content-Disposition: form-data; name="files"; filename="<filename>".
-
-
If multiple files are requested, the server returns a ZIP archive.:
-
Content-Type: application/x-zip-compressed -
The response body is a binary ZIP containing all the requested files (while maintaining the structure of the paths relative to
/user).
-
Mistakes:
-
If at least one file does not exist —
404 Not Found. -
All downloaded files must be located inside the directory.
/userotherwise, the error will return403 Forbidden.
Asynchronous code execution
To execute code whose execution time may exceed the timeout of the HTTP connection, use the asynchronous API. This approach avoids disconnecting the connection when performing long-term operations.
|
The choice between synchronous and asynchronous execution:
|
Creating a background task
POST /external/command/jobs/create
Starts code execution in the background. The server accepts the task and immediately returns a response, without waiting for the code execution to complete.
Request body (application/json):
{
  "job_id": "550e8400-e29b-41d4-a716-446655440000",
  "job_type": "EVAL",
  "code": "a = 5; sleep(60); a * 2",
  "name": "My calculation"
}
Parameters:
-
job_id— unique task identifier (UUID). -
job_type— type of task ("EVAL"). -
code— the code to execute. -
name— optional task name for easy identification.
Answers:
-
202 Accepted— the task has been successfully created and queued for execution. -
409 Conflict— a task with the specifiedjob_idit already exists.If you send a request with an existing one job_id, then the system will return the status409 Conflictand it will not create a duplicate of the task.
Checking the progress status
GET /external/command/jobs/{job_id}/result
Allows you to get the current status of the task and its result (when the task is completed).
Answer:
{
  "job_id": "550e8400-e29b-41d4-a716-446655440000",
  "name": "My calculation",
  "job_type": "EVAL",
  "status": "IN_PROGRESS",
  "start_time": "2024-05-20T12:00:00Z",
  "end_time": null,
  "result": null
}
Response fields:
-
status— completion status:"IN_PROGRESS"(in progress) or"DONE"(completed). -
start_time— the start time of the task. -
end_time— task completion time (filled in when status ="DONE"). -
result— contains the result of execution or an error (filled in whenstatus = "DONE").
Format of the result upon successful completion:
{
  "type": "success",
  "data": {
    "text": "10"
  }
}
Format of the result in case of execution error:
{
  "type": "error",
  "data": {
    "type": "UndefVarError",
    "short_description": "UndefVarError(:some_variable)",
    "full_description": "UndefVarError: `some_variable` not defined\n\nStacktrace:\n..."
  }
}
Answers:
-
200 OK— information about the task has been received. -
404 Not Found— a task with the specifiedjob_idnot found.
Getting a list of issues
GET /external/command/jobs/list
Retrieves the list of all tasks created by the user.
Answer:
{
  "jobs": [
    {
      "job_id": "16763be4-6022-406e-a950-fcd5018633ca",
      "name": "task_1",
      "job_type": "EVAL",
      "status": "DONE",
      "start_time": "2024-05-20T12:00:00Z",
      "end_time": "2024-05-20T12:05:00Z",
      "result": {
        "type": "success",
        "data": {
          "text": "The result of the execution..."
        }
      }
    }
  ]
}
The response contains an object with a single field jobs — an array of tasks. Full information is returned for each task, including:
-
Unique identifier (
job_id). -
Completion status (
status). -
Start and end timestamps.
-
The result of the execution (if the task is completed).