Sending data via COM: Arduino Blink
In this example, we consider modeling in Engee with external equipment connected. The COM port of the computer where Engee is running is in the mode of sending messages to the COM port of the Arduino MEGA microcontroller. The receipt of messages on the microcontroller is processed to control the built-in LED. Adjusting the model parameters during execution allows you to change the data transmitted to the Arduino.
Introduction
Engee has the ability to connect external equipment -
such as, for example, a COM port. Not only office and multimedia devices can be connected via this interface, but also instrumentation devices - sensors, microcontrollers, programmable logic controllers.
To get acquainted with the possibilities of using COM connections in the Engee model, in this example, we will send data - a periodic discrete signal to the Arduino MEGA microcontroller.
The example model
Interface settings, block COM Setup
- the port name is for Windows OS, it is, for example, "COM5";
- Transmission rate, baud - 9600;
- the amount of data to receive and transmit, bit - 8;
- number of receive-transmit stop bits, bit - 1;
- There is no parity bit.
In the transmitter unit COM TX it is necessary to determine the port name - "COM5" and the buffer size for transmission = 1.
The inputs of this block are transmitted:
- the number of elements from the data array to be transmitted: a number in the format
UInt32in our case = 1, - vector of data to be transmitted in the format
UInt8.
The second input will be supplied with a periodic pulse signal with amplitude = 1, fill factor and a changeable period.
Preparing for the execution of the model
Before launching the model in Engee, it is necessary to perform several preparatory actions, as described in the manual.
Installing the Support package
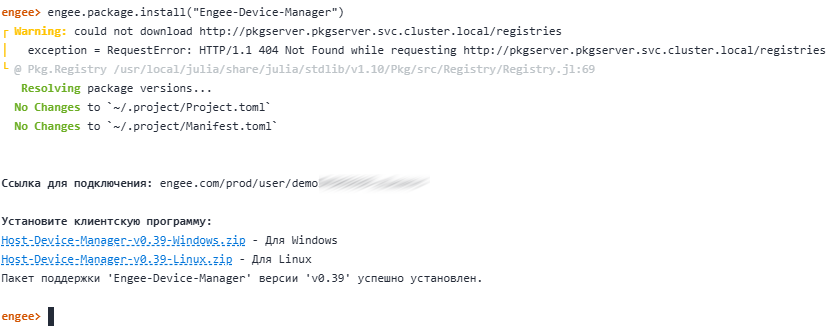
Run the following command in the Engee command prompt:
engee.package.install("Engee-Device-Manager")
After executing the command, the following messages will be displayed indicating the successful installation of the external hardware support package in Engee:
.png)
According to the given link, depending on the operating system, you need to download the archive, unzip it and run the client program.
Connecting to Engee
Next, in the opened window of the client program, you must enter the received connection link and click the "Connect" button:
The message "Connection to the server is established!" and the connection status "Connected" in the client program window indicates that Engee has gained access to the computer interfaces.
Do not close the user program window during operation, otherwise the connection will be lost.
Connecting an Arduino
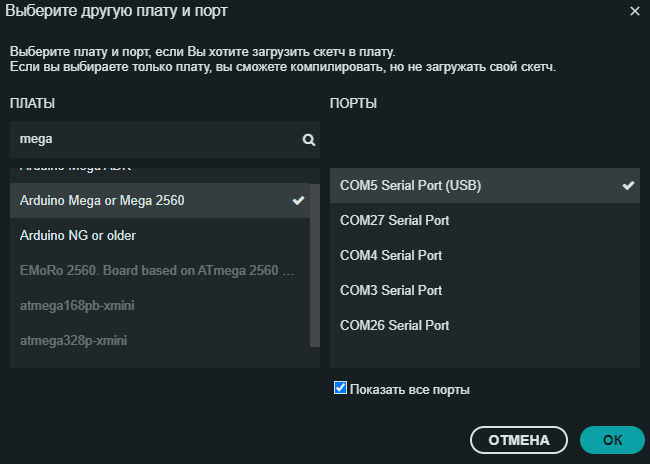
Now we will connect the equipment to the COM5 port specified in the model.
The name of the port to which you connect your device according to this example may be disconnected. Determine the name of the port to which your device is connected and set it in the model interface settings blocks (COM Setup and COM TX).
In this example, the Arduino MEGA is connected to the "COM5" port, as indicated by the connection status in the Arduino IDE.:
.png)
You can also determine the port in the Arduino IDE connection settings.:
.png)
Programming Arduino
The program for processing data received by Arduino from Engee via the serial port is shown in the sketch arduino_com_read_sketch.ino.
The principle of operation of the program is described in detail in the comments of the sketch. The essence of the work is as follows. If the controller receives a "1" from Engee, it lights up the built-in LED on the board, if it does not receive a "1", the LED does not light up.
To program the Arduino Mega, just do the following:
- download the folder
arduino_com_read_sketchwith a sketch, - open a sketch in the Arduino IDE,
- Identify the board model -
Arduino Mega or Mega 2560and the port name - in the case of this example, it isCOM5. - check the sketch,
- Upload it to the board.
If the download and compilation are successful, you can proceed to executing the model in Engee, which will send signals to the Arduino MEGA via COM.
Executing the example model
Before launching the model in Engee, make sure that the following steps
are followed: > 1. The external hardware support package is installed.
- The client program from the support package has been launched.
- The Engee connection status in the client program is "Connected".
- The controller is connected in the COM port.
- The COM signal processing program is running on the controller.
- The name of the COM port to which the controller is connected corresponds to the one set in the interface blocks of the model.
Let's run the model in Engee, after compilation, we can observe the formation of a pulse signal on the Engee graph and the synchronous flashing of the LED on the Arduino MEGA board.:
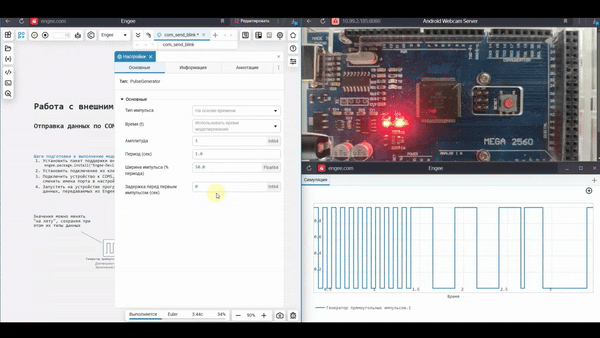
The parameters of the blocks can be changed during the operation of the model, in other words, "on the fly". From the above video, it can be seen that Engee successfully transmits a periodic pulse signal with a variable frequency to the microcontroller via the COM port.
Conclusion
In the example, we discussed the process of configuring the connection to external equipment, and also described how to start working with transmitting signals from Engee to the serial port of a personal computer. The example model generates a periodic pulse signal, and the Arduino MEGA microcontroller connected to the computer receives this signal via the COM port with its further processing.