Stipple Plugins
StippleDownloads
StippleDownloads is a plugin for Stipple that allows you to download dynamically created files. Event handlers ensure that only the requesting client receives a copy of the file.
Text and binary files are supported, and file names can be chosen arbitrarily.
Examples
Downloading the contents of a variable as raw data or BSON
using Stipple, Stipple.ReactiveTools
using StippleUI, StippleDownloads
using BSON

@app begin
    @in data = randn(1000)

    @event download_raw begin
        download_binary(__model__, data, "raw")
    end
    @event download_bson begin
        # При вызове @save для `data` выдается ошибка, так как это реактивная переменная. Необходимо создать копию.
        data_var = data
        io = IOBuffer()
        BSON.@save io data_var
        seekstart(io)
        download_binary(__model__, take!(io), "data.bson")
    end

end

function ui()
    row([
            cell(btn(class="q-ml-lg", "Raw", icon="download", @on(:click, :download_raw, :addclient), color="primary", nocaps=true))
            cell(btn(class="q-ml-lg", "BSON", icon="download", @on(:click, :download_bson, :addclient), color="secondary", nocaps=true))
        ])

end

@page("/", ui)
Download the DataFrame as an Excel sheet
using Stipple, Stipple.ReactiveTools
using StippleUI
using StippleDownloads

using DataFrames
using XLSX

import Stipple.opts
import StippleUI.Tables.table

function df_to_xlsx(df)
    io = IOBuffer()
    XLSX.writetable(io, df)
    take!(io)
end

@app begin
    @out table = DataTable(DataFrame(:a => rand(1:10, 5), :b => rand(1:10, 5)))
    @in text = "The quick brown fox jumped over the ..."

    @event download_text begin
        download_text(__model__, :text)
    end

    @event download_df begin
        try
            download_binary(__model__, df_to_xlsx(table.data), "file.xlsx"; client = event["_client"])
        catch ex
            println(ex)
        end
    end
end

function ui()
    row(cell(class = "st-module", [

        row([
            cell(textfield(class = "q-pr-md", "Download text", :text, placeholder = "no output yet ...", :outlined, :filled, type = "textarea"))
            cell(table(class = "q-pl-md", :table))
        ])

        row([
            cell(col = 1, "Without client info")
            cell(btn("Text File", icon = "download", @on(:click, :download_text), color = "primary", nocaps = true))
            cell(col = 1, "With client info")
            cell(btn(class = "q-ml-lg", "Excel File", icon = "download", @on(:click, :download_df, :addclient), color = "primary", nocaps = true))
        ])
    ]))
end

@page("/", ui)

up(open_browser = true)
To see the difference between calls with and without customer information, duplicate the application tab and click Download Text.
Two identical files will be downloaded, as when duplicating a tab, a synchronized copy of the application is created. In order for the file to be received only by the requesting client, you should limit the download using event["_client"] and add an additional property for the activating button, :addclient, which will include this information.
StippleMarkdown
Displaying Markdown text in Genie applications
This package contains two new Stipple components: markdowntext and `markdowncard'. As an argument, you can pass either a string of Markdown text or a character that refers to a variable with Markdown text.
using GenieFramework
@genietools
using StippleMarkdown

@app begin
    @out txt = "**hello** world"
end
@deps StippleMarkdown

ui() = [ markdowntext(:txt), markdowntext("## Hello World!"), markdowncard(:txt), markdowncard("## Hello World!\n This is a Markdown card")]

@page("/", ui)
StippleLatex
StippleLatex uses Vue-Katex to implement LaTeX formatting in Stipple. There are three possible options for adding LaTeX content to a web page.:
-
The span LaTeX element:
latex(<LaTeX formula>, <formatting options>) -
An HTML element with LaTeX content via a string macro with an optional modifier, which can take the value
autoordisplay:span(latex"<LaTeX formula>")span(latex"<LaTeX formula>"display) -
HTML element with LaTeX content via the macro
@latexwith additional parameters:span(@latex(raw"<LaTeX formula>")span(@latex(raw"<LaTeX formula>", display = true)
All arguments also support symbols for binding to model fields. Here is an application demonstrating possible use cases.
using Stipple, Stipple.ReactiveTools
using StippleUI
using StippleLatex

## определяем небольшой генератор формул
function nestlist(f, a; init = nothing)
    T = eltype(a)
    list = T[]
    el = init
    for (i, x) in enumerate(a)
        el = i == 1 && init === nothing ? x : f(el, x)
        push!(list, el)
    end
    list
end

formula = nestlist(*, ["", raw"\sin", "^2", " x", " +", raw" \sqrt{", "a", "^2", " +", " b", "^2"])
formula[contains.(formula, "sqrt")] .*= "}"

## настраиваем приложение
@app begin
    @in x = 0
    @in formula_1 = raw"\int_{a}^{b} f(x) \, dx = F(x)\Biggr|^b_a"
    @in formula_2 = raw""
    @private p = @task 1 + 1

    @onchange isready begin
        if !istaskstarted(p) || istaskdone(p)
            p = @task begin
                println("Task started")
                while x <= 100
                    sleep(1)
                    x += 1
                    pos = x < 6 ? 1 : (x - 5) % (length(formula) + 5) + 1
                    formula_2 = formula[min(pos, length(formula))]
                end
            end
            schedule(p)
        end
    end
end

function ui()
    [
        row(cell(class = "st-module", [
            cell(h1(latex("\\LaTeX") * "-Demo"))
            cell(h2(latex"a^2 + b^2 = c^2"))
        ]))

        row(cell(class = "st-module", [
            textfield("Enter your LaTeX-Forumla", :formula_1,)
            cell(class = "q-pa-md", latex":formula_1"display)
            row([
                cell(class = "q-pa-md bg-red-1", raw"""cell(latex"\cos^2x"display)""")
                cell(class = "q-pa-md bg-green-1", latex"\cos^2x"display)
            ])
            row([
                cell(class = "q-pa-md bg-red-1", raw"""cell(latex"This is auto mode with a formula \(\cos^2x\)"auto)""")
                cell(class = "q-pa-md bg-green-1", latex"This is auto mode with a formula \(\cos^2x\)"auto)
            ])
            row([
                cell(class = "q-pa-md bg-red-1", raw"""latex(class = "q-pa-md", raw"\tan^2x", display = true)""")
                cell(class = "bg-green-1 q-pa-md", latex(class = "q-pa-md", raw"\tan^2x", display = true))
            ])
            bignumber("Wait for 5", :x, color = R"x >= 5 ? 'negative' : 'positive'", icon = "calculate")

            row([
                cell(class = "q-pa-md bg-red-1", raw"""cell(class = "q-pa-md", @latex(raw"\tanh^2 y", display = R"x >= 5"))""")
                cell(class = "q-pa-md bg-green-1", @latex(raw"\tanh^2 y", display = R"x >= 5"))
            ])


            row([
                cell(class = "q-pa-md bg-red-1", raw"""@latex(raw"This is auto mode with an inline formula \(\cos^2x\) and a display formula $$\sin^2x$$""")
                cell(class = "q-pa-md bg-green-1", @latex(raw"This is auto mode with an inline formula \(\cos^2x\) and a display formula $$\sin^2x$$", auto = true))
            ])
        ]))

        row(cell(class = "st-module", [
            textfield(class = "q-pa-lg", "LaTeX", :formula_2)
            cell(class = "q-pa-md", "Result:")
            cell(class = "q-pa-md", latex":formula_2"display)
        ]))
    ]
end

route("/") do
    page(@init(), ui()) |> html
end

up()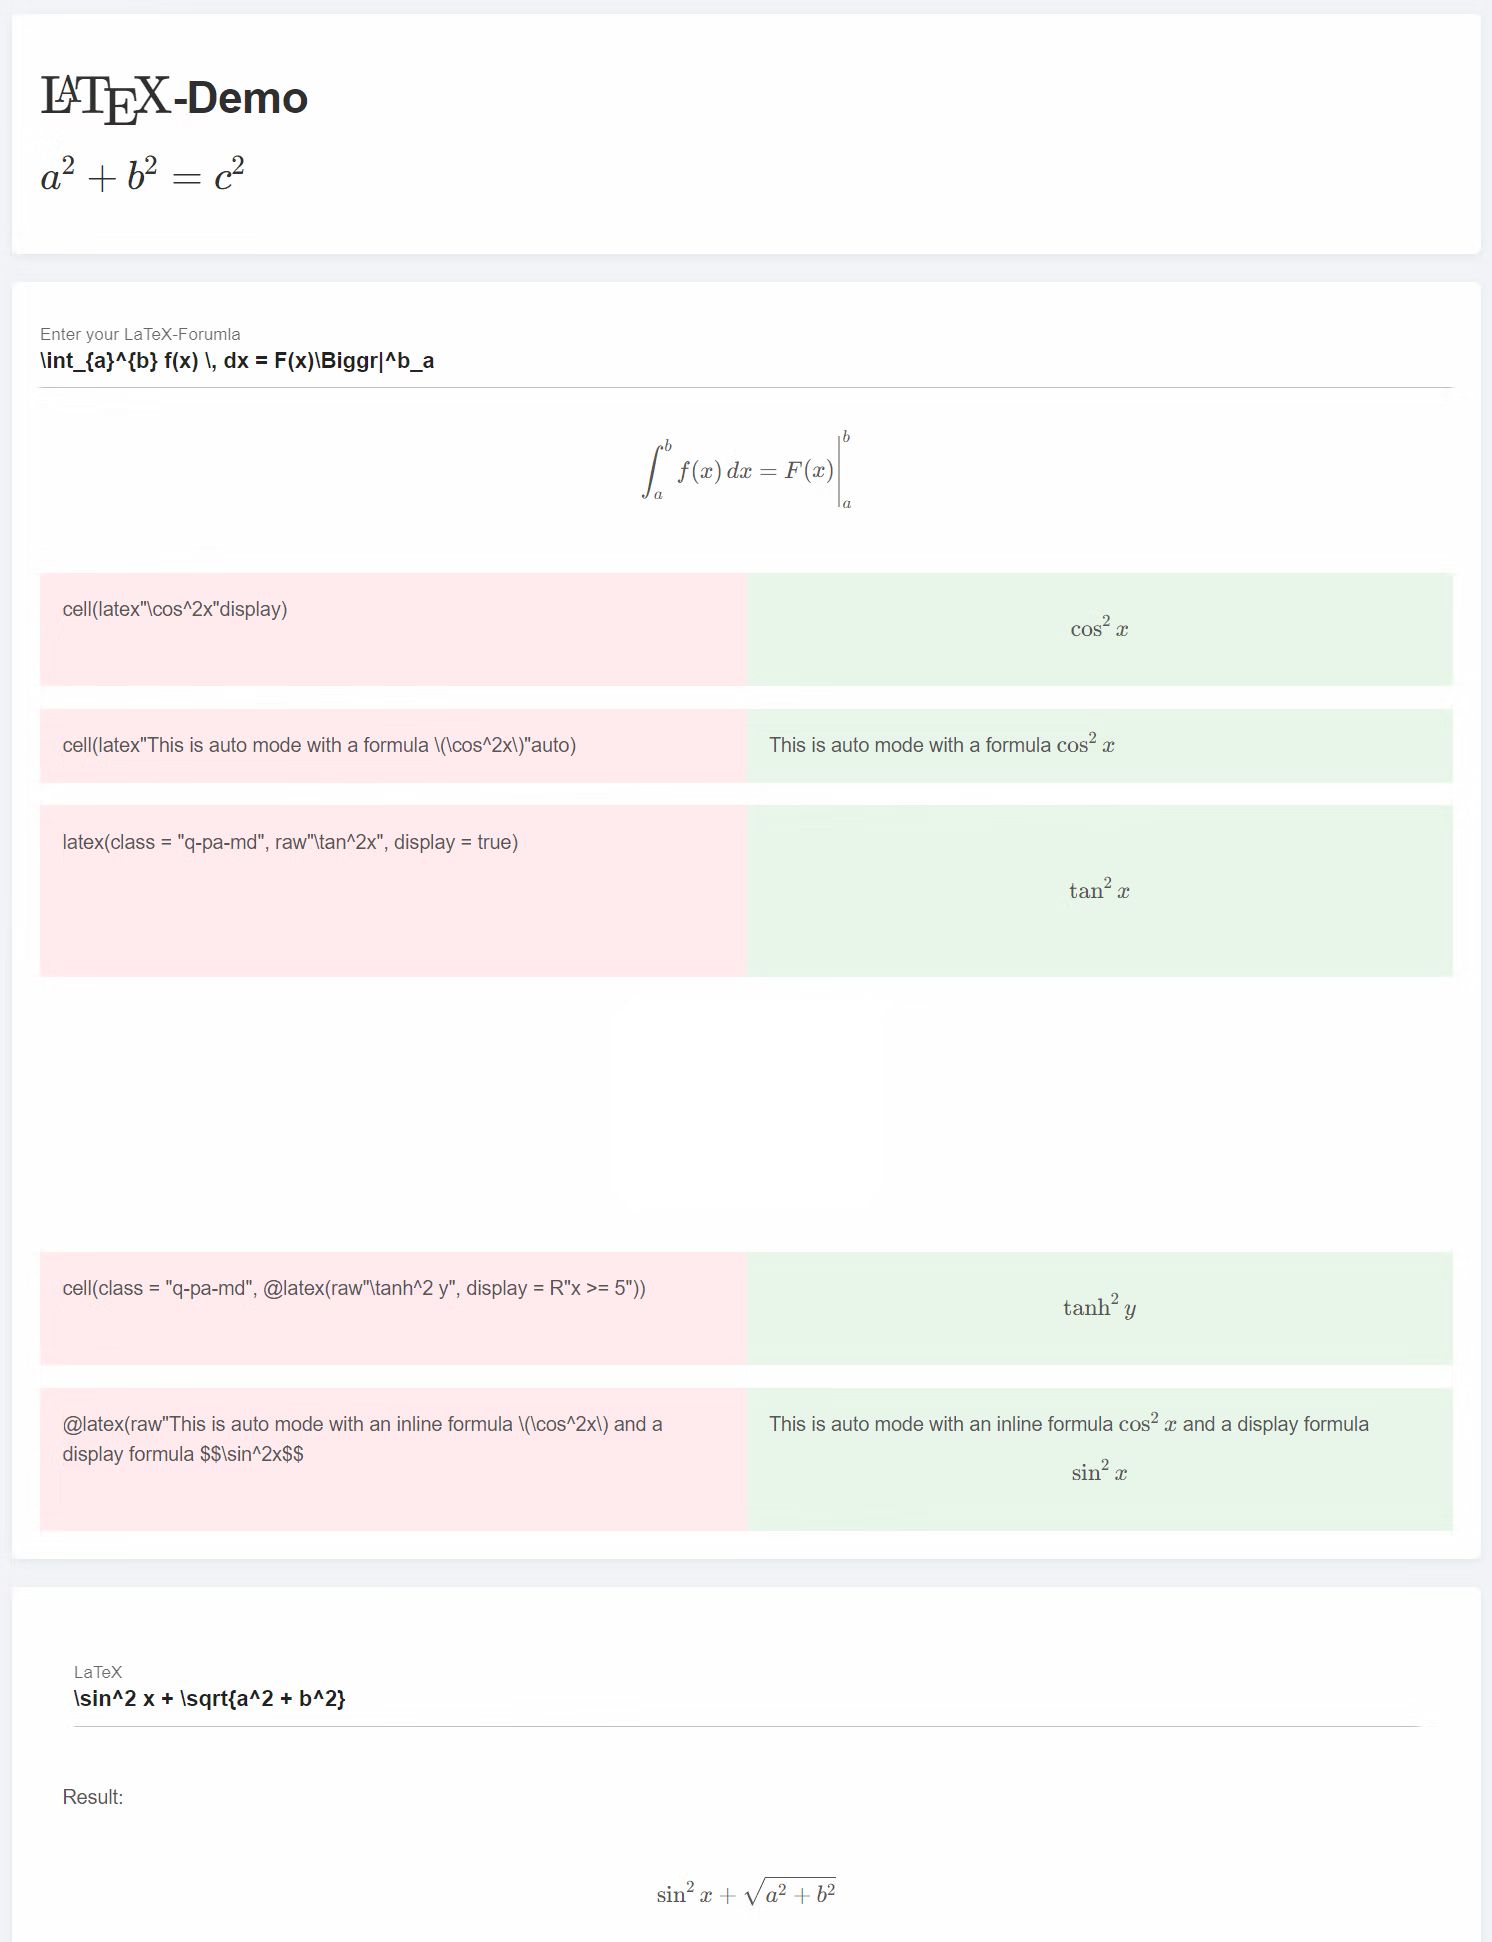
StippleMathjs
The StippleMathjs plugin adds https://mathjs.org /[mathjs] to the project https://github.com/GenieFramework/Stipple.jl [Stipple] or https://github.com/GenieFramework/GenieFramework.jl [GenieFramwork].
In addition, it adds automatic conversion of all types of Complex numbers between the server and the client.
Application Example
using Stipple, Stipple.ReactiveTools
using StippleUI
using StippleMathjs


x0 = 1.0
y0 = 2.0

@app begin
    @in x = x0
    @in y = y0
    @in z = x0 + y0 * im
    @in z2::ComplexF64 = x0 + y0 * im

    @onchange x, y begin
        # обновляем z, не инициируя `@onchange z`
        z[!] = x + y * im

        # обновляем x и y в клиенте
        @push z
    end

    @onchange z begin
        # обновляем x и y, не инициируя `@onchange x, y`
        x[!] = z.re
        y[!] = z.im

        # обновляем x и y в клиенте
        @push x
        @push y
    end
end

@deps StippleMathjs

function ui()
    [
        card(class = "q-pa-md", [
            numberfield(class = "q-ma-md", "x", :x)
            numberfield(class = "q-ma-md", "y", :y)
        ])

        card(class = "q-pa-md q-my-md", [
            row([cell(col = 2, "z"),        cell("{{ z }}")])
            row([cell(col = 2, "z.mul(z)"), cell("{{ z.mul(z) }}")])
            row([cell(col = 2, "z.abs()"),  cell("{{ z.abs() }}")])

            btn(class = "q-my-md", "square(z)", color = "primary", @click("z = z.mul(z)"))
        ])
    ]
end

@page("/", ui, debounce = 10)
up()
An example of an application with the correct contents of the Manifest.toml file is available in https://github.com/GenieFramework/StippleDemos/tree/master/AdvancedExamples/StippleMathjsDemo [StippleDemos.jl].
StippleKeplerGL.jl
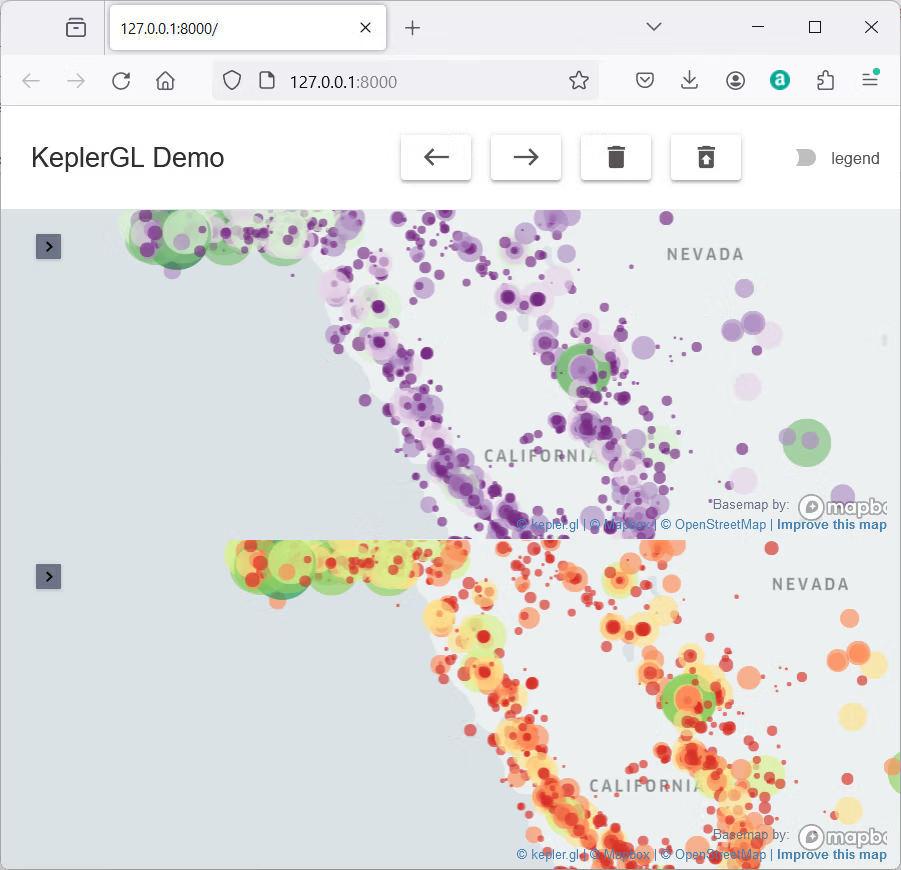
Julia package for integrating KeplerGL cards into Genie/Stipple applications.
Installation
To install the package, run the following command in the Julia command prompt:
] add StippleKeplerGL
Example
using Stipple, Stipple.ReactiveTools
using StippleUI
using StippleKeplerGL
using DataFrames
using CSV
using Colors
using ColorBrewer

keplergl_path = Base.pkgdir(isdefined(@__MODULE__, :KeplerGLBase) ? KeplerGLBase : KeplerGL)
df = CSV.read(joinpath(keplergl_path, "assets", "example_data", "data.csv"), DataFrame)

## token = "token"

m1 = KeplerGL.KeplerGLMap(token, center_map=false)

KeplerGL.add_point_layer!(m1, df, :Latitude, :Longitude,
    color = colorant"rgb(23,184,190)", color_field = :Magnitude, color_scale = "quantize",
    color_range = ColorBrewer.palette("PRGn", 6),
    radius_field = :Magnitude, radius_scale = "sqrt", radius_range = [4.2, 96.2], radius_fixed = false,
    filled = true, opacity = 0.39, outline = false
)

m1.config[:config][:mapState][:latitude] = 38.32068477880718
m1.config[:config][:mapState][:longitude]= -120.42806781055732
m1.config[:config][:mapState][:zoom] = 4.886825331541375
m1.window[:map_legend_show] = m1.window[:map_legend_active] = m1.window[:visible_layers_show] = m1.window[:visible_layers_active] = false

m2 = KeplerGL.KeplerGLMap(token, center_map=false)

KeplerGL.add_point_layer!(m2, df, :Latitude, :Longitude,
    color = colorant"rgb(23,184,190)", color_field = :Magnitude, color_scale = "quantize",
    color_range = ColorBrewer.palette("RdYlGn", 6),
    radius_field = :Magnitude, radius_scale = "sqrt", radius_range = [4.2, 96.2], radius_fixed = false,
    filled = true, opacity = 0.39, outline = false
)

m2.config[:config][:mapState][:latitude] = 38.32068477880718
m2.config[:config][:mapState][:longitude]= -122.42806781055732
m2.config[:config][:mapState][:zoom] = 4.886825331541375
m2.window[:map_legend_show] = m2.window[:map_legend_active] = m2.window[:visible_layers_show] = m2.window[:visible_layers_active] = false

d1, d2 = m1.datasets, m2.datasets

@app begin
    @out map1 = m1
    @out map2 = m2
    @in clear_data = false
    @in restore_data = false
    @in show_legend = false
    @in go_west = false
    @in go_east = false

    @onbutton clear_data begin
        __model__["map1.datasets"] = []
        __model__["map2.datasets"] = []
    end

    @onbutton restore_data begin
        __model__["map1.datasets"] = d1
        __model__["map2.datasets"] = d2
    end

    @onbutton go_west begin
        map1.config[:config][:mapState][:longitude] -= 1
        __model__["map1.config.config.mapState.longitude"] = map1.config[:config][:mapState][:longitude]

        map2.config[:config][:mapState][:longitude] -= 1
        __model__["map2.config.config.mapState.longitude"] = map2.config[:config][:mapState][:longitude]
    end

    @onbutton go_east begin
        map1.config[:config][:mapState][:longitude] += 1
        __model__["map1.config.config.mapState.longitude"] = map1.config[:config][:mapState][:longitude]

        map2.config[:config][:mapState][:longitude] += 1
        __model__["map2.config.config.mapState.longitude"] = map2.config[:config][:mapState][:longitude]
    end

    @onchange show_legend begin
        __model__["map1.window.map_legend_show"] = show_legend
        __model__["map2.window.map_legend_show"] = show_legend

        # alternatively, you can use the following lines to display symbols through the backend,
        # but at the same time, all the card data will be transferred to the frontend

        # map1.window[:map_legend_show] = show_legend
        # notify(map1)
    end
end

@deps StippleKeplerGL
isdefined(Stipple, :register_global_components) && Stipple.register_global_components("VueKeplerGl", legacy = true)

ui() = [
    column(class = "full-height", [
        row(col = :auto, class = "items-center", [
            h5(class = "col-auto q-pl-lg q-py-md", "KeplerGL Demo")
            cell()
            btn(col = :auto, "", icon = "west", @click(:go_west), class = "q-mr-md", [tooltip("go west")])
            btn(col = :auto, "", icon = "east", @click(:go_east), class = "q-mr-md", [tooltip("go east")])
            btn(col = :auto, "", icon = "delete", @click(:clear_data), class = "q-mr-md", [tooltip("clear data")])
            btn(col = :auto, "", icon = "restore_from_trash", @click(:restore_data), class = "q-mr-md", [tooltip("restore data")])
            toggle(col = :auto, "legend", :show_legend, class = "q-mr-md")
        ])

        cell(keplergl(:map1, ref = "map1", id = "map1"))
        cell(keplergl(:map2, ref = "map2"))
    ])
]

route("/") do
    # uncomment the following line for testing or debugging
    global model
    model = @init
    page(class = "fixed-full", model, ui) |> html
end

up(open_browser = true)
StippleTypedArrays
StippleTypedArrays is a Stipple plugin for integrating TypedArrays arrays from JavaScript.
Buffers are a typical use case, for example, for downloading files or processing and sending information via binary channels.
StippleTypedArrays introduces the vector wrapper TypedArray, which can be used in type declarations for application variables.
Pay attention:
on the backend side, all handlers work normally. However, on the client side, JavaScript cannot keep track of typed arrays, so any buffer changes on the client side will not be automatically synchronized.
To synchronize data with the server, after changing the value, you need to call this.push('data').
Demo application
using Stipple, Stipple.ReactiveTools
using StippleUI
using StippleTypedArrays
using StippleDownloads
@app begin
@in data = TypedArray(UInt8[])a
@in data64 = TypedArray(UInt64[])
@in add_data = false
@in clear_data = false
@onbutton add_data begin
x = rand(0:255)
push!(data, x)
notify(data)
push!(data64, x + 1000)
notify(data64)
end
@onbutton clear_data begin
data = data64 = []
end
end
@deps StippleTypedArrays
function ui()
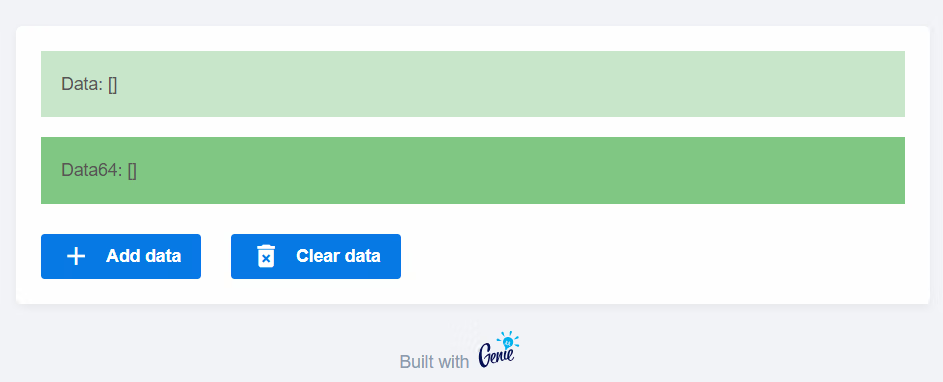
row(cell(class = "st-module q-ma-md", [
row(class = "q-pa-md bg-green-2", "Data: [{{ data }}]")
row(class = "q-pa-md q-my-lg bg-green-4", "Data64: [{{ data64 }}]")
row([
btn("Add data", icon = "add", @click(:add_data), color = "primary", nocaps = true)
btn(class = "q-ml-lg", "Clear data", icon = "delete_forever", @click(:clear_data), color = "primary", nocaps = true)
])
]))
end
@page("/", ui)
up(open_browser = true)