KPM RHYTHM: a quick start
This example shows the beginning of work with complex of semi-natural modeling (KPM) RHYTHM.
The connection of KPM RHYTHM, the addition and configuration of the machine in the application RHYTHM.Machine management,
as well as the creation and operation of a real-time application generated from the Engee model.
Introduction
The connection and configuration of KPM RHYTHM in the example is for Windows 10 and Yandex and Chrome browsers.
The model used is KPM RHYTHM - EE1005.
Before starting work, KPM RHYTHM must be installed and connected
to the mains and monitor according to the operating instructions.
Connecting KPM RHYTHM
Connect to KPM RHYTHM via an Ethernet cable, the "Host" port:
After that, turn on the KPM RHYTHM. When the machine is successfully started and booted
on the connected monitor in the RITM.Monitor application the IP address of the node is displayed. In our example
IP Address: 192.168.56.3
Next, go to the computer's network settings. Open "Settings" ->
"Network and Internet" -> "Ethernet" -> "IP Settings" -> "Edit":
In the IP parameters, specify the address and subnet mask.:
IP address: 192.168.56.0,
Subnet mask: 255.255.255.0,
then we will save the changes.
The connection of KMP RHYTHM to the computer has been completed. Now back to Engee.
Adding the car to the RHYTHM.Machine management
Open the application RHYTHM.Machine Management:
.png)
Let's move on to adding the machine, and then in the add machine menu we will specify the name and IP address of our KPM.:
.png)
If you select the option "Default machine", its removal from the list of available machines will be blocked.
When you first set up KPM RHYTHM, after saving the settings of the added machine, a message will appear in the application "I cannot connect to the RITM_DEMO machine.
Possible reasons: ..."
If the machine is turned on, proceed to the [display of unsafe elements in the browser] setting1.
Configuring the browser
Chrome:
Open the "Site Information" of the Chrome browser and go to the site settings.
In the site settings, we will find the column "⚠️ Unsafe content" and set this permission.
.png)
Close the settings, after which the browser will prompt you to refresh the application page on engee.com to accept the changes.
After updating the page, the status of the car will change.:
.png)
INTO THE ** RHYTHM.Machine Management**
Real-time application management, machine power management,
as well as firmware and support package updates are now available.
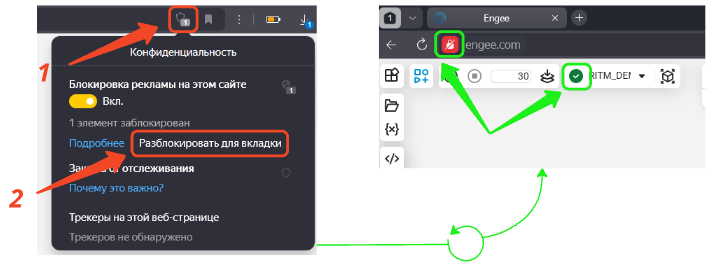
Yandex Browser:
In the search bar on the tab engee.com open the privacy settings,
and then unlock the locked item.
.png)
After that, the page will update automatically, the status of Yandex Protect and
the connection status with the RITM_DEMO machine will change.
INTO THE ** RHYTHM.Machine Management**
Real-time application management, machine power management,
and firmware and support package update are now available.
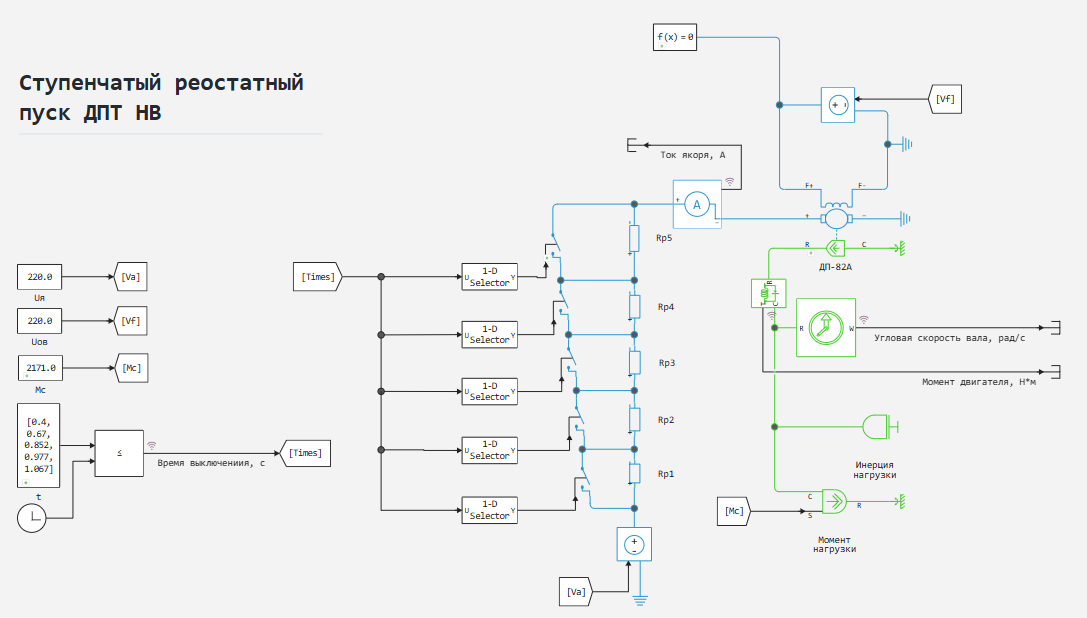
The example model
The example model - ritm_dcm_resistance_starter.engee.
It is a physical model of an electric drive based on a DC motor
of independent excitation (DCT NV) with a mechanical load and a rheostatic step start.
The five stages of the rheostat are output sequentially during engine acceleration, supporting
armature current in the switching current range .
For example, a model with a DP-82A crane-metallurgical engine at
rated power is taken. and the turnover .
.png)
Let's run the model in Engee:
модель = "ritm_dcm_resistance_starter" # @param {type:"string",placeholder:"ritm_dcm_resistance_starter"}
# Enabling the loading and executing functions of the model
include("start_model_engee.jl")
# Model Execution
start_model_engee(model)
Creating variables from the received data:
t = simout["ritm_dcm_resistance_starter/Armature current, A"].time[:];
I = simout["ritm_dcm_resistance_starter/Armature current, A"].value[:];
ω = simout["ritm_dcm_resistance_starter/Angular velocity of the shaft, rad/s"].value[:];
M = simout["ritm_dcm_resistance_starter/Engine torque, NM"].value[:];
Let's build the dynamic and static characteristics
of engine acceleration.
using Plots
gr(format=:png)
IMt = plot(t,[I, M]; label=["Armature current, A" "Engine torque, NM"]);
ωt = plot(t,ω; label="Angular velocity of the shaft, rad/s");
ωI = plot(I,ω; label="Electromechanical\phcharacteristics");
ωM = plot(M,ω; label="Mechanical\phcharacteristics");
plot(IMt,ωt,ωI,ωM;layout=(2,2), legend=:outertop)
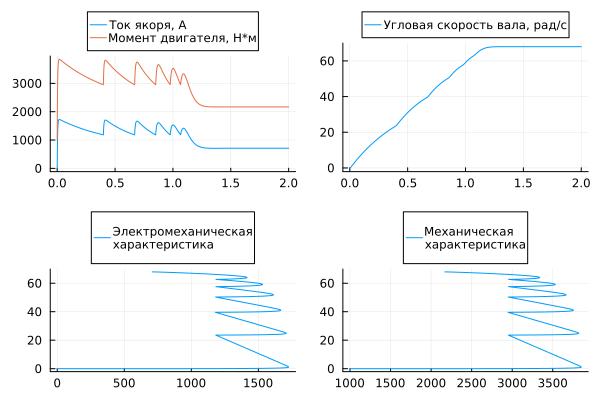
The model works according to the requirements.
After checking the operation of the model in the Engee calculation environment, we will proceed to the execution of the model on KPM RHYTHM.
Executing the model interactively (Monitor & Tune)
Let's switch to interactive mode models:

As a result, on the monitor screen connected to KPM RHYTHM,
in the RITM.Monitor application in the field Model Name:
the name of the uploaded model will be updated - ritm_dcm_resistance_starter,
in the field Model Status: the current status of the loaded model will appear - running,
in the fields Sample Time and Stop Time the values set in the model will appear.
Graphs of the model executed on KPM RHYTHM in [real-time] mode1
will display graphs of recorded signals:
Immediately after launching the model, the following message will be displayed in the application log (Application Log) RITM.Monitor:
** starting model ritm_dcm_resistance_starter (Monitor & Tune).
At the end of the model execution time, a message will be displayed:
** stopping model ritm_dcm_resistance_starter.
After checking the operation of the model interactively
and finalizing on-the-fly settings of all necessary parameters
, you can proceed to KPM RHYTHM working with the model in independent mode.
Model execution in independent mode
Let's run the model in independent mode:

As a result, on the monitor screen connected to KPM RHYTHM,
in the RITM.Monitor application in the field Model Name:
The name of the uploaded model will be updated in the same way. - ritm_dcm_resistance_starter,
in the field Model Status: the current status of the loaded model will appear - running,
in the fields Sample Time and Stop Time the values set in the model will appear.
Immediately after launching the model, the following message will be displayed in the application log (Application Log) RITM.Monitor:
** starting model ritm_dcm_resistance_starter (Standalone).
At the end of the model execution time, a message will be displayed:
** stopping model ritm_dcm_resistance_starter.
Conclusion
In this example, we conducted the initial configuration of the workspace for working with KPM RHYTHM from Engee,
and also got acquainted with the basic techniques of semi-natural modeling.