Creating a simple web application using GenieFramework
This article will look at creating a simple web application using GenieFramework. The application will include a text block, an input field for the user's name, and a slider for specifying the age. The structure of the application will be described in detail, including the parts @app, ui and @page. Particular attention will be paid to reactivity and the differences between internal (@in) and external (@out) variables. At the end, the full code with comments will be provided, which should be saved in a file. app.jl.
What is GenieFramework?
GenieFramework is a web application development tool that combines a backend (Genie) and a reactive interface via Stipple.jl. Stipple.jl provides reactivity and allows you to describe the interface using pure Julia code rather than HTML. Its part, StippleUI, provides convenient components for building the interface, although this example uses the basic functions of Stipple.
As part of the introduction to GenieFramework, the application will be simple: the user will be asked to enter a name and select an age using a slider, and the displayed text will be updated depending on this data.
Web Application Structure
The GenieFramework-based application consists of three main parts corresponding to the [MVC pattern] (https://ru.wikipedia.org/wiki/Model-View-Controller ):
-
Part
@app
\ The data model is defined here. This part defines the reactive variables that connect the interface and the server logic. Variables are divided into two types:- Internal (
@in): used to receive data from the user. They change when interacting with the interface (for example, when entering text or moving a slider) and transmit information from the interface to the server. - External (
@out): designed to transfer data from the server side to the interface. They update the displayed elements (for example, text) and reflect the result of data processing. The main difference between@inand@out— flow direction:@inaccepts input, and@outoutputs the result.
- Internal (
-
Part
ui
\ The interface using Stipple functions is described here.jl, such astextfieldandslider. The interface is set via the Julia code, but you can also do this using your own html page template. -
Part
@page
Defines the application route (URL) through which the interface will be accessible. This part connects the data model to the functionui.
Reactivity in Stipple
The reactivity provided by Stipple.jl, allows you to automatically update the interface when data changes and vice versa. Variables @in they respond to user actions, and variables @out update the displayed information. Communication between them is established through handlers, for example, such as @onchange.
It is not necessary to connect this library, it is just useful to know that its methods are used in the application.
Application Code
This code must be saved in a file. app.jl, which is the standard name for the main application file in GenieFramework. After creating the file, you can run it using the command engee.genie.start("путь/к/файлу/app.jl")
using GenieFramework

# Определяется модель данных с помощью макроса @app
@app begin
    # Внутренние переменные (@in) — данные, поступающие от пользователя
    @in user_name = "Ваше имя"      # Начальное значение поля ввода
    @in age = 50                    # Начальное значение ползунка возраста (0–100)

    # Внешние переменные (@out) — данные, отправляемые в интерфейс
    @out display_text = "уважаемый пользователь"  # Текст для отображения

    # Обработчик событий: обновляется display_text при изменении входных данных
    @onchange user_name, age begin
        display_text = """$(user_name)!
        Ваш возраст, согласно ползунку: $(age)"""
    end
end

# Определяется пользовательский интерфейс
function ui()
    [
        # Текстовая строка с использованием переменной display_text
        h2("Здравствуйте, {{display_text}}"),

        # Поле ввода, связанное с переменной user_name
        cell([textfield("Введите ваше имя:", :user_name),

        # Ползунок, связанный с переменной age
        slider(0:100, :age, label="")])
    ]
end

# Задается маршрут для страницы
@page("/", ui)
Code analysis
-
Import libraries
ConnectingGenieFrameworkto work with the application andStipplefor reactivity and interface. -
The data model (
@app)@in user_name— a string that accepts the user's name (initial value: "Your name").@in age— the number received from the slider (initial value: 50).@out display_text— a string sent to the interface (initial value: "dear user").@onchange— the handler that updatesdisplay_textwhen changinguser_nameorage. The text is formed using a multiline string.
-
Interface (
ui)h2("Здравствуйте, {{display_text}}")— the second-level header that displays the valuedisplay_text.cell([...])— a container that combines an input field and a slider.textfield— the input field associated withuser_name.slider— a slider with a range of 0-100, associated withage.
-
Route (
@page)
The interface becomes available at the address returned by the functionengee.genie.start
What will be the result?
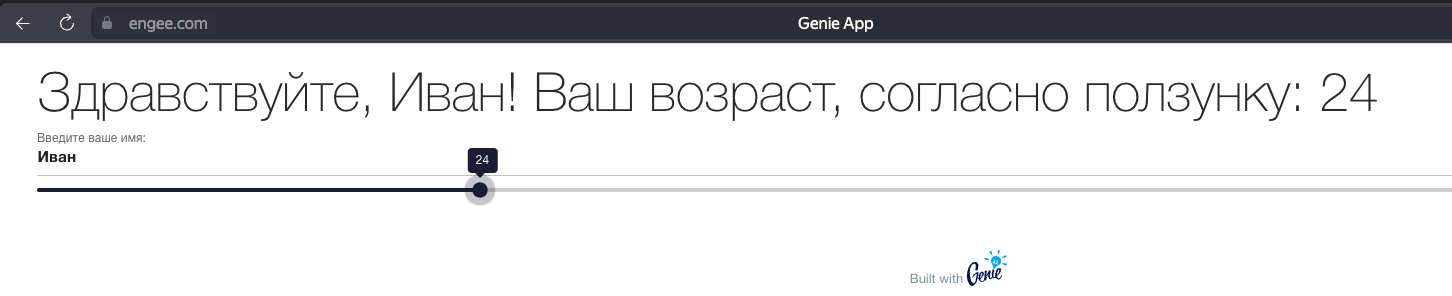
At startup, the text "Hello, dear user!", an input field with "Your name" and a slider at 50 are displayed. Entering a name or changing the position of the slider causes an update. display_text, which is immediately reflected in the title. For example, if you enter "Anna" and the slider value is 25, the text will become: "Hello, Anna! Your age, according to the slider: 25".
How do I launch the app?
Go to the folder with the current script and execute the cell below.
As a result, a window with a web application should open.
engee.genie.start( "$(@__DIR__)/app.jl", open_url=true )
Conclusion
A simple web application was created using GenieFramework. The data model was demonstrated (@app), interface (ui) and routing (@page), as well as the differences between @in (input from the user) and @out (output data for the interface).