STM32 Support Package
|
Before you start, do the general preparation and setup from the article Running models on target hardware. It describes the general steps for running models on target hardware: environment preparation, connection, generation/assembly, and basic startup verification. |
This article describes the features of launching models on STM32 boards in Target Hardware mode.
To work with STM32 boards in Target Hardware mode, the block is used EDM-Target-STM32. It provides code generation, firmware assembly and download, as well as running the model on a microcontroller.
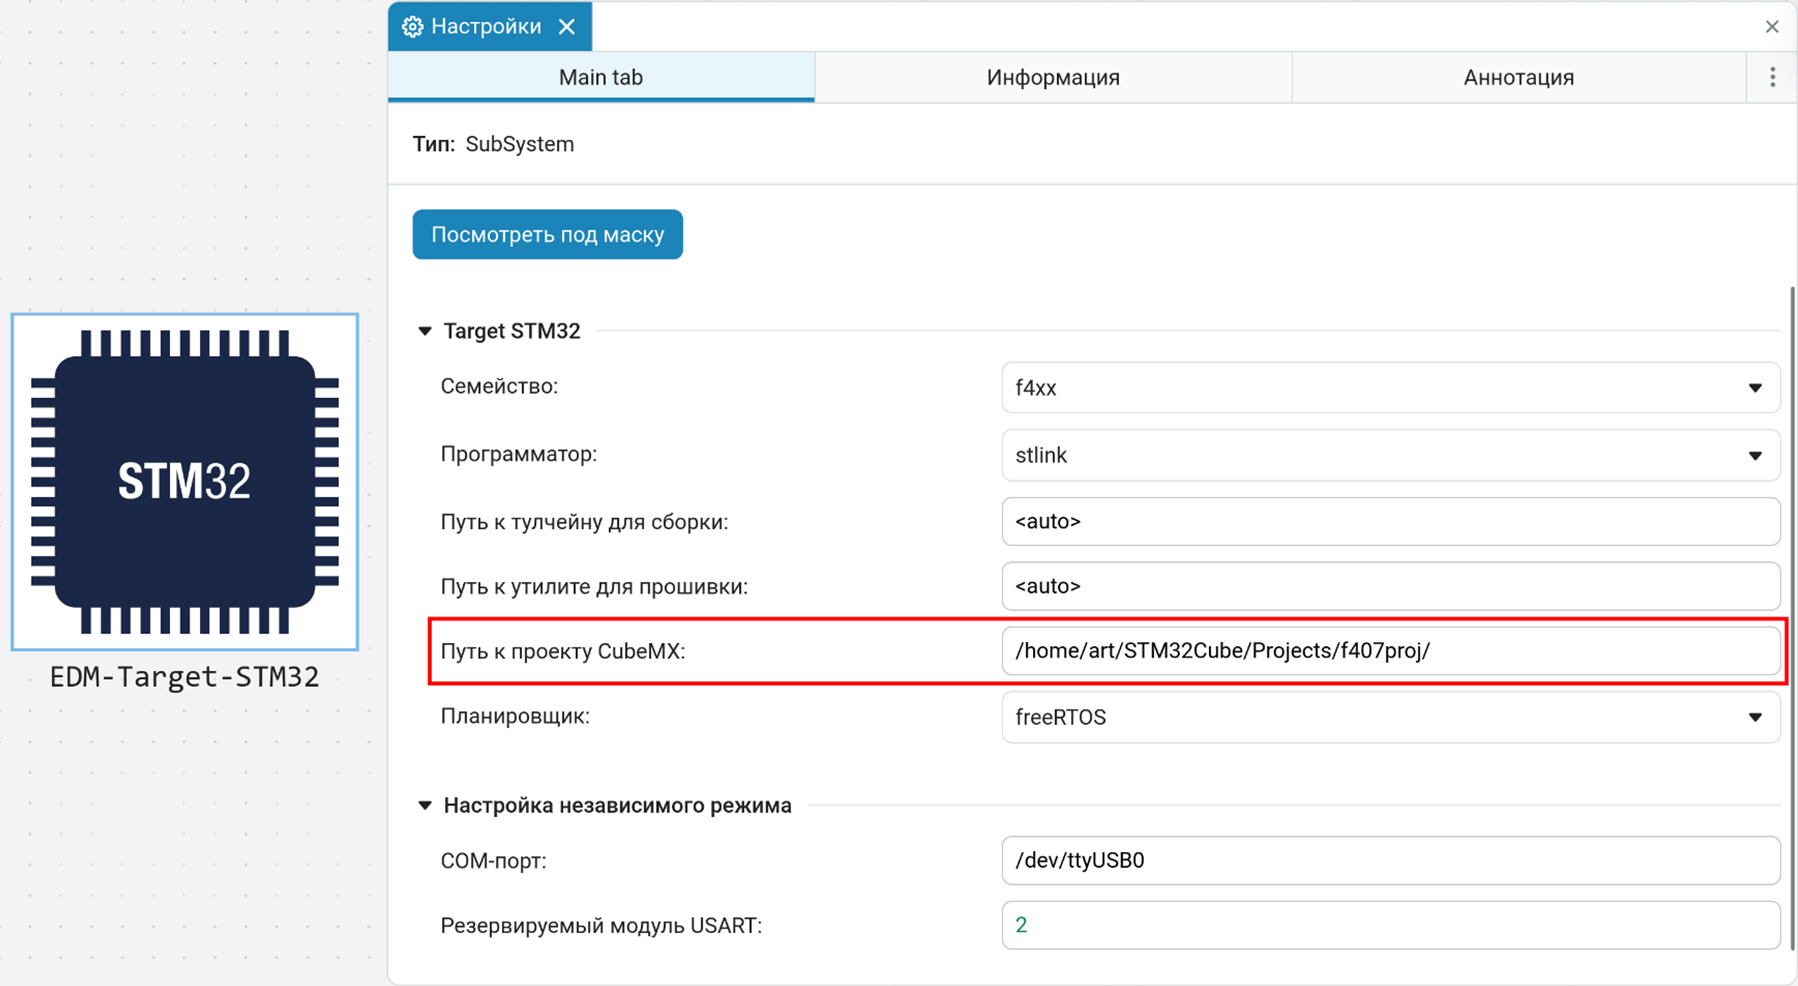
EDM-Target-STM32 Block Parameters
Block EDM-Target-STM32 configures interaction with the microcontroller through the following parameters:
-
Path to the CubeMX project — the full path to the generated STM32CubeMX project.
-
The path to the toolchain:[A toolchain is a set of console tools (compiler, linker, and utilities) that assemble firmware for a microcontroller from the source files of a project.] — full path to the compiler
arm-none-eabi-gcc.When specifying
<auto>first, it is searched in the paths where CubeIDE puts them (if it is installed). Then in the PATH and in the system paths.-
An example for Windows:
C:\ST\STM32CubeIDE_1.13.2\STM32CubeIDE\plugins\ com.st.stm32cube.ide.mcu.externaltools.gnu-tools-for-stm32.11.3.rel1.win32_2.0.100.202309141235\ tools\bin\ -
An example for Linux:
/opt/st/stm32cubeide_1.13.2/plugins/com.st.stm32cube.ide.mcu.externaltools.gnu-tools-for-stm32.11.3.rel1.linux64_2.0.100.202309141235/tools/bin/arm-none-eabi-gcc
-
-
Path to STM32CubeProgrammerCLI — full path to the executable file
STM32CubeProgrammerCLI.To automatically detect an installed tulchain, use the expression
<auto>in ways to define a tulchain: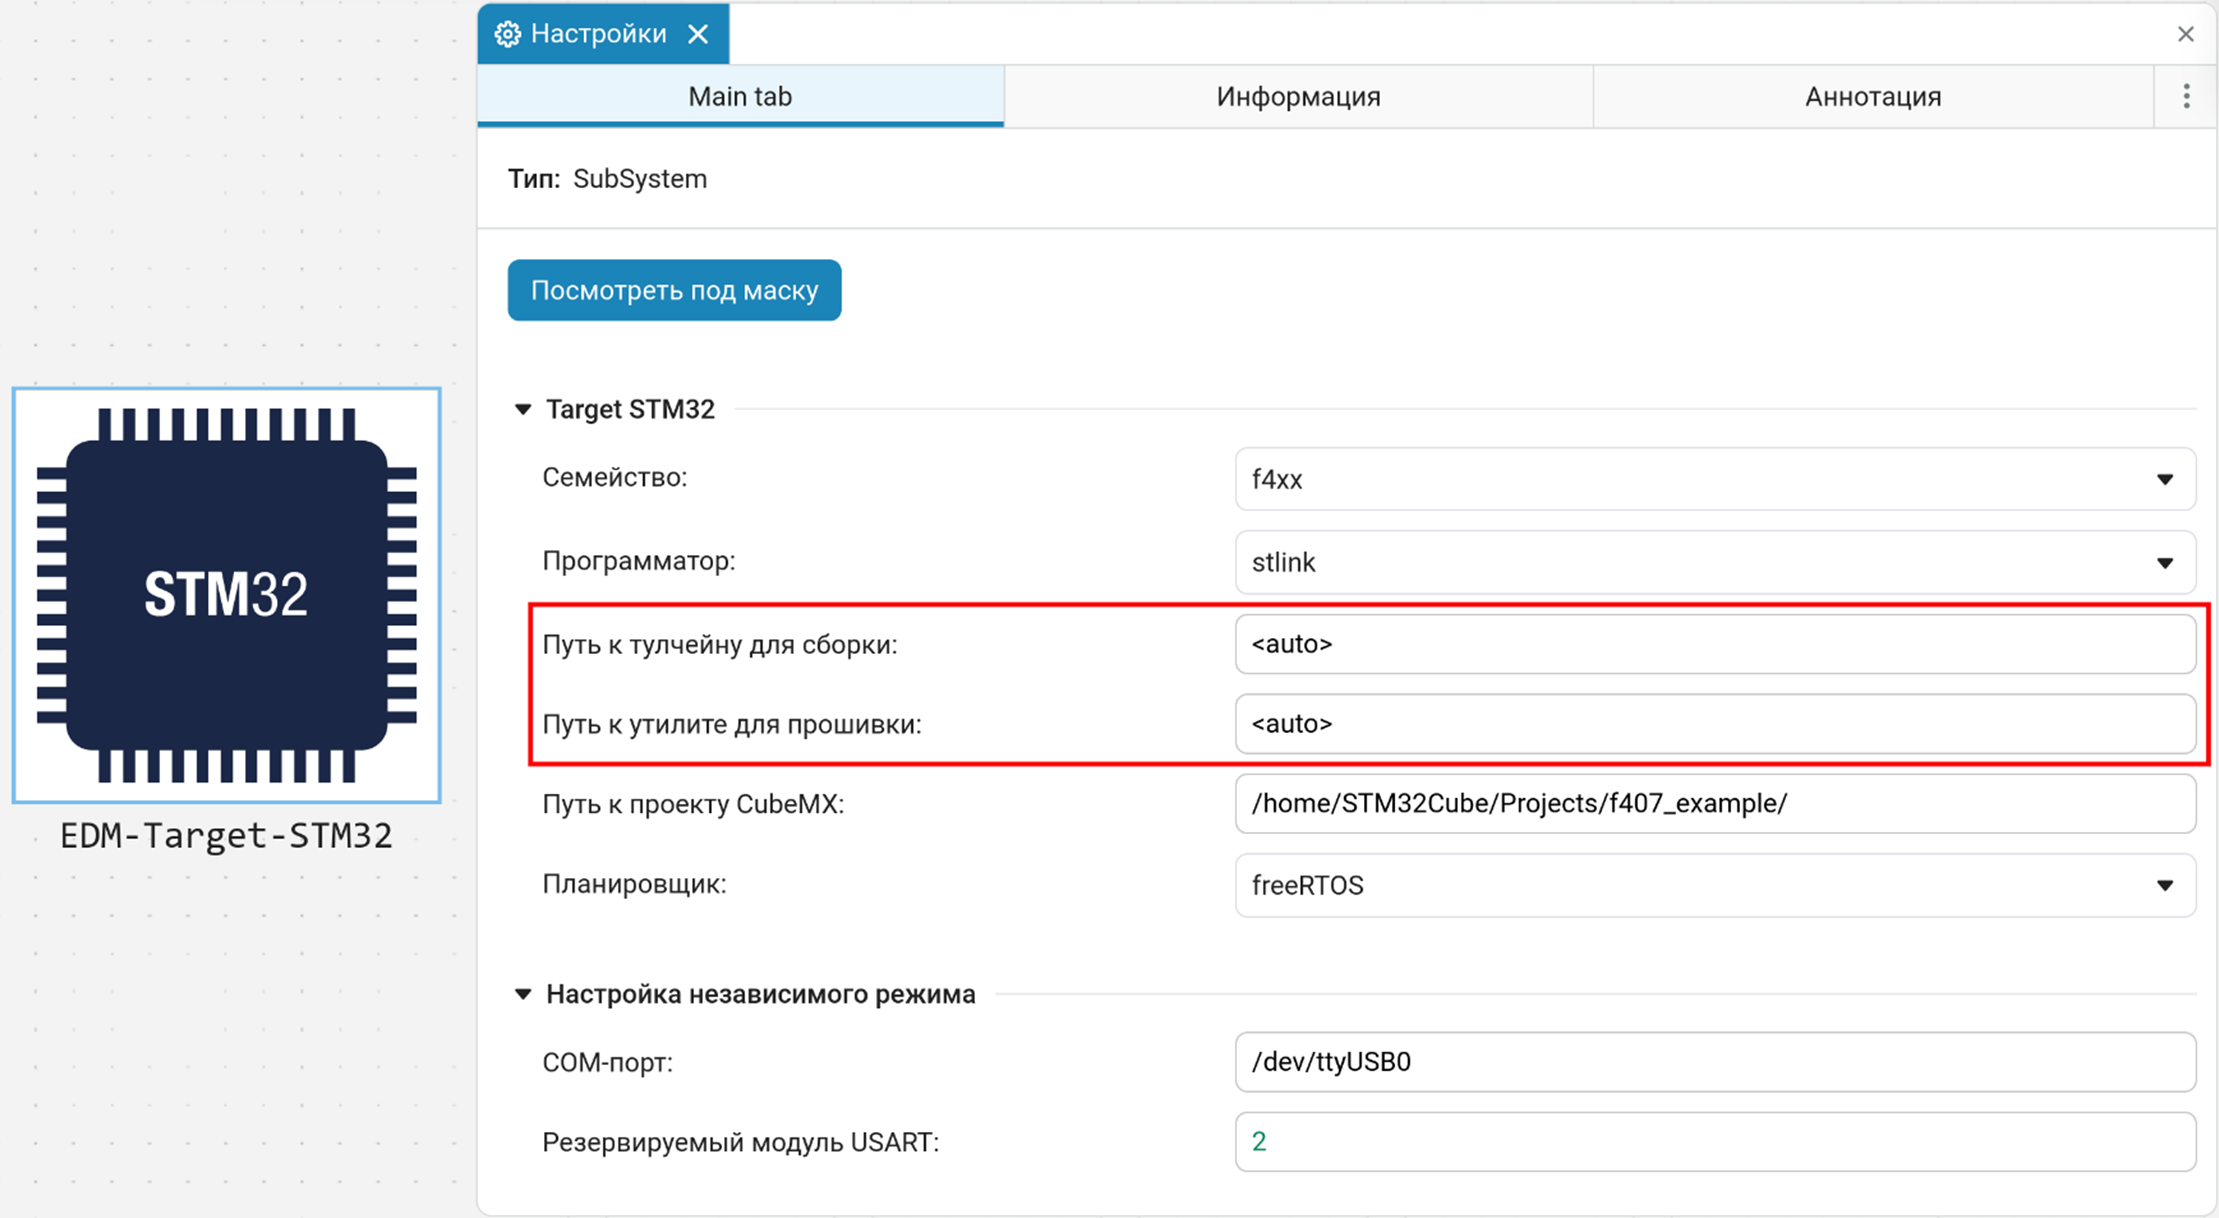
-
UART module — the USART number to be used for interactive mode.
This number must match the module that must be pre-configured in STM32CubeMX for UART data transmission. For detailed instructions, see Interactive mode.
After configuring in CubeMX, specify the same USART number in the Redundant USART module parameter of the EDM-Target-STM32 block (for example,
2for USART2). -
COM port — the serial port corresponding to the selected UART module (for example,
COM3or/dev/ttyUSB0).
| To operate the unit, you must install the STMicroelectronics software in advance (see the Required Software section). |
Required Software
To work with STM32, you need to install the following tools:
-
STM32CubeMX — for configuring the microcontroller peripherals and generating a project.
-
STM32CubeIDE is a recommended development environment that includes a compiler and debugging tools.
It is allowed to work without STM32CubeIDE. In this case, it must be installed separately.:
-
The compiler
gcc-arm-none-eabi. -
The firmware utility
STM32CubeProgrammerCLI.
|
Utilities can be used in two ways:
|
Preparation Engee
Make sure that the hardware support package is installed and configured. Its installation is described in detail in the section engee-hardware/engee-integrations.adoc#hardware-installation.
| If the support package is already installed, then you can proceed to launch the client program and connect using the provided URL. |
Preparation of the STM32 project
-
Install and configure STM32CubeMX.
-
Create a project for your STM32 board and perform basic peripheral configuration.
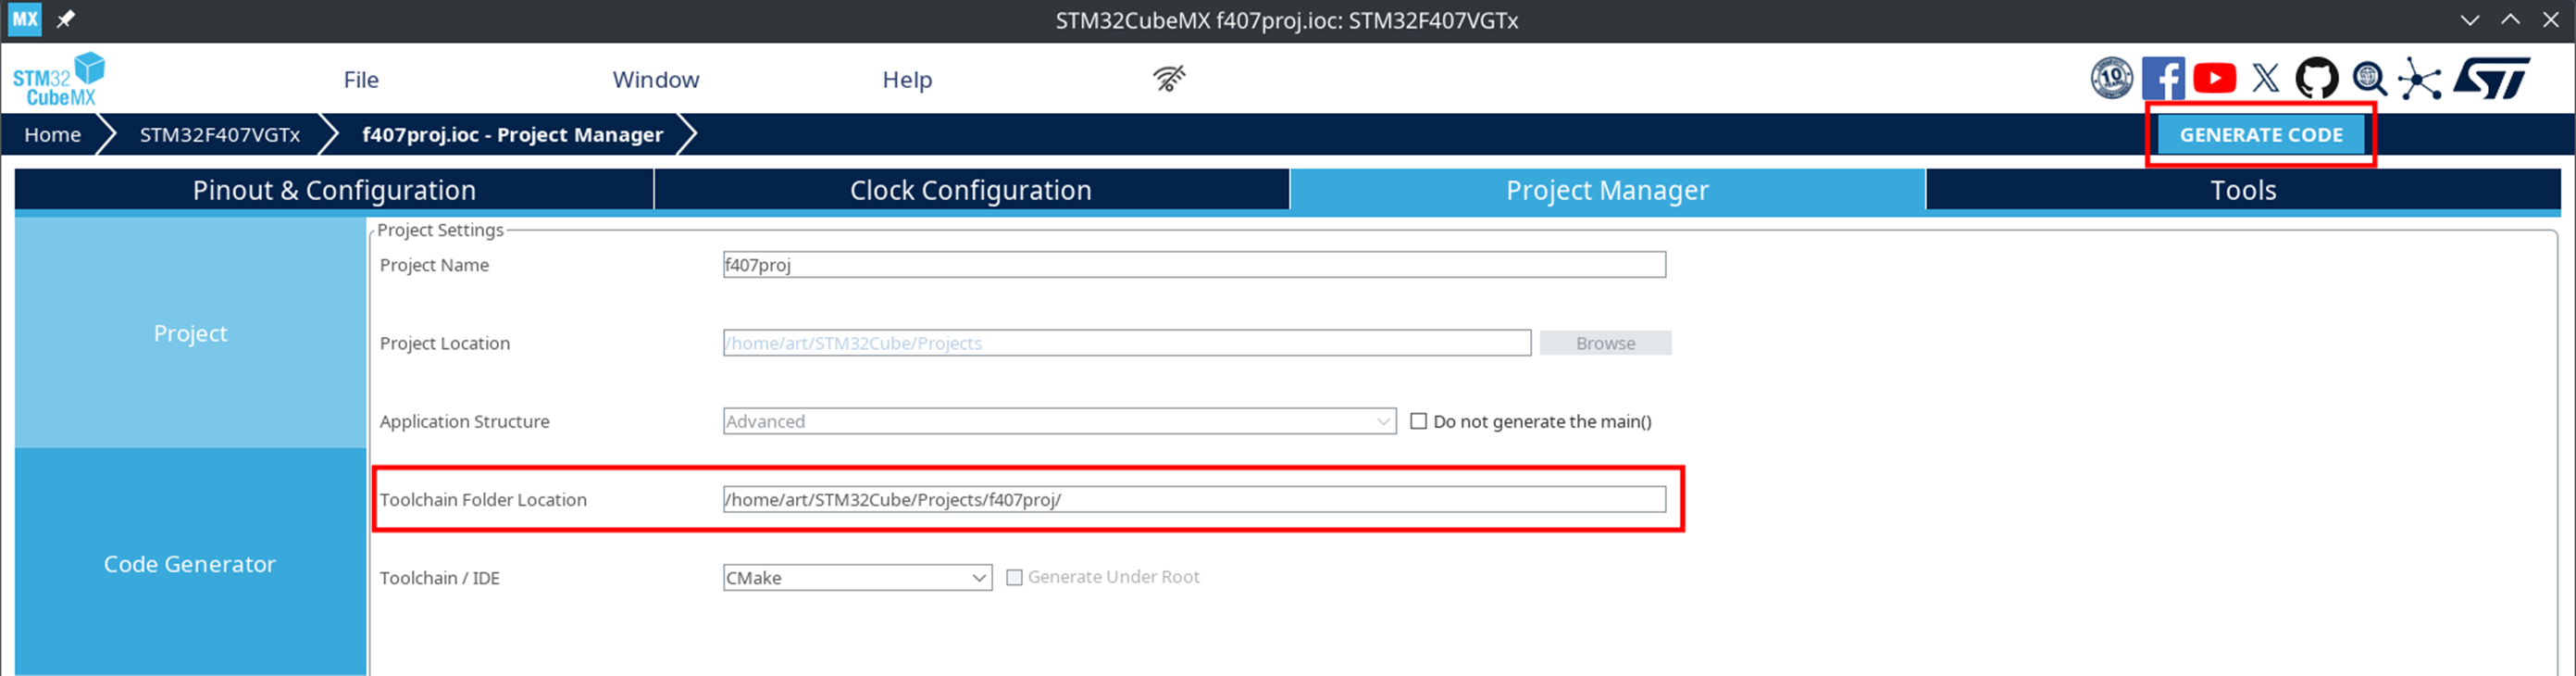
-
Click GENERATE CODE and save the project to a convenient directory.
-
Install STM32CubeIDE or configure the compiler and firmware utility separately if you use an external toolchain.
| Detailed configuration of the CubeMX project for working with Engee described below in the Setting up and launching the model section. |
Setting up and launching the model
-
Open the model Engee.
-
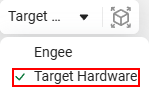
Click on the target platform selection button and select the mode Target Hardware:
-
Add the EDM-Target-STM32 block from block libraries on canvas Engee. If the block is missing, update the support package with the command:
engee.package.start("Engee-Device-Manager") -
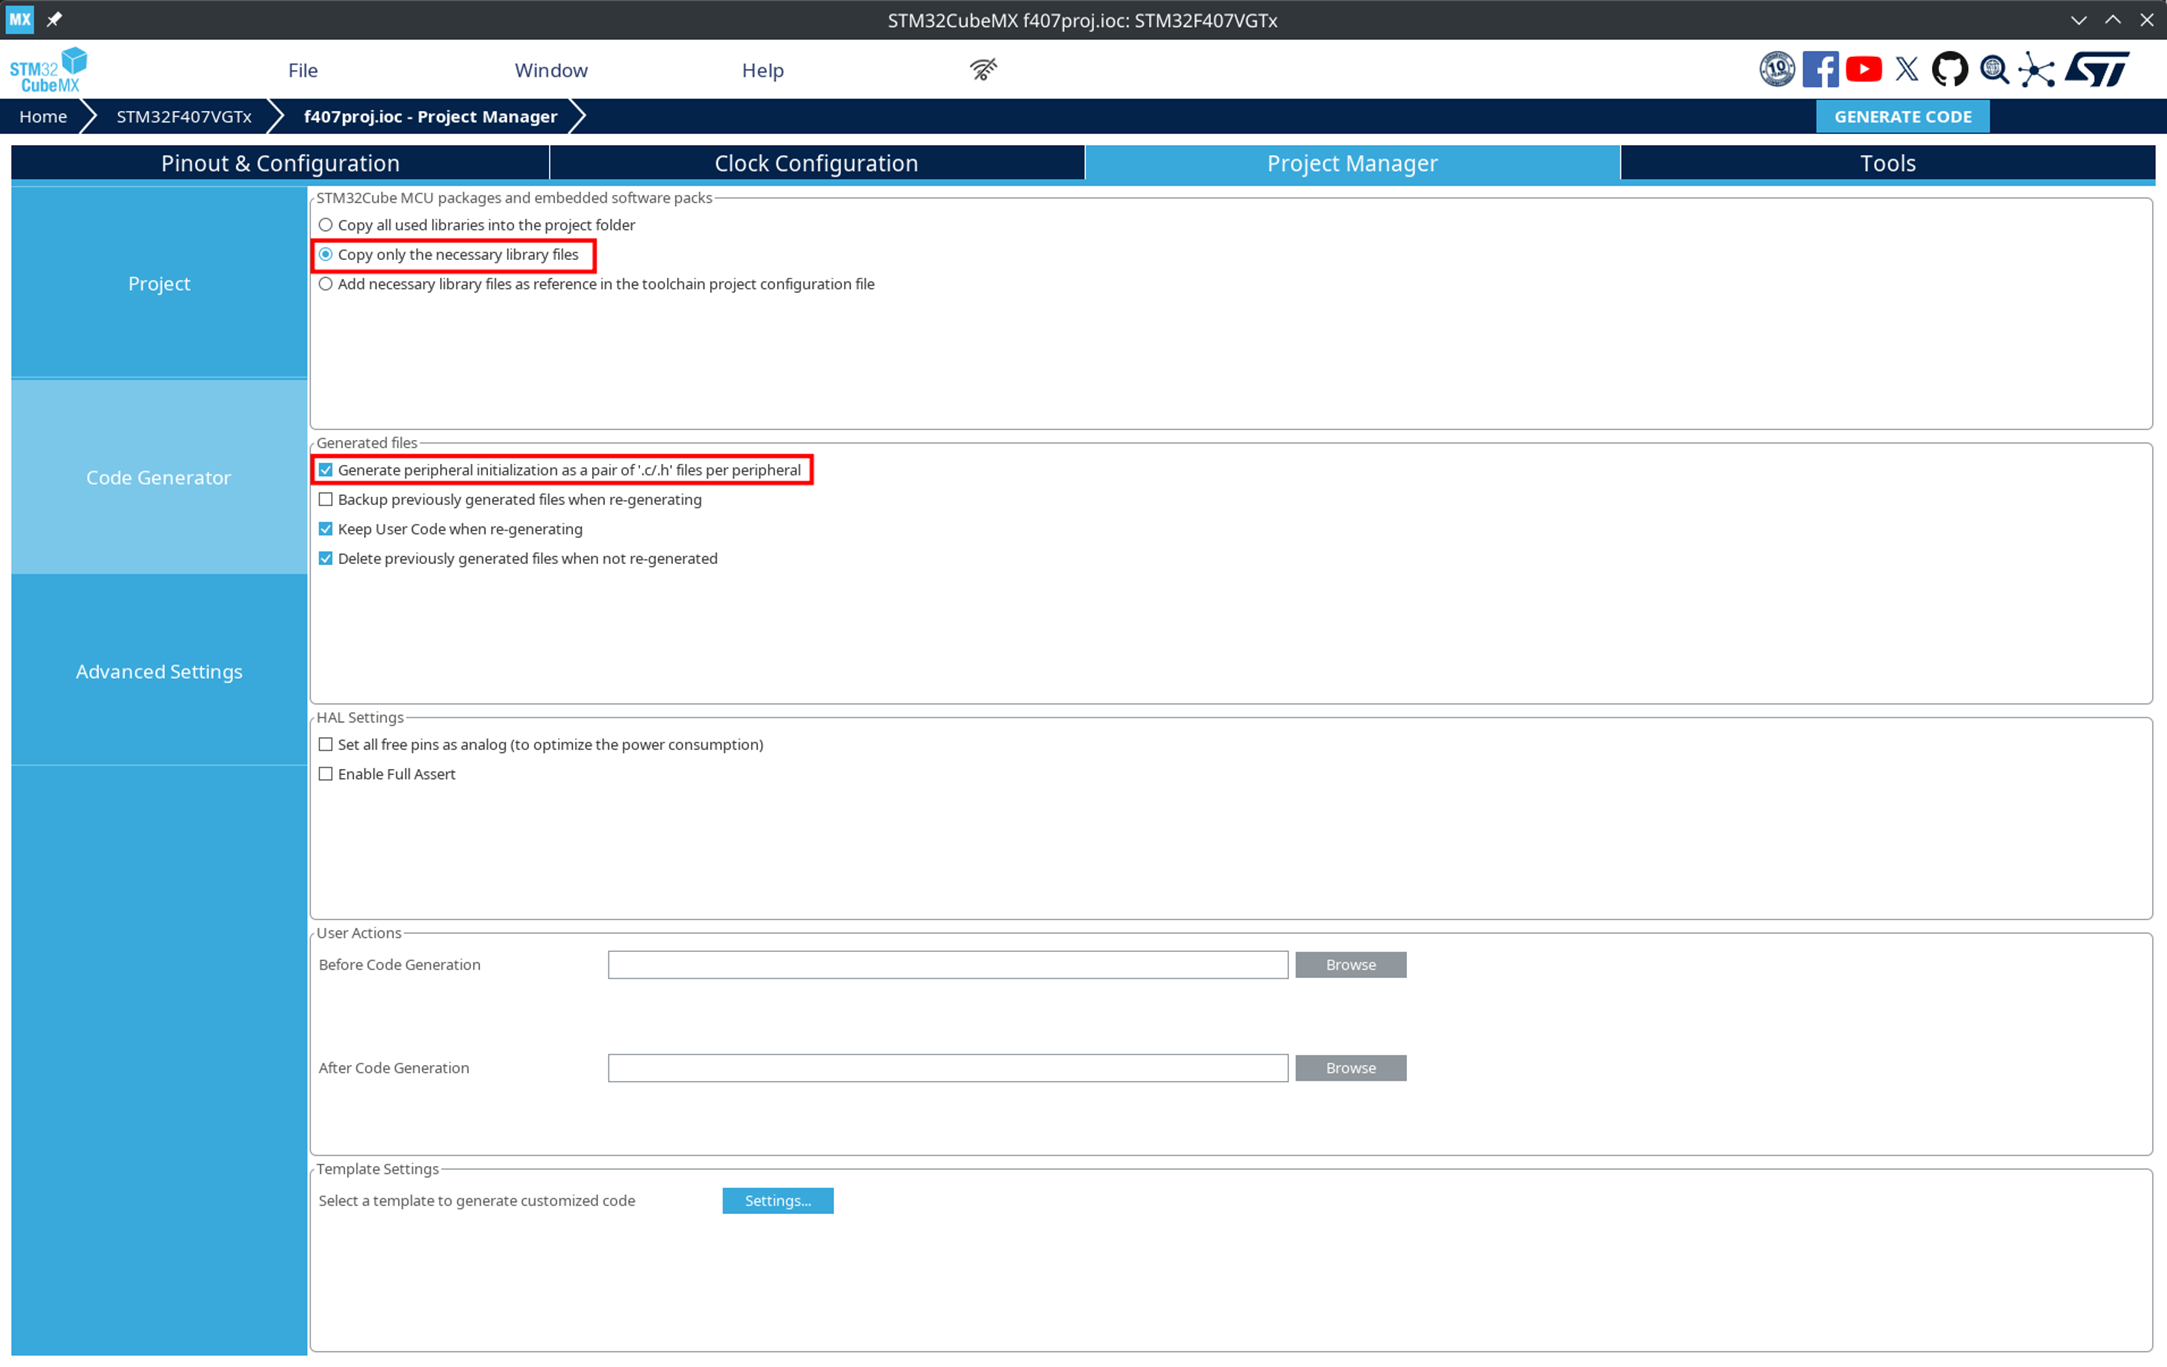
Set up the project in STM32CubeMX:
-
In the Project Manager → Project section, select Copy only the necessary library files.
-
In the Project Manager → Toolchain / IDE section, be sure to set the value to CMake.
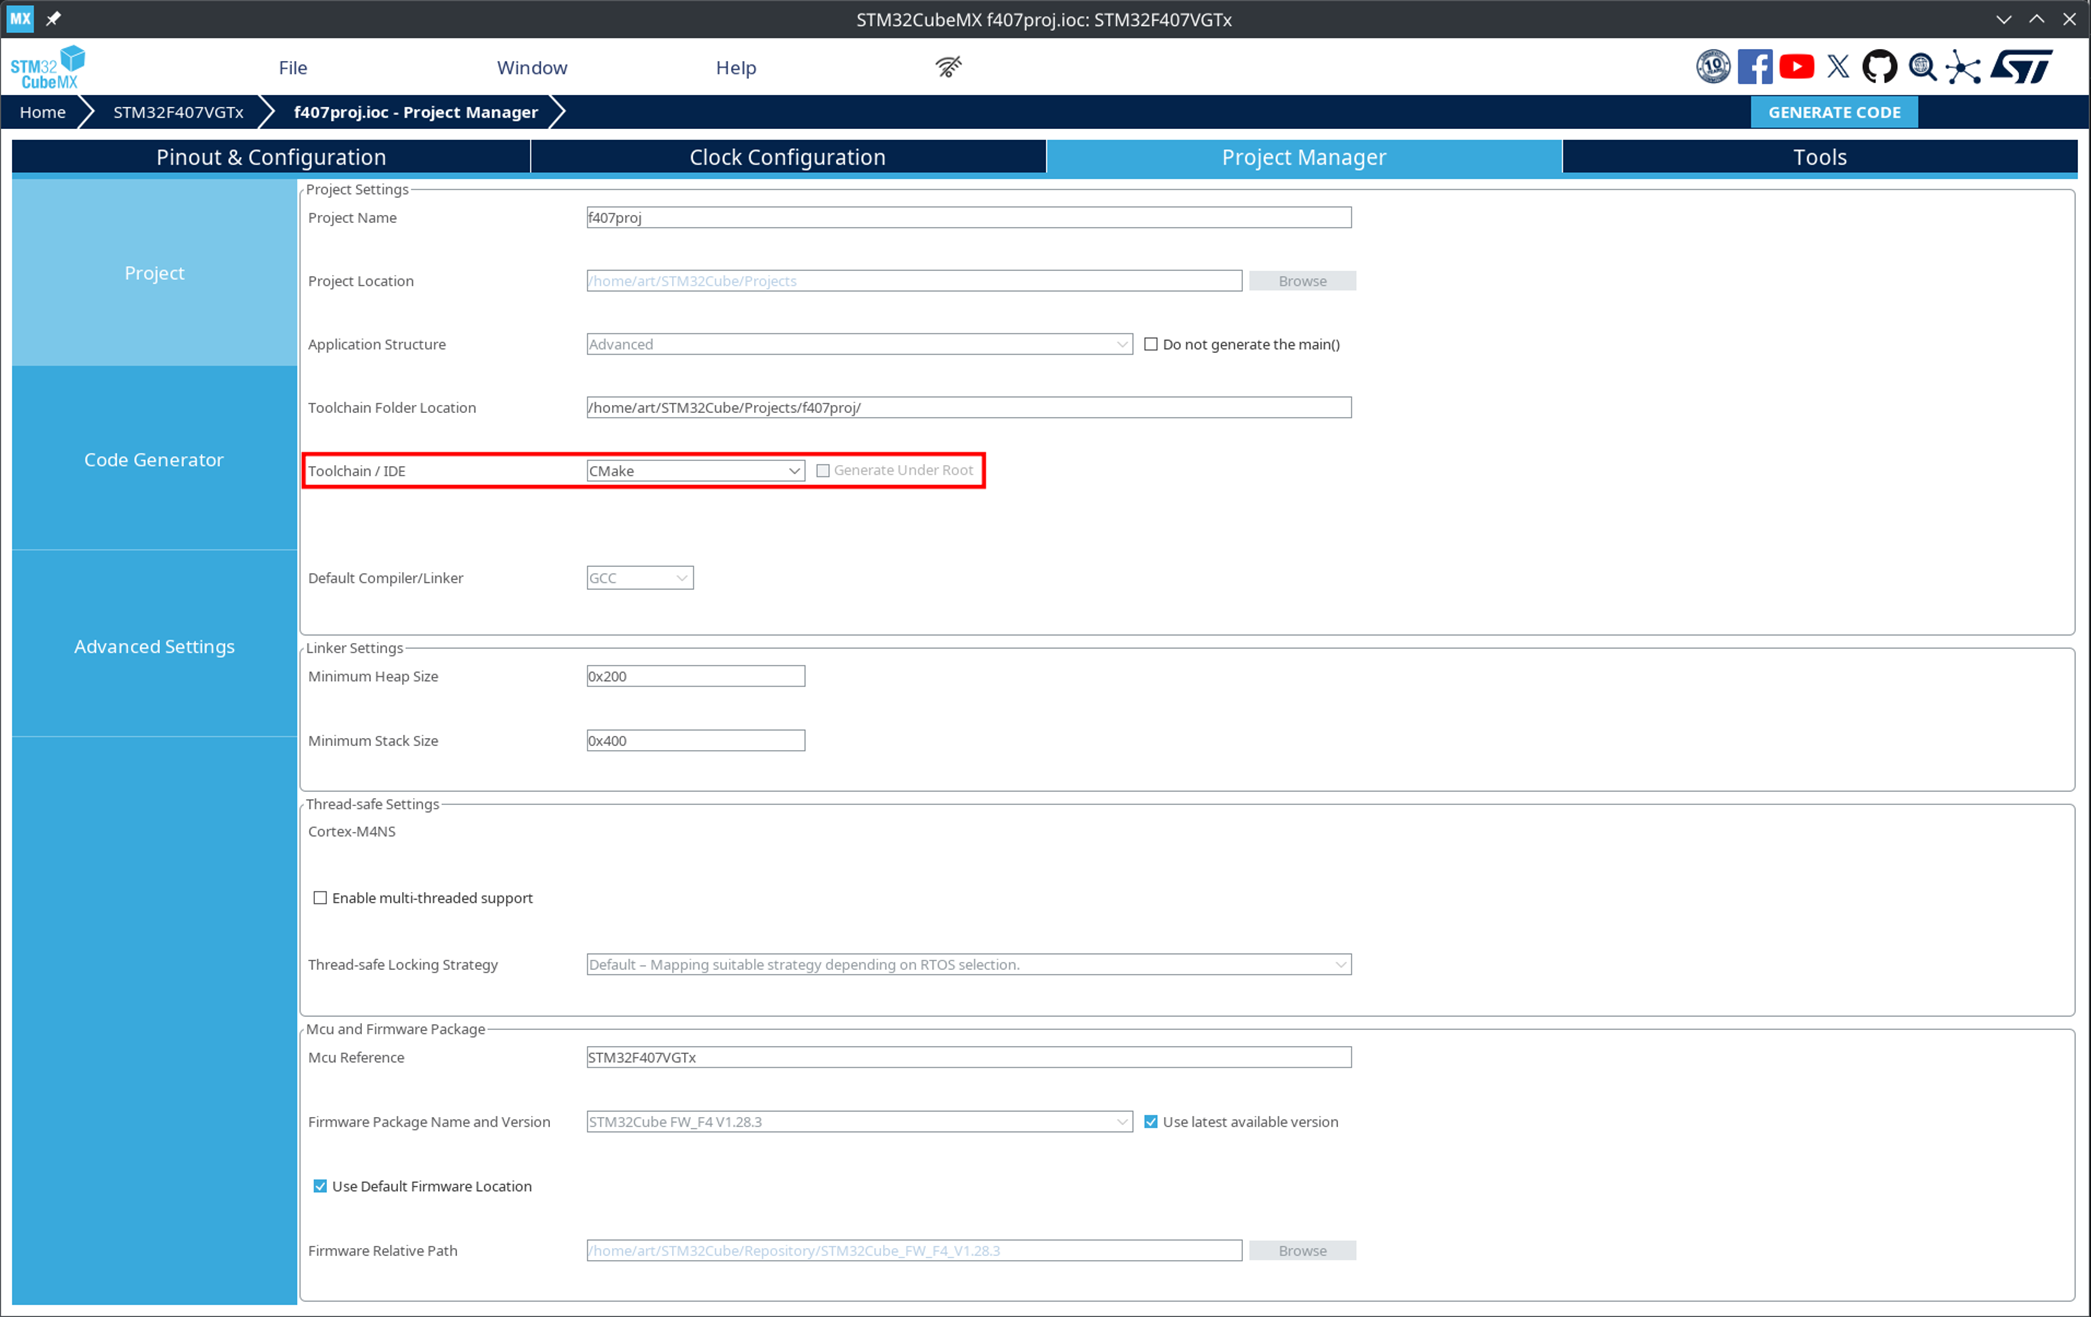
The choice of CMake is mandatory. Without this, the project format will be incompatible with Engee.
-
In the Code Generator section, select Generate peripheral initialization as a pair of '.c/.h' files per peripheral.
-
Configure the necessary peripherals and click GENERATE CODE.
-
Specify the path to the generated project in the CubeMX project path parameter of the EDM-Target-STM32 block.
-
-
Select the model execution mode:
-
Run the model on hardware
 — interactive execution with control from Engee.
 -
Run in independent mode
 — offline execution without control from Engee.
-
-
Click the start button.
|
If the EDM-Target-STM32 block is not placed in the model, an error will appear at startup: |
Special settings for different modes
Setting up for FreeRTOS
The FreeRTOSfootnote project:[FreeRTOS is a lightweight real-time operating system (RTOS) that provides task scheduling, delays, queues, and other mechanisms that conveniently run the model in parallel with the rest of the firmware logic.] can be configured as simply as possible:
-
In STM32CubeMX open Pinout & Configuration → Middleware and Software Packs.
-
Turn on FREERTOS.
-
In the FREERTOS Mode and Configuration section, set Interface to
CMSIS_V2.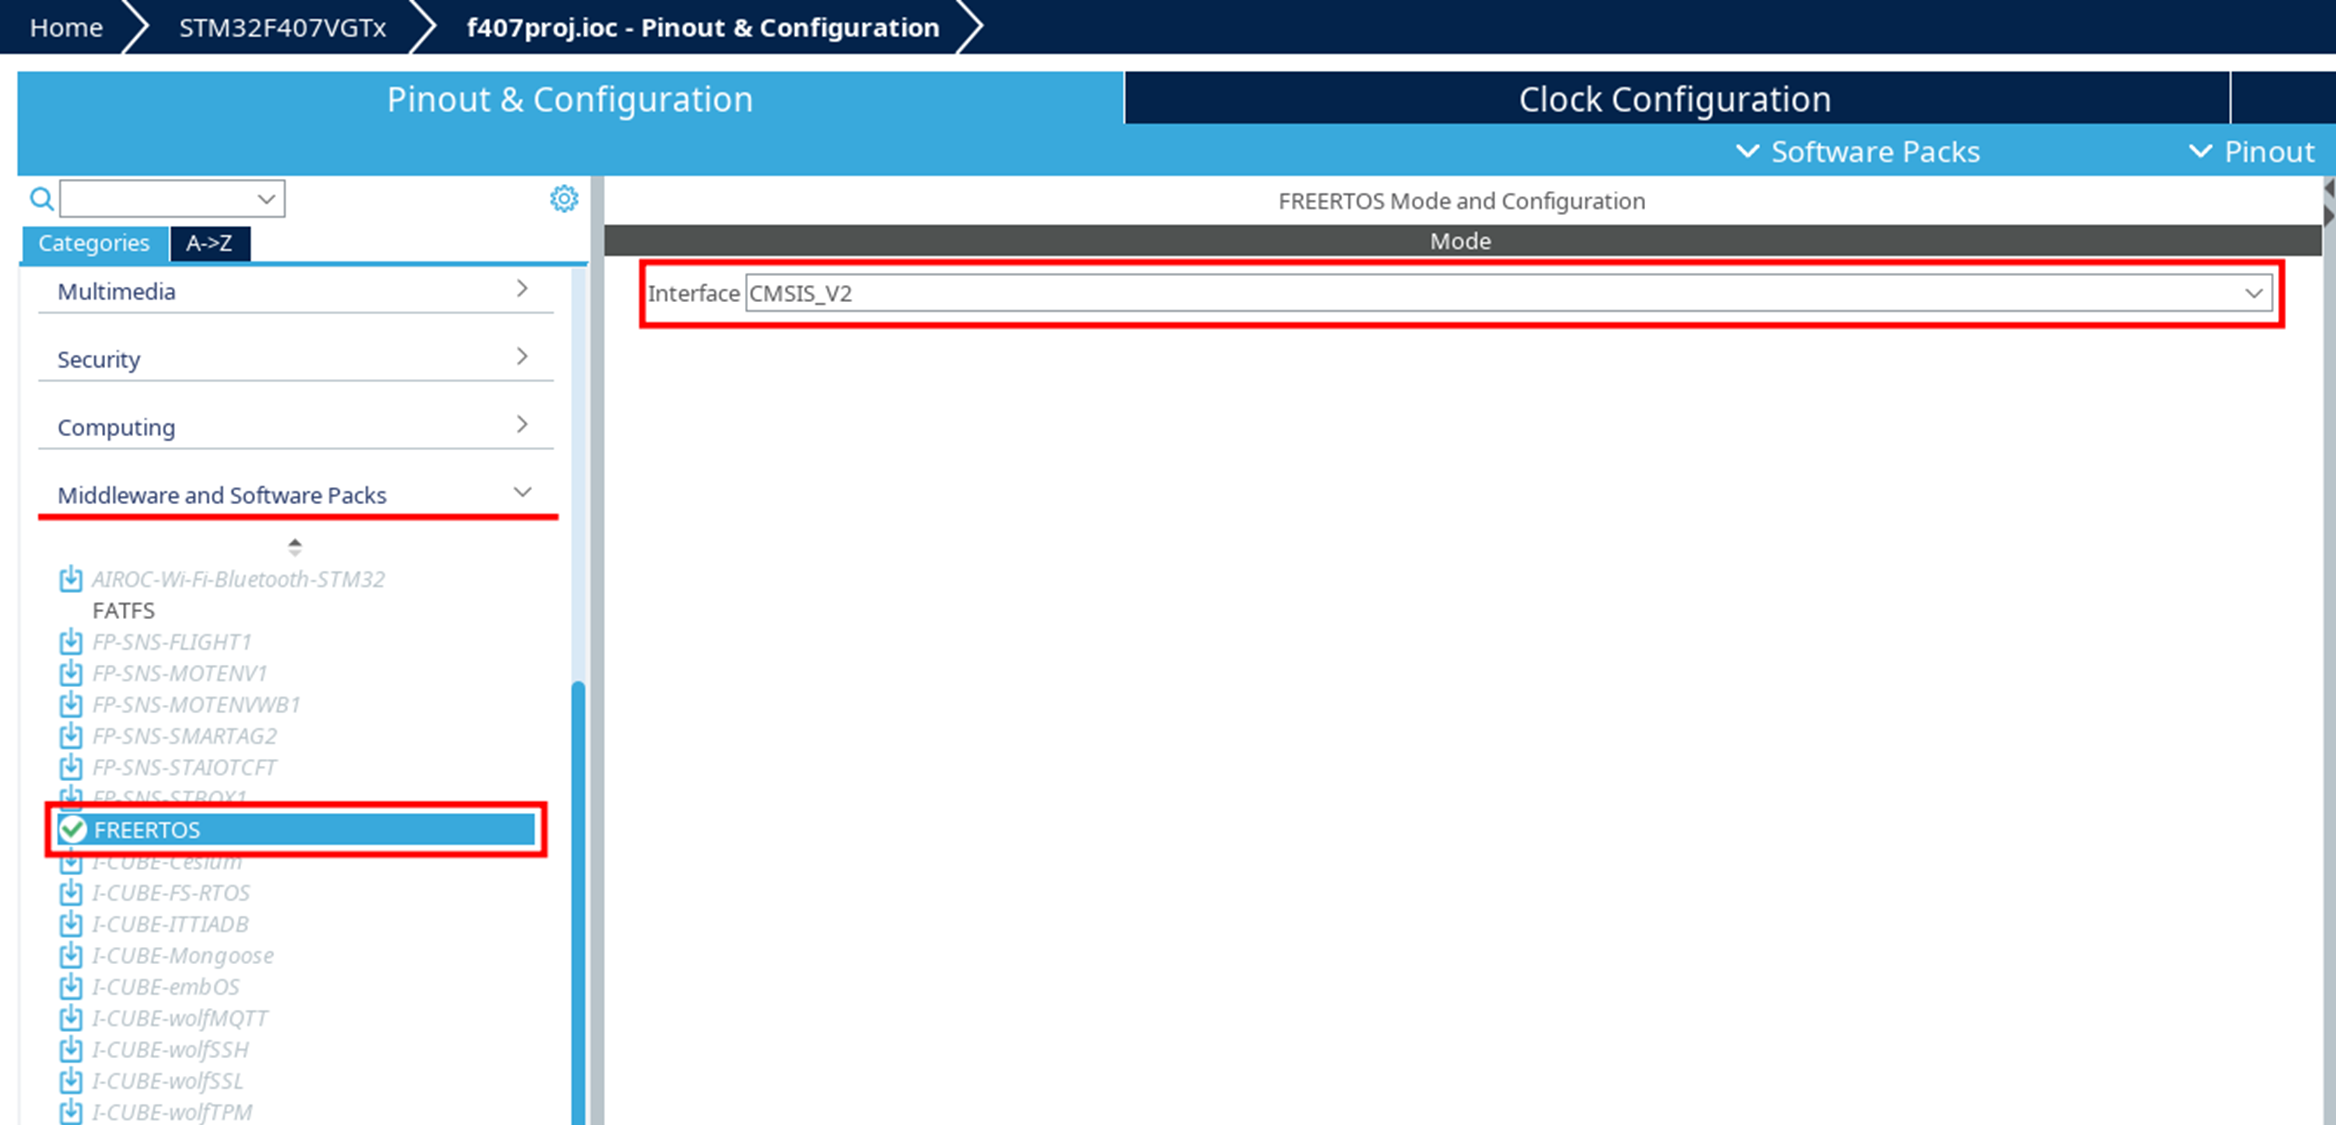
-
Leave the other parameters by default.
-
Generate the code using the GENERATE CODE button.
| In FreeRTOS mode, manual setting of the model execution frequency is not required, unlike in bare-metal mode, where the timer is set manually. |
Setting up for bare-metal
In bare-metalfootnote mode:[Bare-metal is the launch of a program without an operating system. The code runs directly on the microcontroller, and all tasks (timers, calls model_tick(), event handling) must be configured manually.] the frequency of model execution is set manually via a timer:
-
Select a free timer (for example, TIM3).
-
Set the clock source
Internal Clock.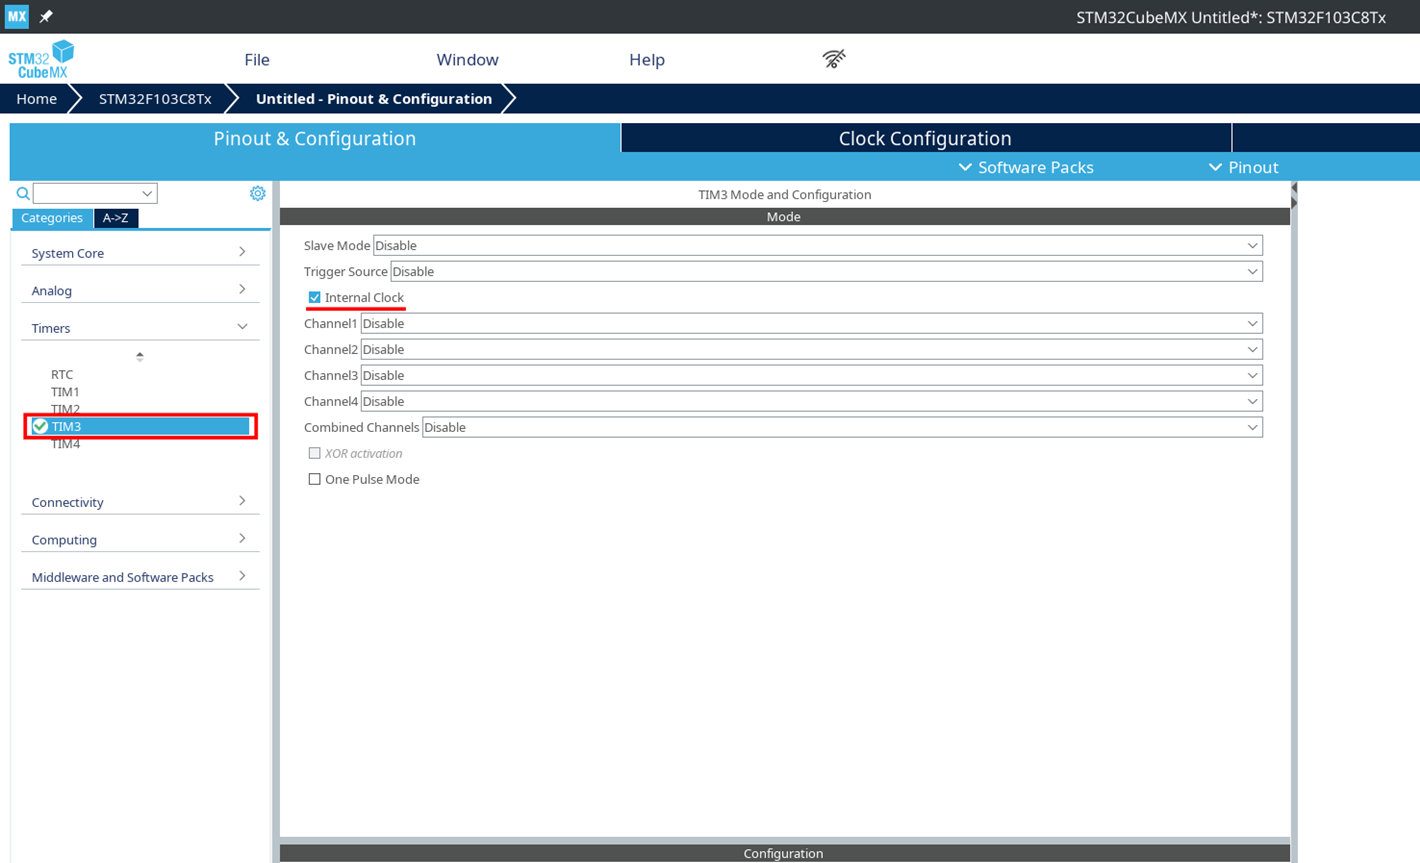
-
Calculate the timer parameters using the formula:
T = ((P + 1) × (R + 1)) / F_CPUwhere
-
P— Prescaler; -
R— Counter Period; -
F_CPU— the clock frequency of the microcontroller.An example for 72 MHz:
P = 7199
R = 9
-
-
Set the values in the timer parameters.
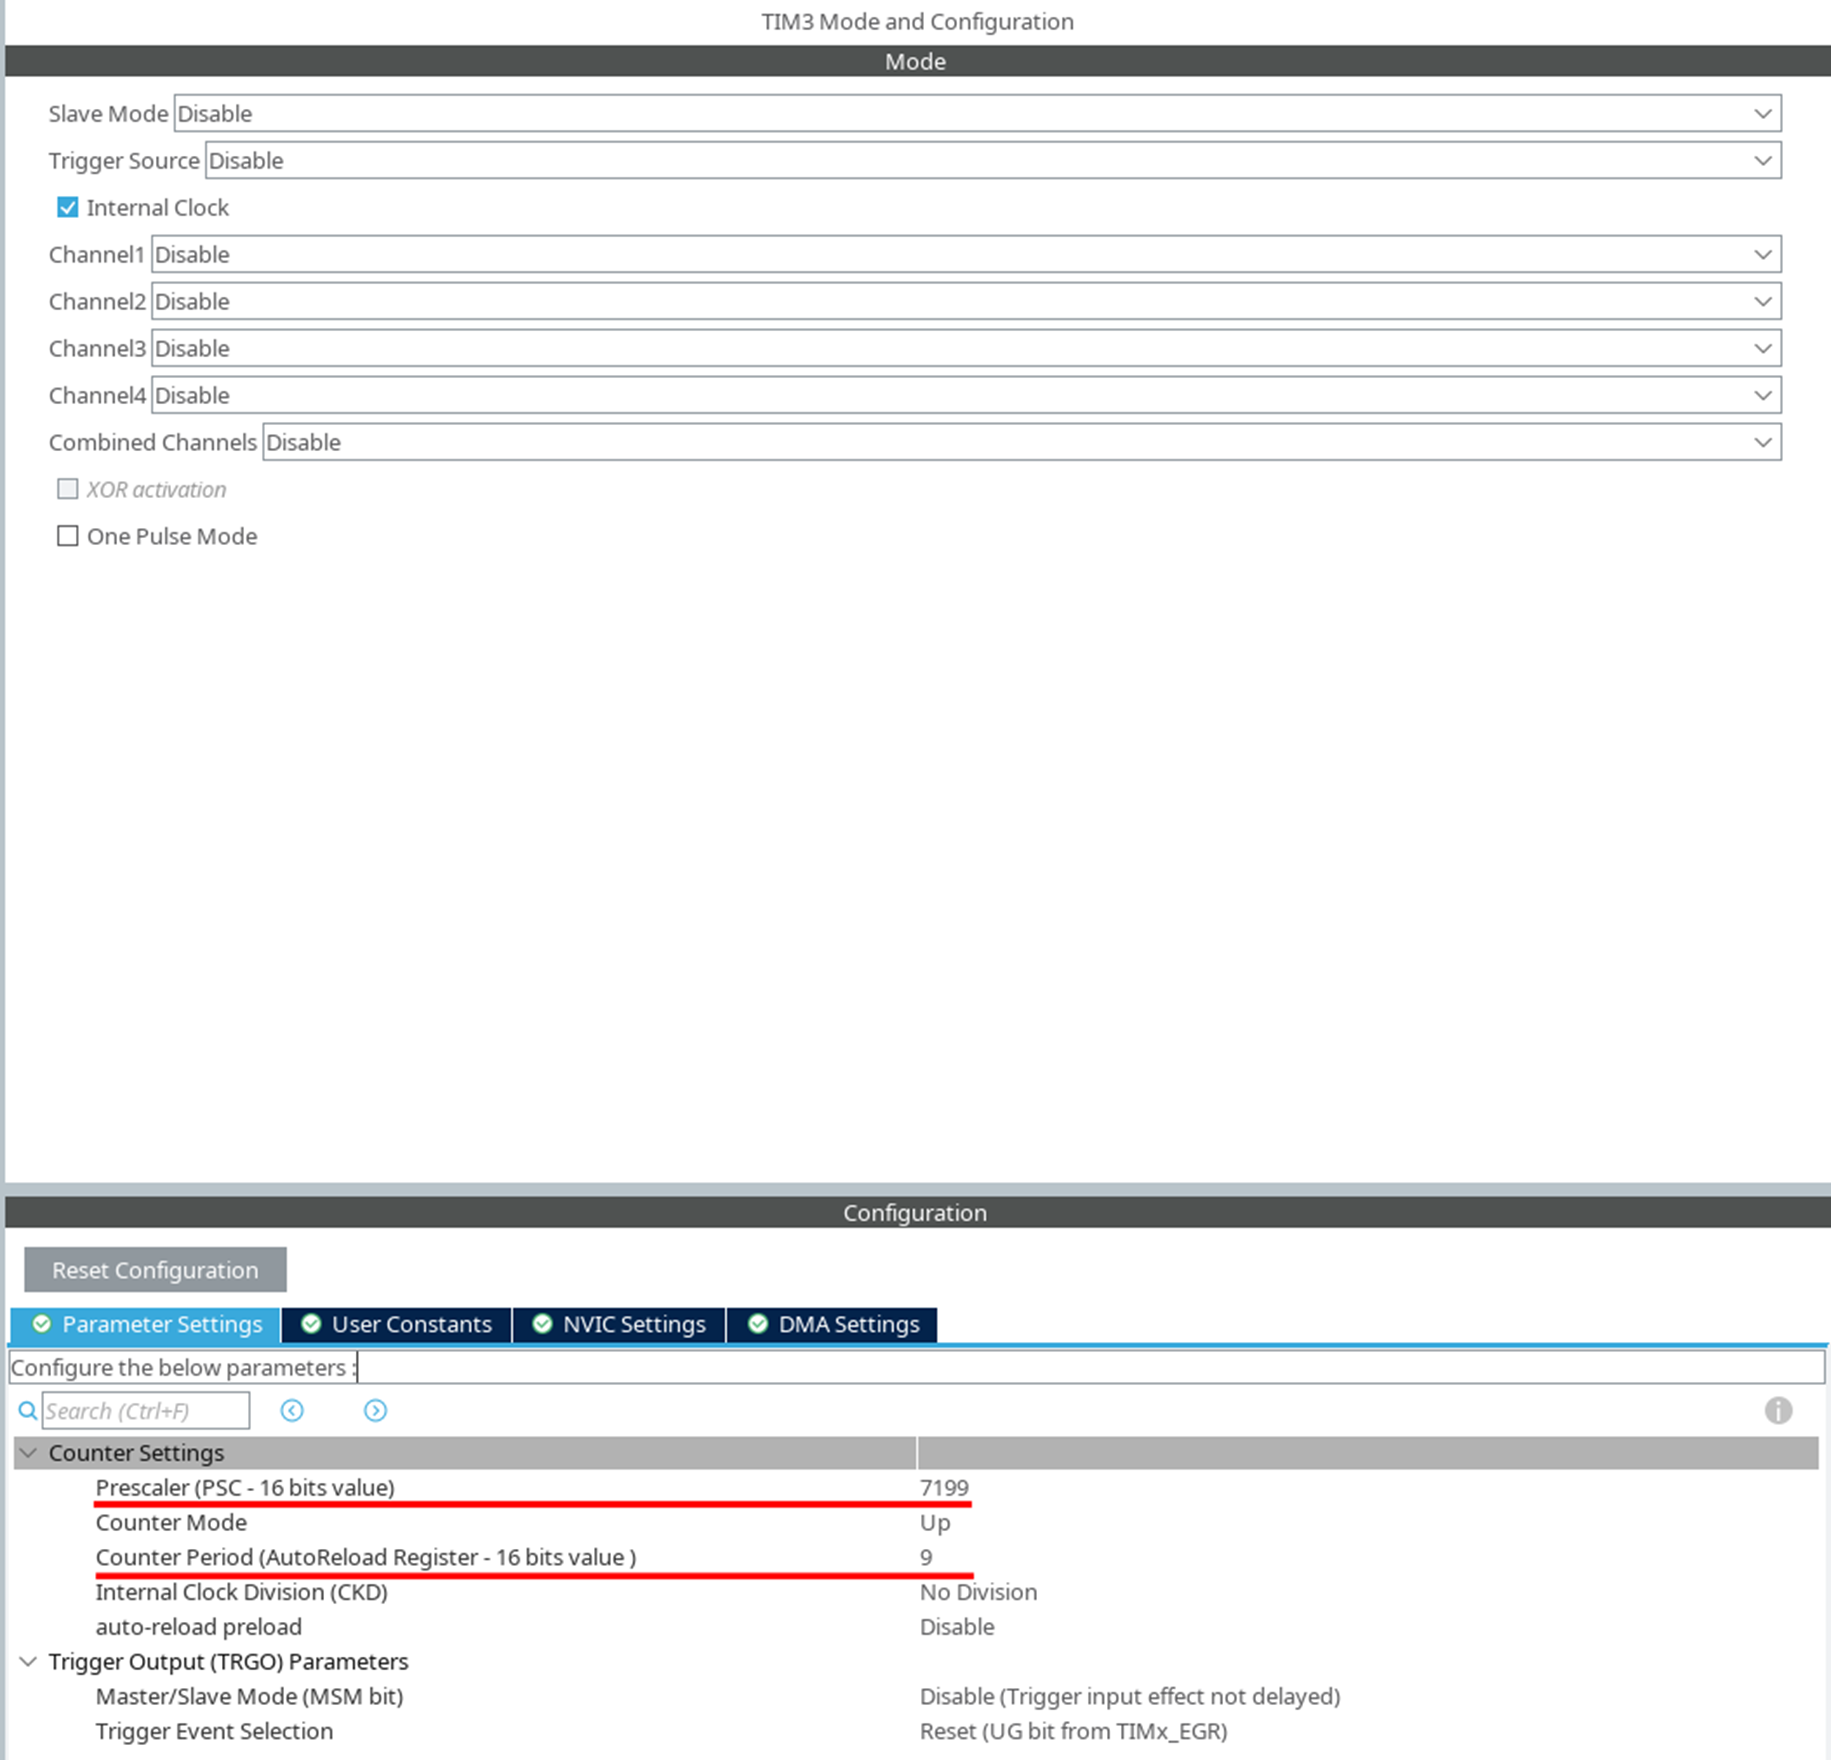
-
In the NVIC Settings tab, enable timer interrupt.
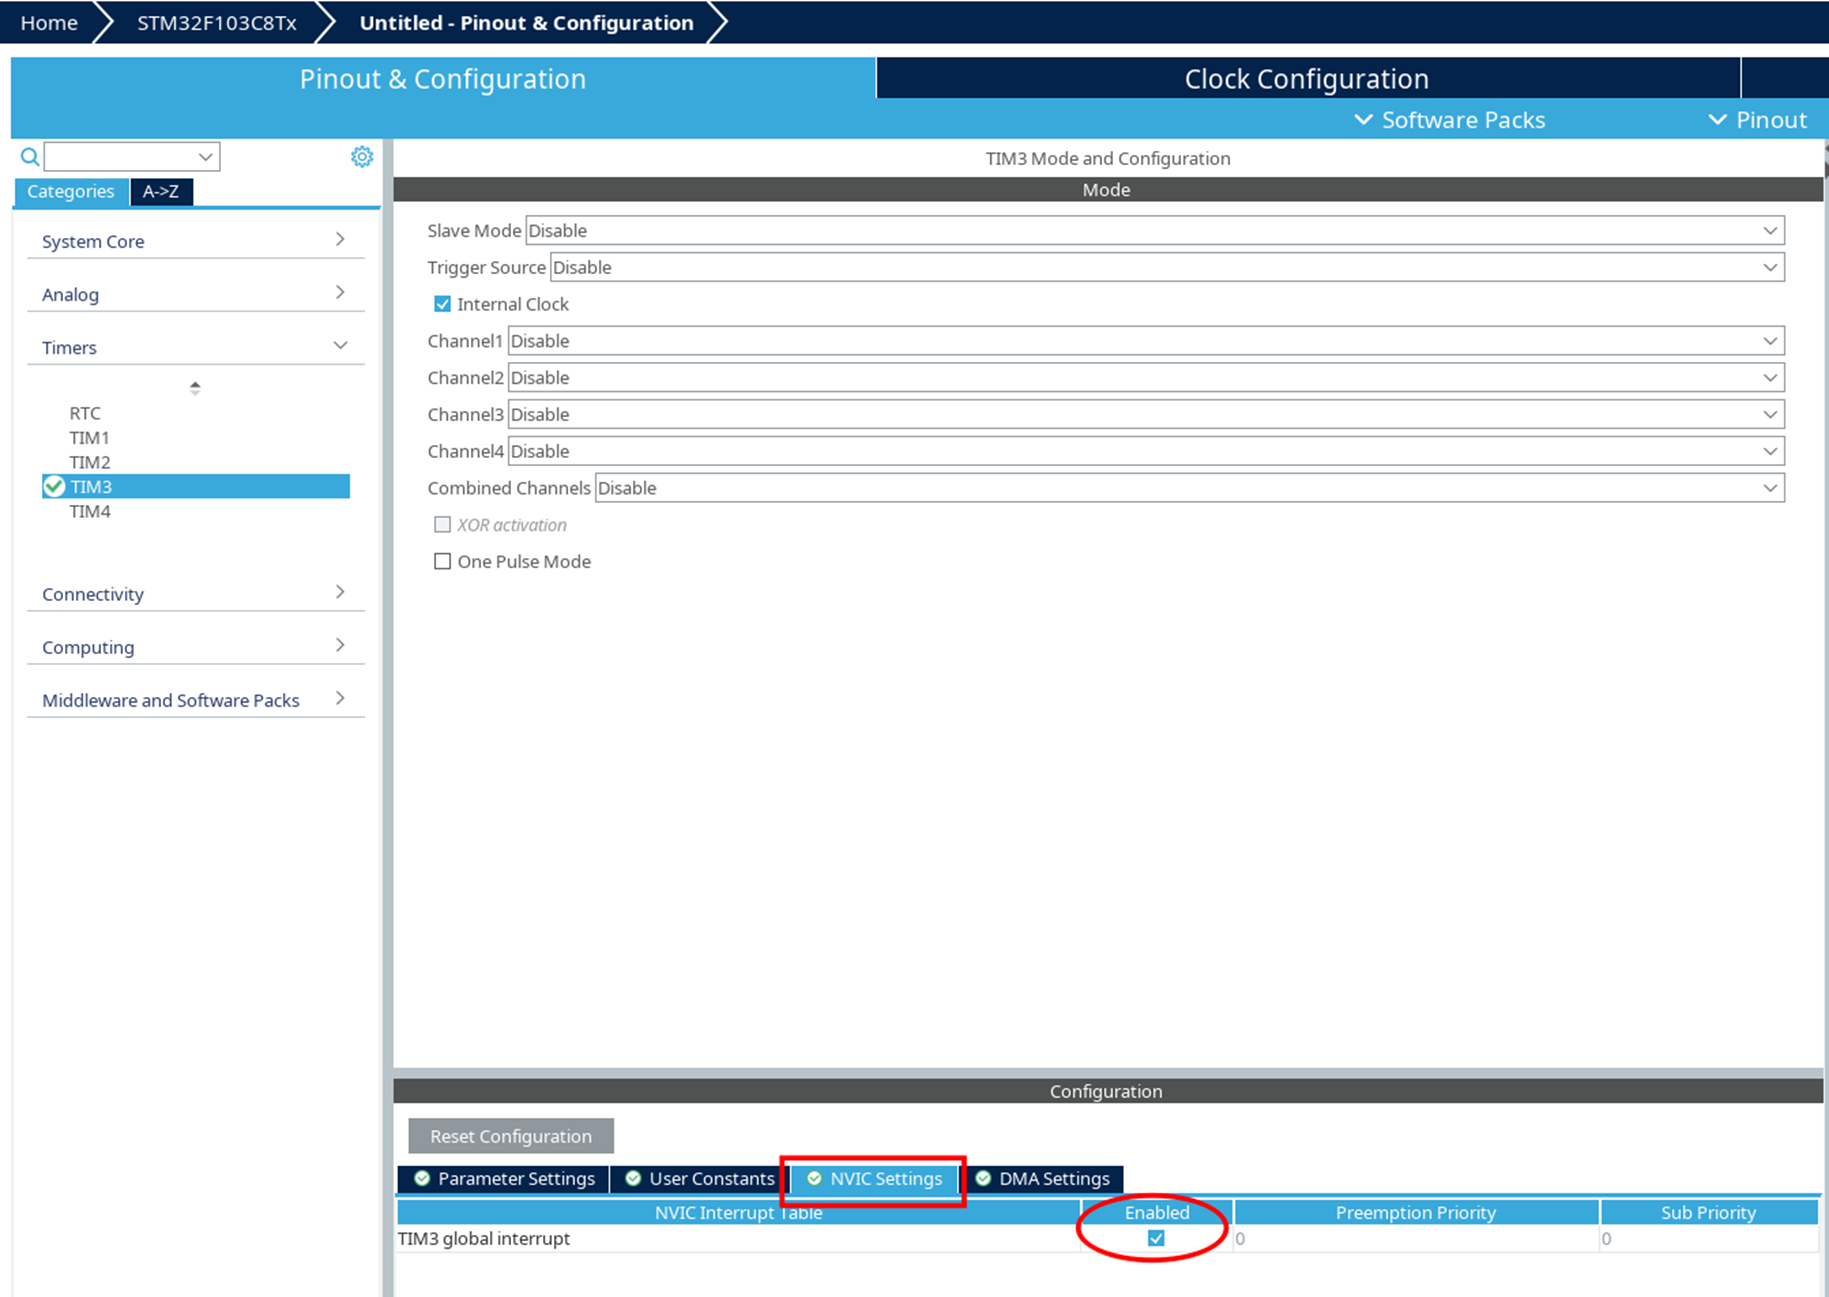
-
Add a call to the model_tick() function[1]:
void HAL_TIM_PeriodElapsedCallback(TIM_HandleTypeDef *htim) { if (htim->Instance == TIM1) { HAL_IncTick(); } if (htim->Instance == TIM3) { model_tick(); } } -
After initializing the timer, add startup:
HAL_TIM_Base_Start_IT(&htim3;);
Interactive mode
Interactive mode uses UART to communicate with Engee:
-
In STM32CubeMX, select a free USART module.
-
Set the parameters:
-
Baud Rate —
115200 Bit/s;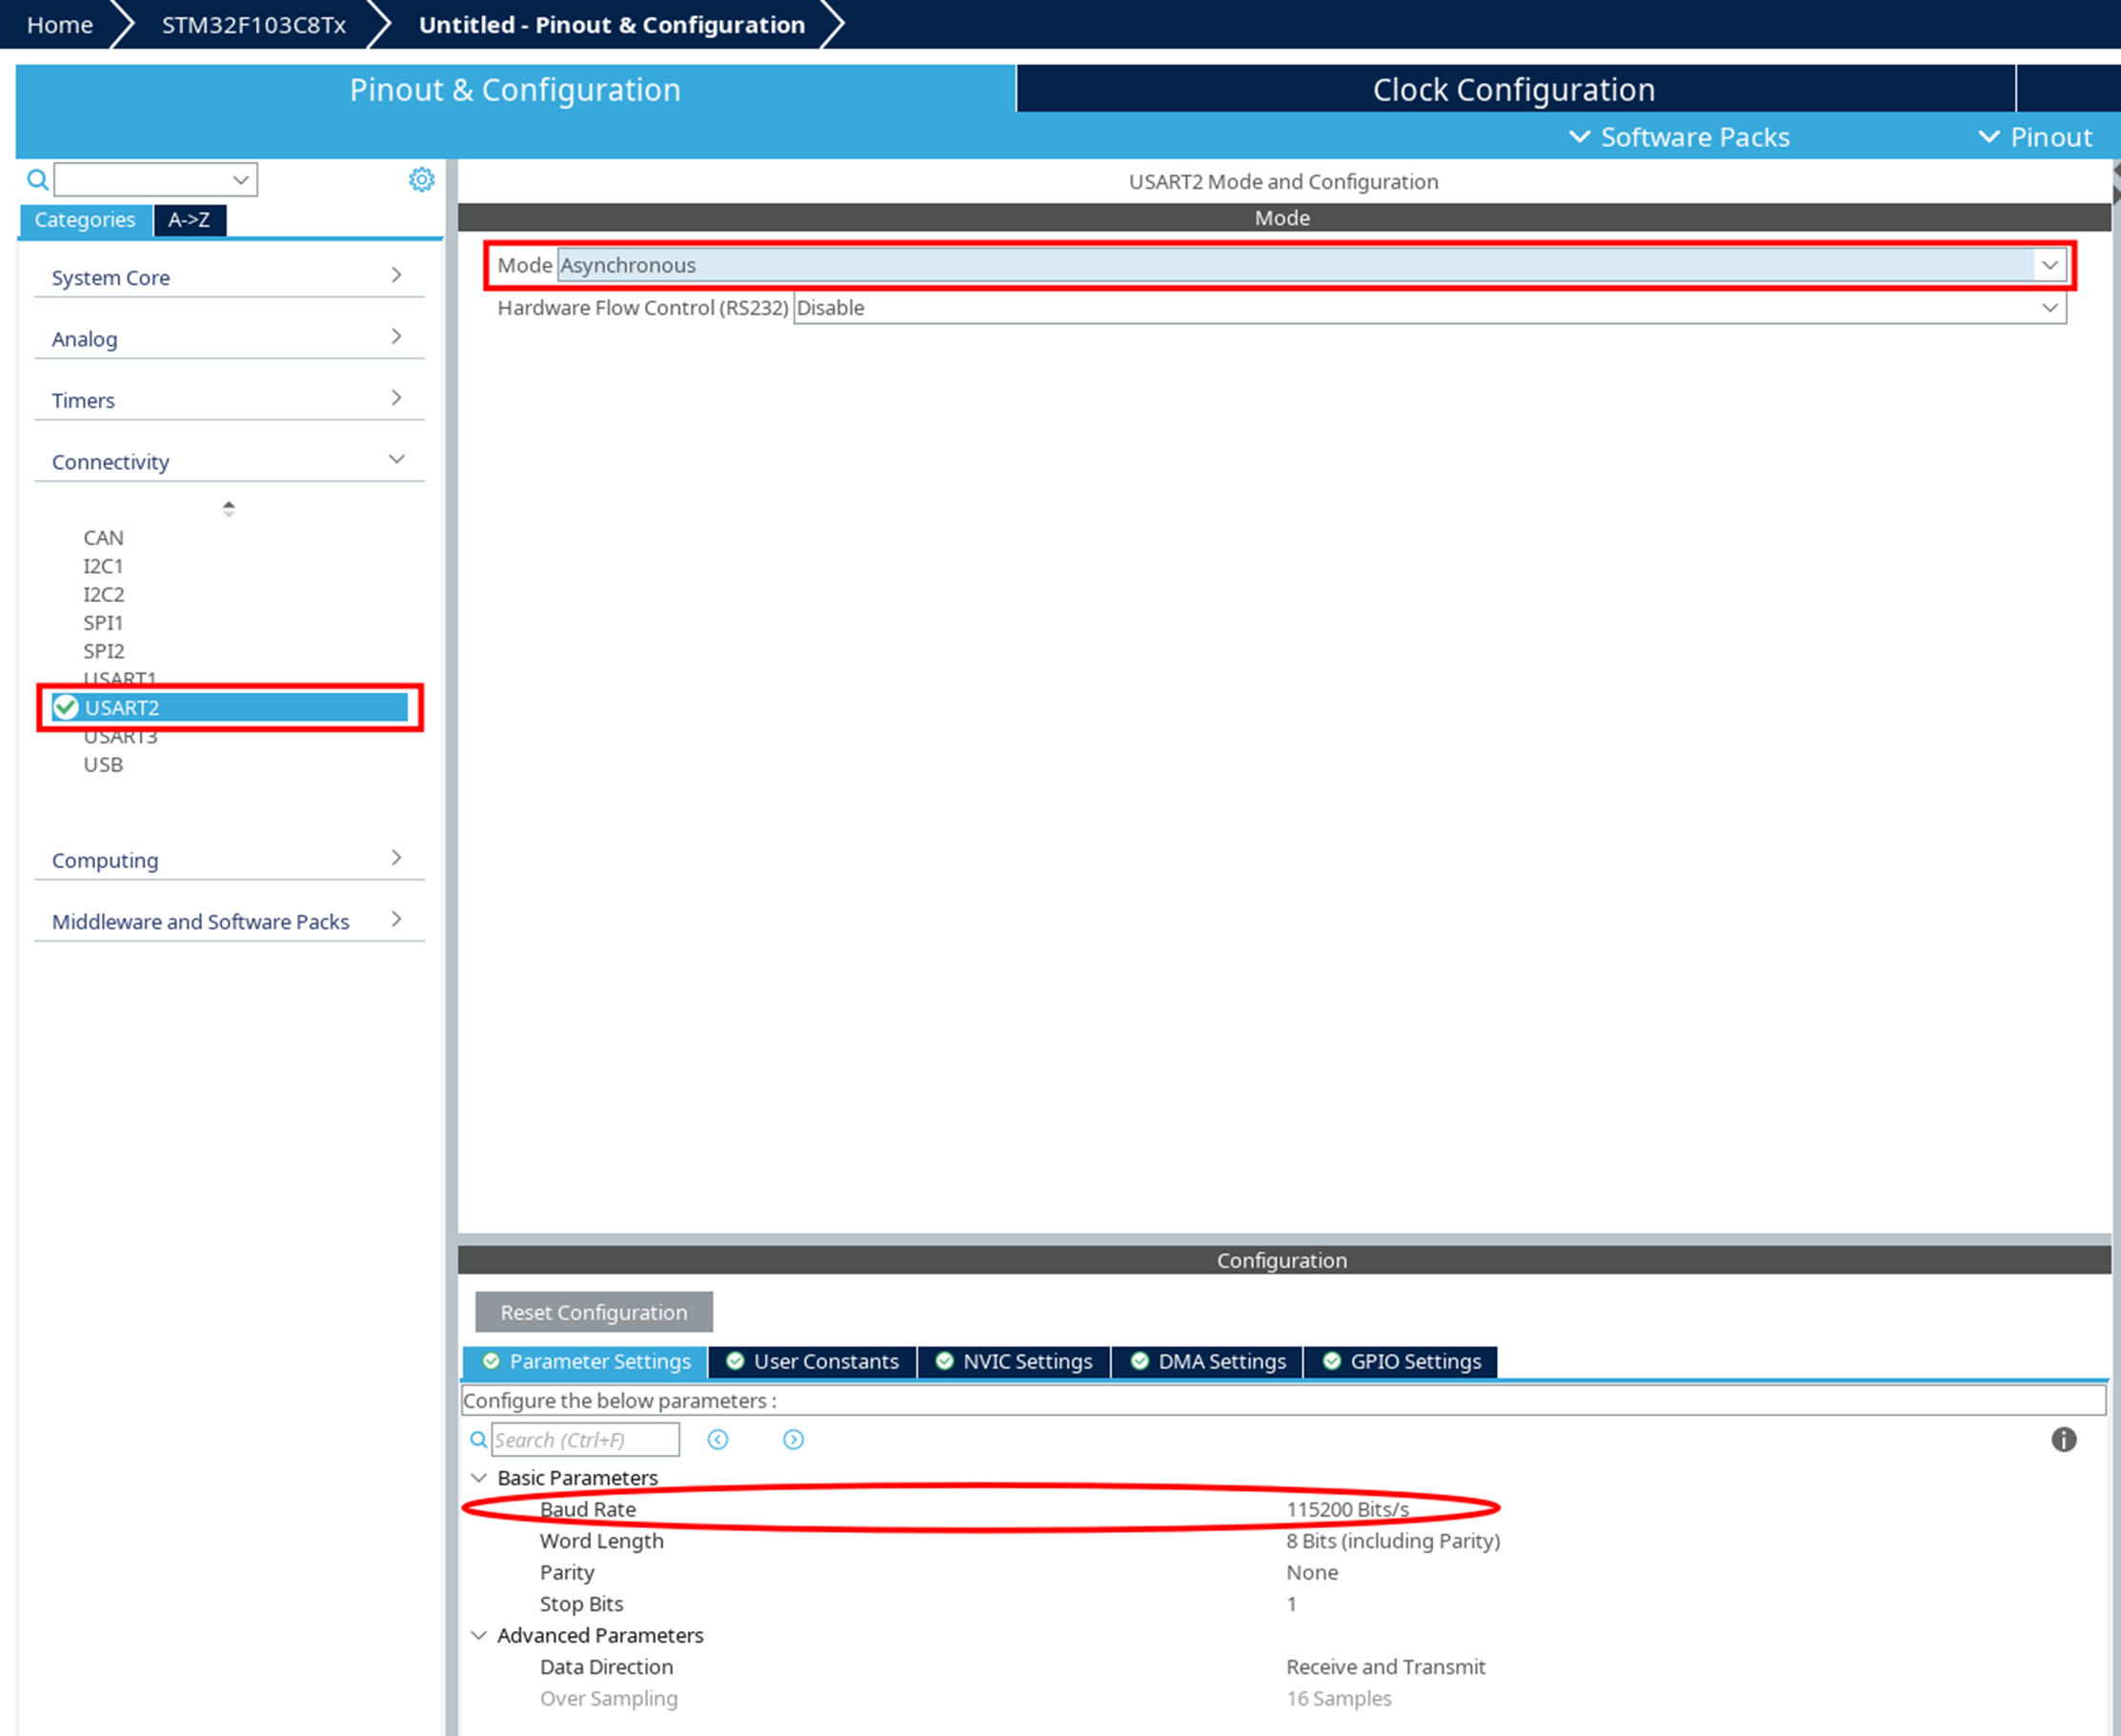
-
The other parameters are by default.
-
-
Set the UART operation mode:
-
In the DMA Settings tab, click on the Add button and add a new DMA Request —
USARTx_RX, wherex— the number of the reserved USART module.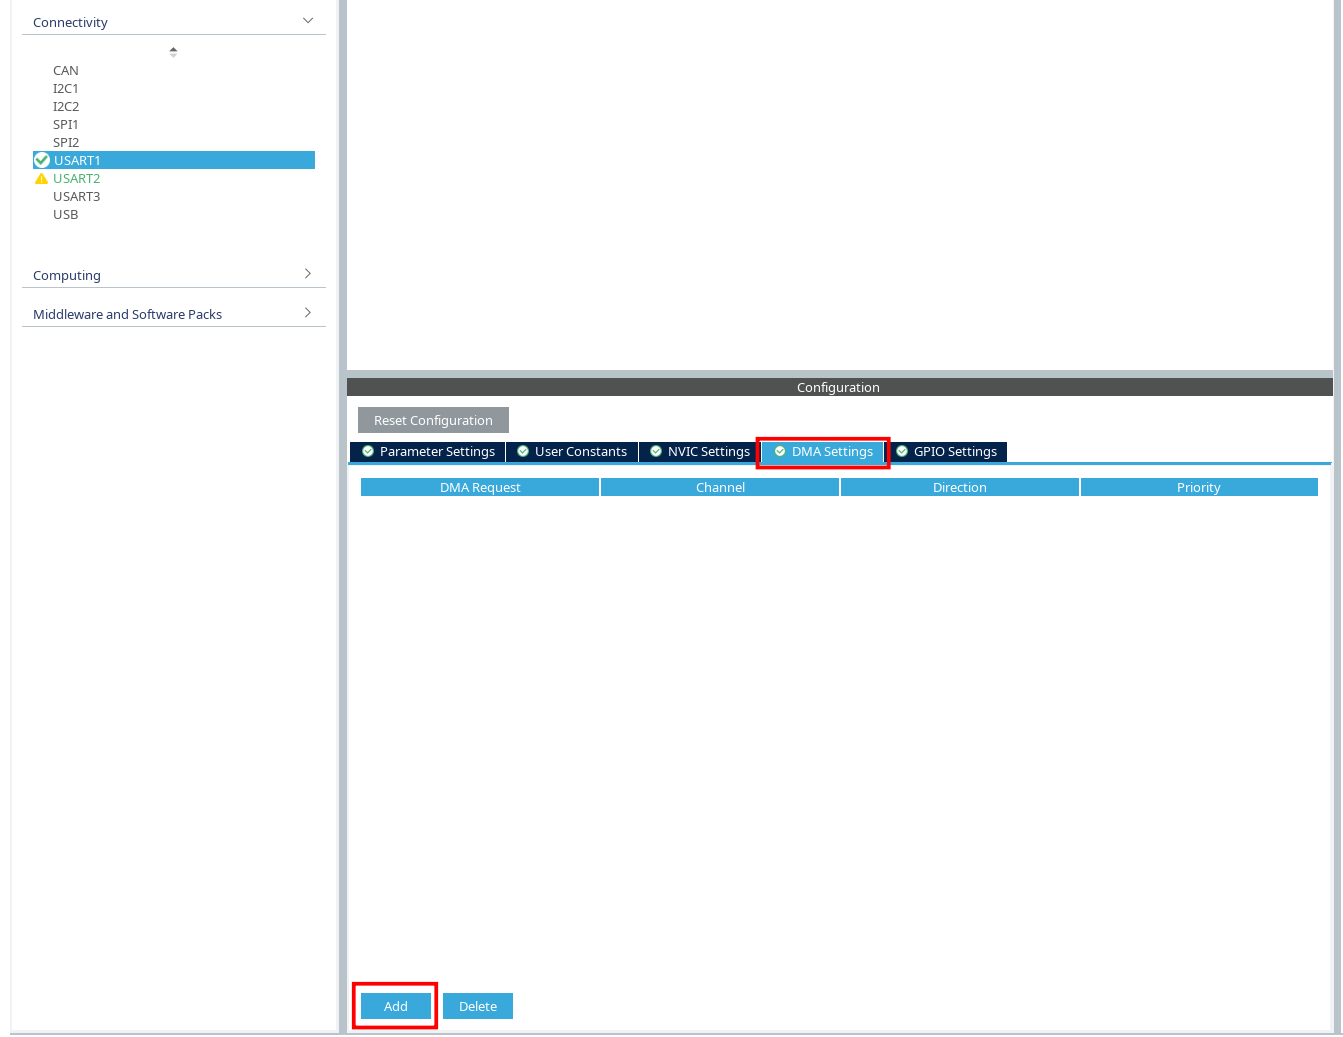
-
In the Priority field for this DMA Request, specify
High, and at the bottom in the settings field DMA Request Settings set the value for ModeCircular.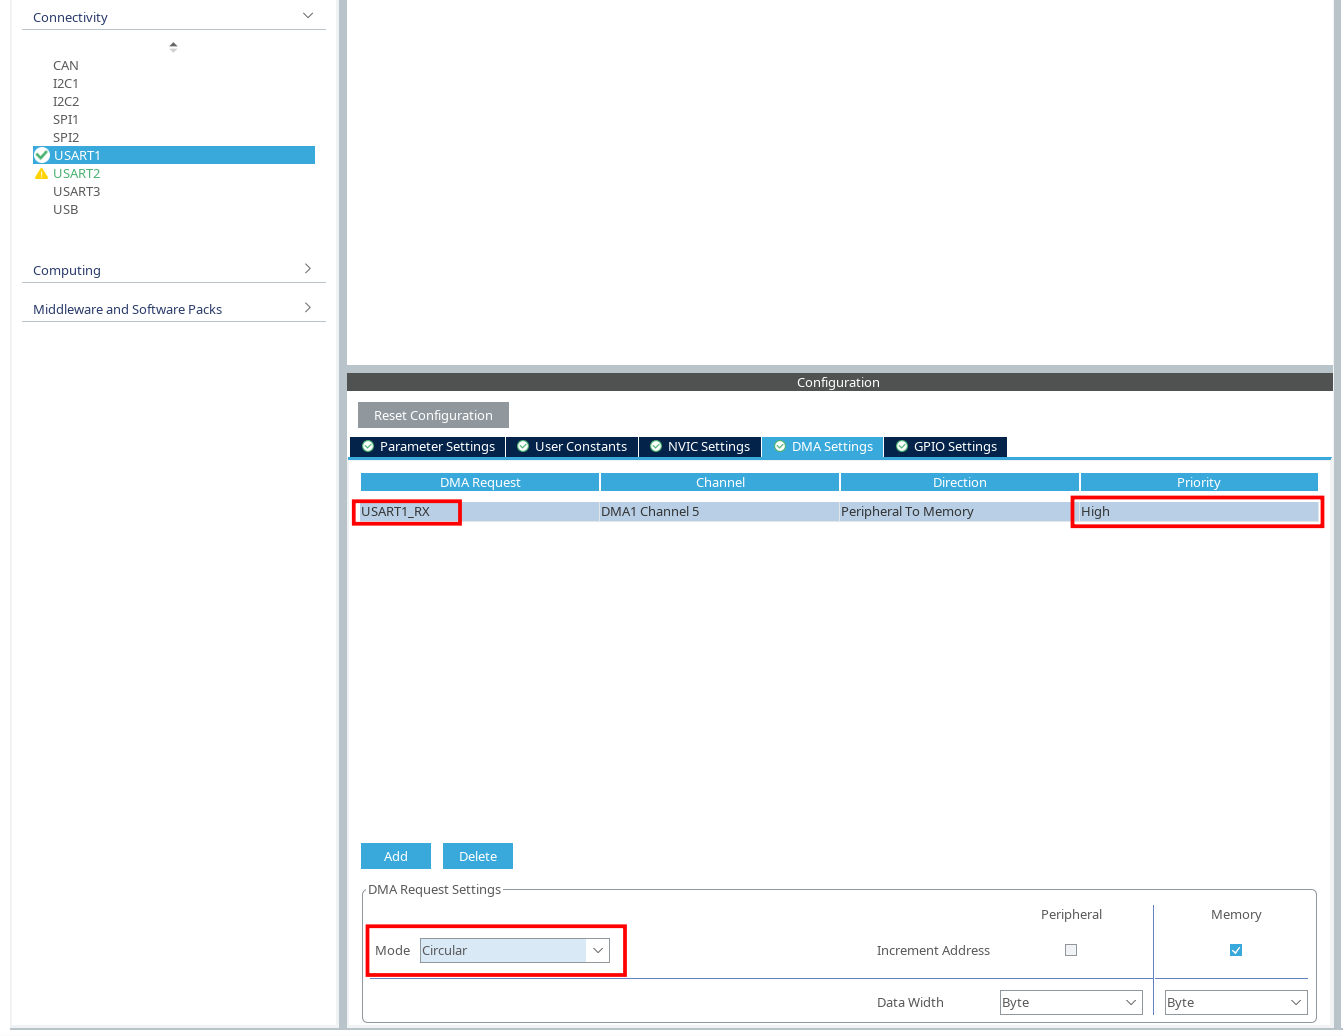
-
Next, add another DMA Request —
USARTx_TX. In the Priority field, specifyHigh, and at the bottom, in the settings field DMA Request Settings, set the value for ModeNormal.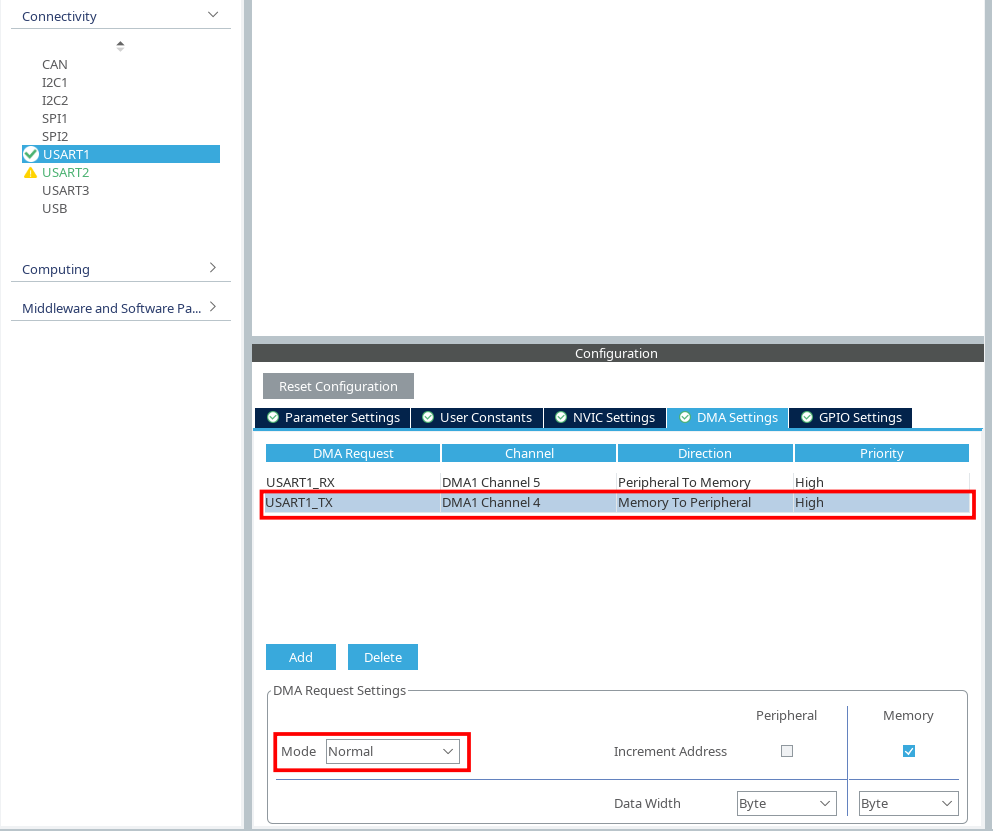
-
Also make sure that in the NVIC Settings tab next to all
DMAx channel_№ global interruptand on the contraryUSARTx global interruptthere are ticks.
-
-
In the EDM-Target-STM32 block parameters, specify:
-
UART module — USART number;
-
COM port — the device’s port.
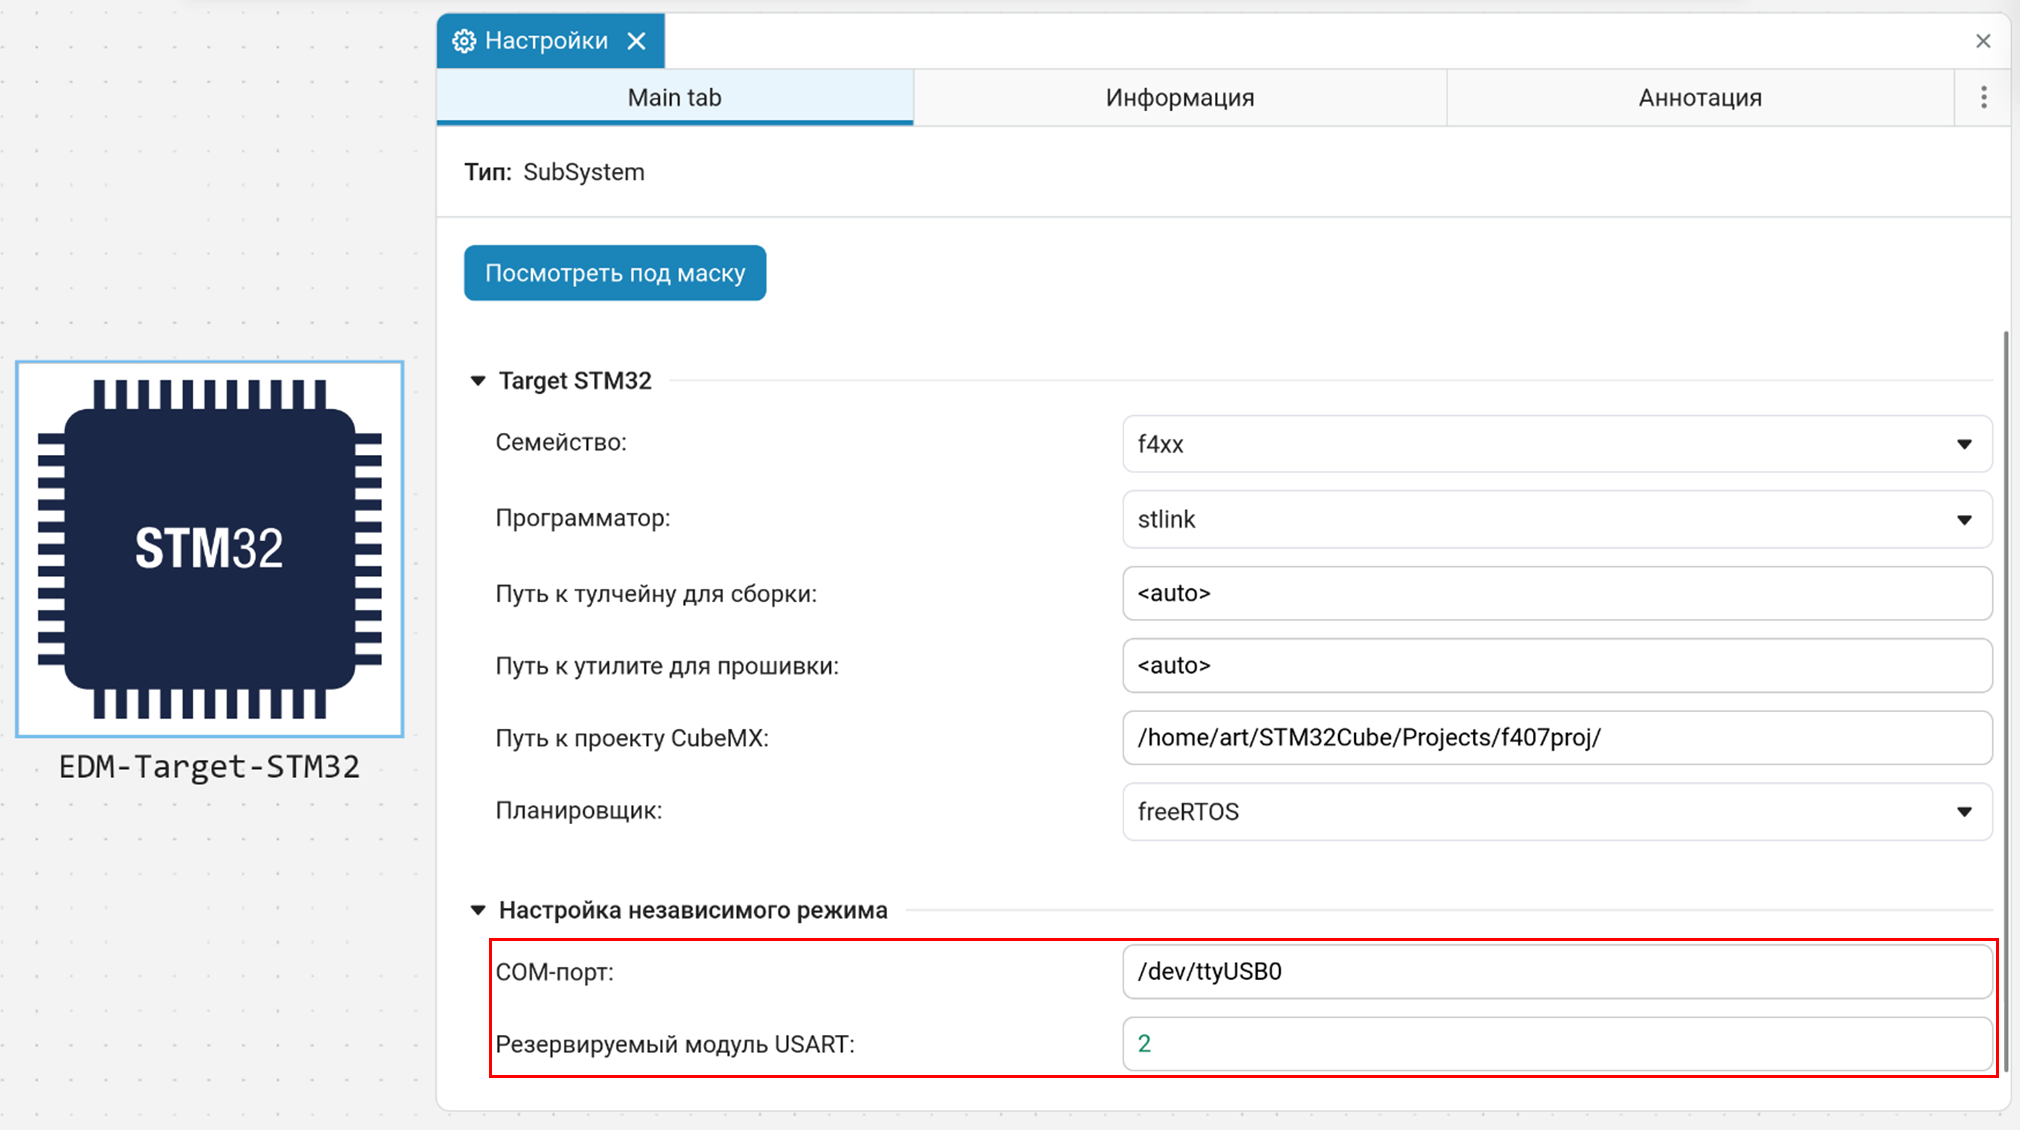 Examples:
-
Linux —
/dev/ttyUSB0 -
Windows —
COM1Checking available ports on Linux:
ls /dev | grep ttyUSB
-
-
| To display the UART as a COM port, you may need to configure USB_DEVICE. For more information, see the manual: STM32 and USB. USB Virtual COM Port Implementation |
Solving possible problems
Problems with the UART connection
When reporting Unable connect to target:
-
Check the reliability of the USB connection.
-
Make sure that the TX/RX connection is correct.
-
On Linux, add a user to a group that has access to serial devices (for example,
wheel,uucpor another one, depending on your distribution).
Firmware issues
If the anchors were removed USER CODE BEGIN or the CubeMX system code:
-
Delete the corrupted project files.
-
Generate the project again in CubeMX (by clicking GENERATE CODE).
Assembly problems
-
Errors are displayed in the interface of the client program with a complete output of information about the problem.
-
Check that the paths to the utilities are correct.
-
Make sure that the path to the tools is specified correctly in the block parameters and they are accessible using the specified path.