RPRMakie
|
该页面正在翻译中。 |
使用AMDs的实验射线追踪后端https://radeon-pro.github.io/RadeonProRenderDocs/en/index.html[RadeonProRender]。虽然它是由AMD创建并为Radeon GPUs量身定做的,但它仍然适用于使用OpenCL的NVidia和英特尔GPUs。 它也适用于CPU,甚至有一个混合模式使用GPUs和Cpu串联渲染图像。
RadeonProRender目前仅适用于Windows和Linux,并在创建最基本的上下文时在OSX上崩溃。 如果您使用OSX并且擅长调试segfaults,请通过调试帮助我们:
using RadeonProRender
RadeonProRender.Context()
要在带有M系列芯片的Mac上使用RPRMakie,目前,您需要使用Julia的x86_64构建(而不是ARM构建,您可能需要手动下载)。 RadeonProRender还没有分发为M系列处理器的ARM架构构建的二进制文件。
激活和屏幕配置
通过调用激活后端 RPRMakie.启动!() 具有以下选项:
#
<无翻译>*RPRMakie.启动!*-Function
RPRMakie.activate!(; screen_config...)将RPRMakie设置为当前活动的后端,并允许快速设置 屏幕_config. 请注意, 屏幕_config 也可以通过永久设置 Makie。set_theme!(RPRMakie=(screen_config。..,)).
可以通过的参数 屏幕_config:
-
迭代=200:光模拟的迭代。 迭代次数越多,图像变得越少,但更高的数字需要更长的时间。 例如:迭代=10人们应该期望渲染需要几秒钟,但它会产生相当嘈杂的输出。 200是一个很好的中间地带,在旧的nvidia1060上大约需要30秒。 为了获得最高质量的输出,需要500以上的数字。 -
资源=RPR。RPR_CREATION_FLAGS_ENABLE_GPU0:GPU或CPU使用。 多个Gpu和Cpu可以通过使用一起使用&(例如RPR。RPR_CREATION_FLAGS_ENABLE_GPU0&RPR。RPR_CREATION_FLAGS_ENABLE_CPU). -
插件=RPR。塔霍:-
RPR。塔霍,遗留的RadeonProRender后端。 它是最稳定的,但没有所有新功能(例如RPR。马特克斯料),并且可能比其他人慢 -
RPR。北极星,新的重写后端,更快,优化了许多迭代。 单次迭代速度要慢得多,因此交互式显示的可用性较低。 有时,Northstar只是产生黑色,摇晃的物体。 目前尚不清楚,如果这只是一个错误,或者是使用不支持/不推荐的功能的结果。 切换到塔霍如果发生这种情况。 -
RPR。混合动力车:Vulkan后端,适合实时渲染,使用AMDs和Nvidia新硬件加速光线追踪。 还不能可靠地工作,只能与RPR。优步材料。 -
RPR。混合动力车:与Hybrid相同,但仅适用于Radeon Gpu,使用AMDs自己的硬件加速API。
-
由于RPRMakie是一个非常独特的后端,并且仍然是实验性的,因此在使用它时有几个问题。
fig = Figure(); # RPRMakie can't show Figures yet, since it only supports a physical 3D camera
radiance = 10000
# Lights are much more important for ray tracing,
# so most examples will use extra lights and environment lights.
# Note, that RPRMakie is the only backend
# supporting multiple light sources and EnvironmentLights right now
lights = [
    EnvironmentLight(0.5, Makie.FileIO.load(RPR.assetpath("studio026.exr"))),
    PointLight(Vec3f(0, 0, 20), RGBf(radiance, radiance, radiance))
]

# Only LScene is supported right now,
# since the other projections don't map to the physical accurate Camera in RPR.
ax = LScene(fig[1, 1]; show_axis = false, scenekw=(lights=lights,))
# Note that since RPRMakie doesn't yet support text (this is being worked on!),
# you can't show a 3d axis yet.

# to create materials, one needs access to the RPR context.
# Note, if you create an Screen manually, don't display the scene or fig anymore, since that would create a new RPR context, in which resources from the manually created Context would be invalid. Since RPRs error handling is pretty bad, this usually results in Segfaults.
# See below how to render a picture with a manually created context
screen = RPRMakie.Screen(ax.scene; iterations=10, plugin=RPR.Northstar)
matsys = screen.matsys
context = screen.context
# You can use lots of materials from RPR.
# Note, that this API may change in the future to a backend  independent representation
# Or at least one, that doesn't need to access the RPR context
mat = RPR.Chrome(matsys)
# The material attribute is specific to RPRMakie and gets ignored by other Backends. This may change in the future
mesh!(ax, Sphere(Point3f(0), 1), material=mat)

# There are three main ways to turn a Makie scene into a picture:
# Get the colorbuffer of the Screen. Screen also has `show` overloaded for the mime `image\png` so it should display in IJulia/Jupyter/VSCode.
image = colorbuffer(screen)::Matrix{RGB{N0f8}}
# Replace a specific (sub) LScene with RPR, and display the whole scene interactively in RPRMakie
using RPRMakie
refresh = Observable(nothing) # Optional observable that triggers rerendering
display(ax.scene; backend=GLMakie) # Make sure to display scene first in GLMakie
# Replace the scene with an interactively rendered RPR output.
# See more about this in the RPRMakie interop example
context, task = RPRMakie.replace_scene_rpr!(ax.scene, screen; refresh=refresh)
# If one doesn't create the Screen manually to create custom materials,
# display(ax.scene), show(io, MIME"image/png", ax.scene), save("rpr.png", ax.scene)
# Should work just like with other backends.
# Note, that only the scene from LScene can be displayed directly, but soon, `display(fig)` should also work.
有几个例子显示了如何使用RPRMakie的不同方面。 例子在https://github.com/MakieOrg/Makie.jl/tree/master/RPRMakie/examples[RPRMakie/例子]
MaterialX和预定义材料(materials.jl)
有几个预定义的材料可以在RadeonProRender中使用。 RPR还支持https://www.materialx.org/[MaterialX]标准加载各种预定义材料。 确保使用北极星后端 材料x.
using GeometryBasics, RPRMakie
using Colors, FileIO
using Colors: N0f8

radiance = 500
lights = [EnvironmentLight(1.0, load(RPR.assetpath("studio026.exr"))),
            PointLight(Vec3f(10), RGBf(radiance, radiance, radiance * 1.1))]
fig = Figure(; size=(1500, 700));
ax = LScene(fig[1, 1]; show_axis=false, scenekw=(; lights=lights))
screen = RPRMakie.Screen(ax.scene; plugin=RPR.Northstar, iterations=400)

matsys = screen.matsys
emissive = RPR.EmissiveMaterial(matsys)
diffuse = RPR.DiffuseMaterial(matsys)
glass = RPR.Glass(matsys)
plastic = RPR.Plastic(matsys)
chrome = RPR.Chrome(matsys)
dielectric = RPR.DielectricBrdfX(matsys)
gold = RPR.SurfaceGoldX(matsys)

materials = [glass chrome;
                gold dielectric;
                emissive plastic]

mesh!(ax, load(Makie.assetpath("matball_floor.obj")); color=:white)
palette = reshape(Makie.wong_colors()[1:6], size(materials))

for i in CartesianIndices(materials)
    x, y = Tuple(i)
    mat = materials[i]
    mplot = if mat === emissive
        matball!(ax, diffuse; inner=emissive, color=nothing)
    else
        matball!(ax, mat; color=nothing)
    end
    v = Vec3f(((x, y) .- (0.5 .* size(materials)) .- 0.5)..., 0)
    translate!(mplot, 0.9 .* (v .- Vec3f(0, 3, 0)))
end
cam = cameracontrols(ax.scene)
cam.eyeposition[] = Vec3f(-0.3, -5.5, 0.9)
cam.lookat[] = Vec3f(0.5, 0, -0.5)
cam.upvector[] = Vec3f(0, 0, 1)
cam.fov[] = 35
emissive.color = Vec3f(4, 2, 2)
image = colorbuffer(screen)
save("materials.png", image)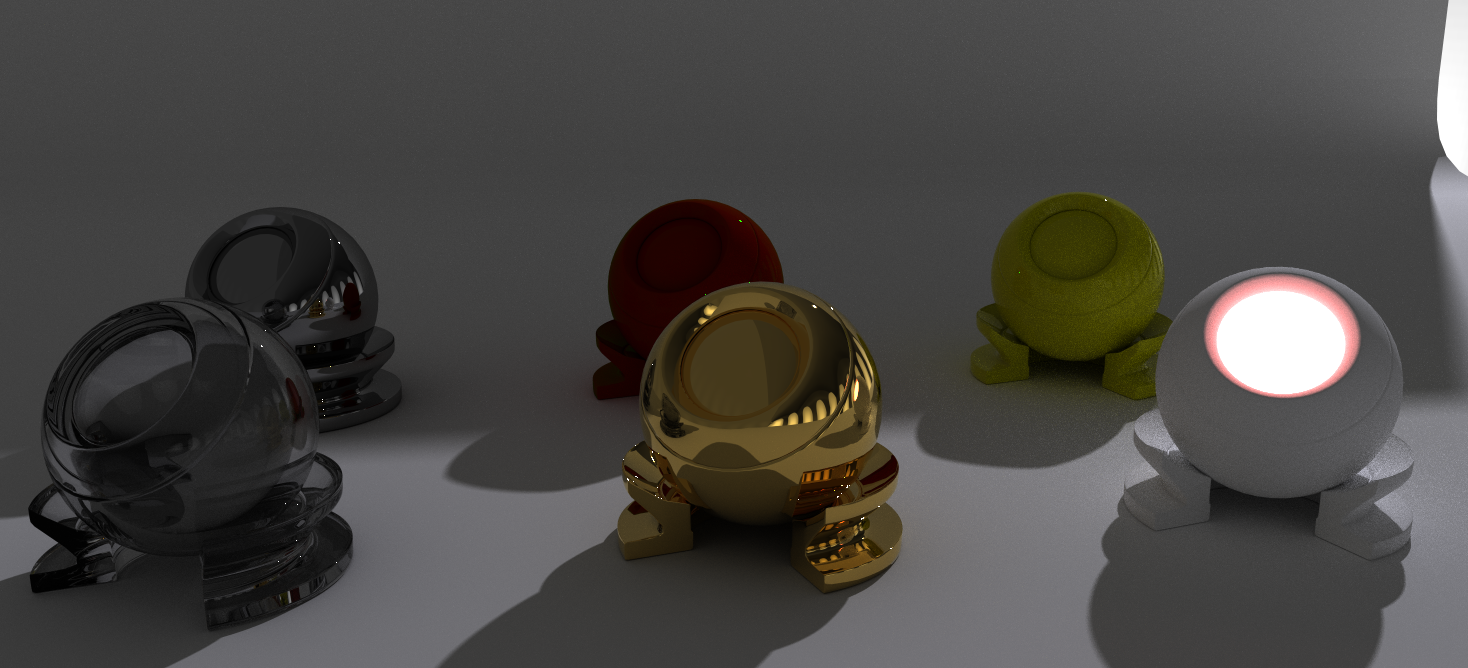
高级定制材料(earth_topography.jl)
using NCDatasets, ColorSchemes, RPRMakie
using ImageShow, FileIO

#取自https://lazarusa.github.io/BeautifulMakie/GeoPlots/topography/
cmap=dataset=Dataset(joinpath(@__DIR__,"ETOPO1_halfdegree.nc"))
lon=数据集["lon"][:]
lat=数据集["lat"][:]
数据=Float32。(数据集["ETOPO1avg"][:,:])

函数glow_material(data_normed)
    emission_weight=map(data_normed)做我
        返回Float32(i<0.7? 0.0:i)
    结束
    emission_color=map(data_normed)做我
        em=i*2
        返回RGBf(em*2.0,em*0.4,em*0.3)
    结束

    返回(
        reflection_weight=1,
        reflection_color=RGBf(0.5,0.5,1.0),
        反射率=0,
        反射率=1.4,
        扩散量=1,
        emission_weight=emission_weight',
        emission_color=emission_color',
    )
结束

RPRMakie.启动!(迭代=32,插件=RPR。北极星)
fig=Figure(;size=(2000,800))
光辉=30000
lights=[EnvironmentLight(1.0,load(RPR.assetpath("studio026.exr"))),
            PointLight(Vec3f(0,100,100),RGBf(radiance,radiance,radiance))]

ax=LScene(fig[1,1];show_axis=false,scenekw=(lights=lights,))

迷你,maxi=极值(数据)
data_normed=((数据。-迷你)。/(马克西-迷你))

材料=glow_material(data_normed)

pltobj=表面!(ax,lon,lat,data_normed。* 20;
                    材料=材料,颜色表=[:黑色,:白色,:棕色],
                    colorrange=(0.2,0.8)。* 20)
#将相机设置为一个不错的角度
cam=cameracontrols(ax。景)
凯。eyeposition[]=Vec3f(3,-300,300)
凯。lookat[]=Vec3f(0)
凯。upvector[]=Vec3f(0,0,1)
凯。fov[]=23

保存("topographie。png",ax。景)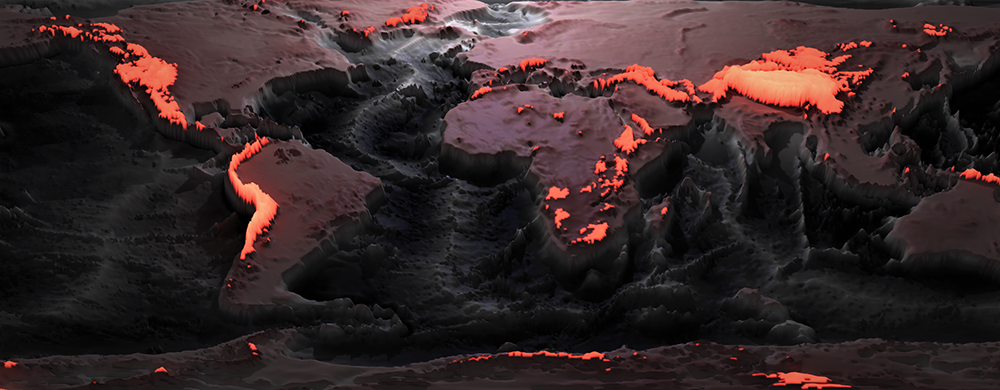
Rprmakie互操作(opengl_interop。jl)
RPRMakie还不支持布局和子场景,但您可以用rpr渲染的交互式窗口替换单个场景。 这特别方便,可以在光线追踪场景旁边显示2d图形和交互式UI元素,并以交互方式调整相机和材质参数。
using RPRMakie, GeometryBasics, RPRMakie, RadeonProRender
using Colors, FileIO
using Colors: N0f8

f = (u, v) -> cos(v) * (6 - (5 / 4 + sin(3 * u)) * sin(u - 3 * v))
g = (u, v) -> sin(v) * (6 - (5 / 4 + sin(3 * u)) * sin(u - 3 * v))
h = (u, v) -> -cos(u - 3 * v) * (5 / 4 + sin(3 * u));
u = range(0; stop=2π, length=150)
v = range(0; stop=2π, length=150)
radiance = 500
lights = [EnvironmentLight(1.0, load(RPR.assetpath("studio026.exr"))),
          PointLight(Vec3f(10), RGBf(radiance, radiance, radiance * 1.1))]

fig = Figure(; size=(1500, 1000))
ax = LScene(fig[1, 1]; show_axis=false, scenekw=(; lights=lights))
screen = RPRMakie.Screen(size(ax.scene); plugin=RPR.Tahoe)
material = RPR.UberMaterial(screen.matsys)

surface!(ax, f.(u, v'), g.(u, v'), h.(u, v'); ambient=Vec3f(0.5), diffuse=Vec3f(1), specular=0.5,
         colormap=:balance, material=material)

功能输入(图,val::RGB)
    色调=滑块(图;范围=1:380,宽度=200)
    亮度=滑块(图;范围=LinRange(0,1,100),宽度=200)
    标签=[标签(图,"色调";halign=:左),标签(图,"光";halign=:左)]
    布局=网格!(hcat(标签,[色调,亮度]))
    hsl=HSL(val)
    set_close_to!(色调,hsl。h)
    set_close_to!(轻盈,hsl。升)
    颜色=地图((h,l)->RGB(HSL(h,0.9,l)),色调。价值,轻盈。值)
    返回颜色,布局
结束

功能输入(图,val::Vec4)
    s=滑块(图;范围=LinRange(0,1,100),宽度=200)
    set_close_to!(s,第一(val))
    返回映射(x->Vec4f(x),s.值),s
结束

函数输入(fig,val::Bool)
    切换=切换(图;活动=val)
    返回切换。活动,切换
结束

滑块=(reflection_color=输入(fig,RGB(0,0,0)),reflection_weight=输入(fig,Vec4(0)),
           reflection_roughness=输入(图,Vec4(0)),reflection_anisotropy=输入(图,Vec4(0)),
           reflection_anisotropy_rotation=输入(图,Vec4(0)),reflection_mode=输入(图,Vec4(0)),
           reflection_ior=输入(图,Vec4(0)),reflection_metalness=输入(图,Vec4(0)),
           refraction_color=输入(fig,RGB(0,0,0)),refraction_weight=输入(fig,VEC4(0)),
           refraction_roughness=输入(图,Vec4(0)),refraction_ior=输入(图,Vec4(0)),
           refraction_absorption_color=输入(图,RGB(0,0,0)),
           refraction_absorption_distance=输入(fig,Vec4(0)),refraction_caustics=输入(fig,true),
           sss_scatter_color=输入(fig,RGB(0,0,0)),sss_scatter_distance=输入(fig,Vec4(0)),
           sss_scatter_direction=输入(fig,Vec4(0)),sss_weight=输入(fig,Vec4(0)),
           sss_multiscatter=输入(fig,false),backscatter_weight=输入(fig,Vec4(0)),
           backscatter_color=输入(图,RGB(0,0,0)))

标签=[]
输入=[]
refresh=Observable(无)
对于(键,(obs,输入))成对(滑块)
    推!(标签,标签(图,字符串(键);对齐=:左))
    推!(输入,输入)
    on(obs)做值
        setproperty!(材质,键,值)
        返回通知(刷新)
    结束
结束

fig[1,2]=网格!(hcat(标签,输入);宽度=500)
RPRMakie.启动!()

cam=cameracontrols(ax。景)
凯。眼位[]=Vec3f(22,0,17)
凯。lookat[]=Vec3f(0,0,-1)
凯。upvector[]=Vec3f(0,0,1)
凯。fov[]=30

显示(图)

上下文,任务=RPRMakie。替换_scene_rpr!(斧头。场景,屏幕;refresh=刷新)

#交互式更改灯光参数
開始啦。
    灯[1]。强度[]=1.5
    灯[2]。光辉[]=RGBf(1000,1000,1000)
    灯[2]。位置[]=Vec3f(3,10,10)
    通知(刷新)
结束动画(乐高。jl)
并非所有对象都支持通过Observables更新,但翻译,相机等已经涵盖,可以与Makie的标准动画API一起使用。
# Example inspiration and Lego model by https://github.com/Kevin-Mattheus-Moerman
# https://twitter.com/KMMoerman/status/1417759722963415041
using MeshIO, FileIO, GeometryBasics, RPRMakie

colors = Dict(
    "eyes" => "#000",
    "belt" => "#000059",
    "arm" => "#009925",
    "leg" => "#3369E8",
    "torso" => "#D50F25",
    "head" => "yellow",
    "hand" => "yellow"
)

origins = Dict(
    "arm_right" => Point3f(0.1427, -6.2127, 5.7342),
    "arm_left" => Point3f(0.1427, 6.2127, 5.7342),
    "leg_right" => Point3f(0, -1, -8.2),
    "leg_left" => Point3f(0, 1, -8.2),
)

旋转_axes=Dict(
    "arm_right"=>Vec3f(0.0000,-0.9828,0.1848),
    "arm_left"=>Vec3f(0.0000,0.9828,0.1848),
    "leg_right"=>Vec3f(0,-1,0),
    "leg_left"=>Vec3f(0,1,0),
)

函数plot_part!(场景,父,名称::字符串)
    m=load(assetpath("lego_figure_"*name*"。stl"))
    颜色=颜色[分割(名称,"_")[1]]
    trans=Transformation(父)
    ptrans=Makie。转变(家长)
    origin=get(origins,name,nothing)
    如果!isnothing(起源)
        居中=m.位置。-产地来源
        m=GeometryBasics。网格(m,位置=居中)
        翻译!(反式,原产地)
    其他
        翻译!(trans,-ptrans。翻译[])
    结束
    返回网格!(场景,m;颜色=颜色,变换=反式)
结束

函数plot_lego_figure(s,floor=true)
    #Plot分层网格!
    图=Dict()
    #Plot分层网格!
    图["躯干"]=plot_part!(s,s,"躯干")
        图["头"]=plot_part!(s,图["躯干"],"头部")
            图["eyes_mouth"]=plot_part!(s,figure["head"],"eyes_mouth")
        图["arm_right"]=plot_part!(s,图["躯干"],"arm_right")
            图["hand_right"]=plot_part!(s,图["arm_right"],"hand_right")
        图["arm_left"]=plot_part!(s,图["躯干"],"arm_left")
            图["hand_left"]=plot_part!(s,图["arm_left"],"hand_left")
        图["皮带"]=plot_part!(s,图["躯干"],"腰带")
            图["leg_right"]=plot_part!(s,figure["belt"],"leg_right")
            图["leg_left"]=plot_part!(s,图["皮带"],"leg_left")
     把小家伙举起来
    翻译!(图["躯干"],0,0,20)
    #增加楼层
    地板和网格!(s,Vec3f(Vec3f(-400,-400,-2),Vec3f(800,800,2)),颜色=:白色)
    返回图
结束

RPRMakie.启动!(迭代=200,插件=RPR。北极星)
光辉=50000
灯光=[
    EnvironmentLight(1.5,rotl90(load(assetpath("sunflowers_1k.hdr"))')),
    PointLight(Vec3f(50,0,200),RGBf(radiance,radiance,radiance*1.1)),
]
s=场景(大小=(500,500),灯光=灯光)

cam3d!(s)
c=cameracontrols(s)
c.近[]=5
c.远[]=1000
update_cam!(s,c,Vec3f(100,30,80),Vec3f(0,0,-10))
图=plot_lego_figure(s)

rot_joints_by=0.25*pi
total_translation=50
动画_strides=10

a1=LinRange(0,rot_joints_by,animation_strides)
angles=[a1;reverse(a1[1:end-1]);-a1[2:end];reverse(-a1[1:end-1]);]
nsteps=length(angles);#动画步数
翻译=LinRange(0,total_translation,nsteps)

麦琪record(s,"lego_walk.mp4",zip(translations,angles))do(translation,angle)

    #旋转右臂+手
    名称在["arm_left","arm_right","leg_left","leg_right"]
        旋转!(图[名称],rotation_axes[名称],角度)
    结束
    翻译!(图["躯干"],翻译,0,20)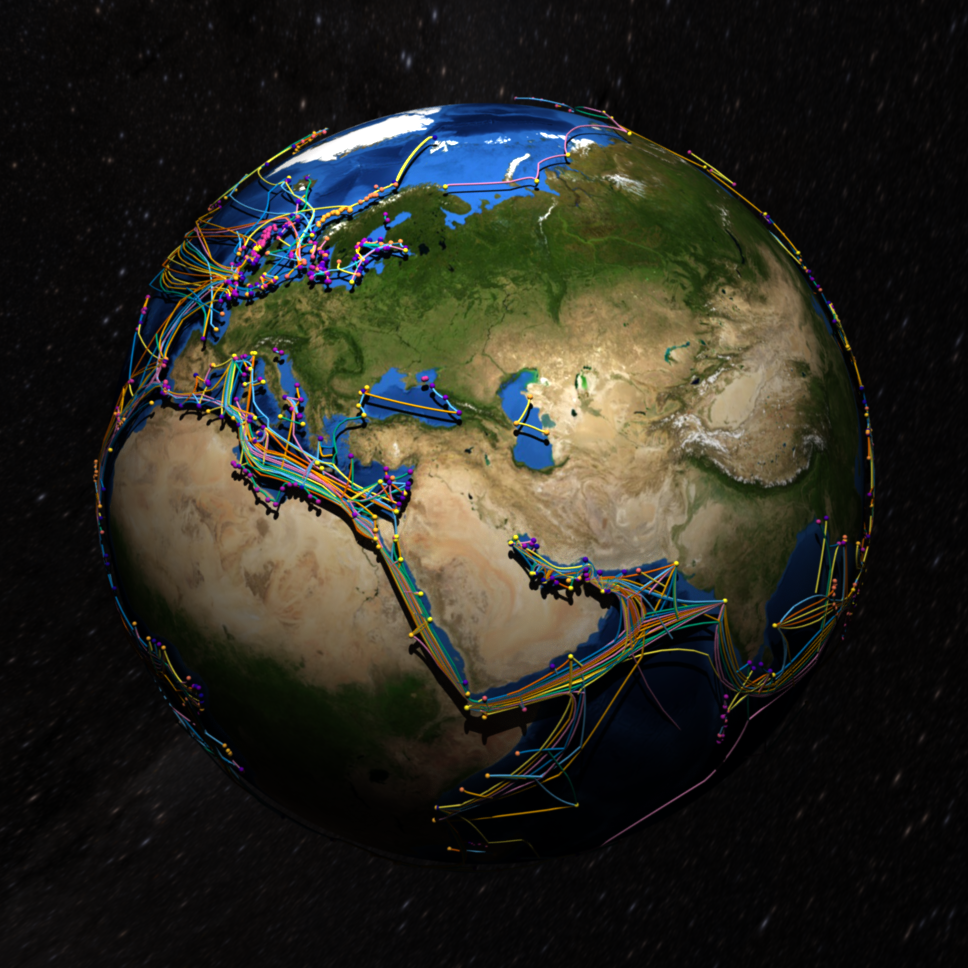
结束地球例子
# by Lazaro Alonso
# taken from: https://lazarusa.github.io/BeautifulMakie/GeoPlots/submarineCables3D/
using GeoMakie, Downloads
using GeoJSON, GeoInterface
using FileIO
using RPRMakie
# data from
# https://github.com/telegeography/www.submarinecablemap.com
urlPoints = "https://raw.githubusercontent.com/telegeography/www.submarinecablemap.com/master/web/public/api/v3/landing-point/landing-point-geo.json"
urlCables = "https://raw.githubusercontent.com/telegeography/www.submarinecablemap.com/master/web/public/api/v3/cable/cable-geo.json"

landPoints = Downloads.download(urlPoints, IOBuffer())
landCables = Downloads.download(urlCables, IOBuffer())

land_geoPoints = GeoJSON.read(seekstart(landPoints))
land_geoCables = GeoJSON.read(seekstart(landCables))

toPoints = GeoMakie.geo2basic(land_geoPoints)
feat = GeoInterface.features(land_geoCables)
toLines = GeoInterface.coordinates.(GeoInterface.geometry.(feat))

# broken lines at -180 and 180... they should
# be the same line and be in the same array.

#一些3D转换
函数toCartesian(lon,lat;r=1.02,cxyz=(0,0,0))
    x=cxyz[1]+r*cosd(lat)*cosd(lon)
    y=cxyz[2]+r*cosd(lat)*sind(lon)
    z=cxyz[3]+r*sind(lat)
    返回(x,y,z)
结束

toPoints3D=[Point3f([toCartesian(point[1],point[2])。..])对于点在toPoints]

splitLines3D=[]
对于i in1:长度(toLines)
    对于j in1:长度(toLines[i])
        ptsLines=toLines[i][j]
        tmp3D=[]
        对于k in1:长度(ptsLines)
            x,y=ptsLines[k]
            x,y,z=toCartesian(x,y)
            推!(tmp3D,[x,y,z])
        结束
        推!(splitLines3D,Point3f.(tmp3D))
    结束
结束

earth_img=load(Downloads.download("https://upload.wikimedia.org/wikipedia/commons/5/56/Blue_Marble_Next_Generation_%2B_topography_%2B_bathymetry.jpg"))
#实际情节!
RPRMakie.启动!(;迭代=100)
场景=with_theme(theme_dark())do
    fig=Figure(;size=(1000,1000))
    光辉=30
    lights=[EnvironmentLight(0.5,load(RPR.assetpath("starmap_4k.tif"))),
              PointLight(Vec3f(1,1,3),RGBf(radiance,radiance,radiance))]
    ax=LScene(图[1,1];show_axis=false,scenekw=(;lights=lights))
    n=1024÷4#2048
    θ=LinRange(0,pi,n)
    φ=LinRange(-pi,pi,2*n)
    xe=[cos(φ)*sin(θ)for θ in θ,φ in φ]
    ye=[sin(φ)*sin(θ)for θ in θ,φ in φ]
    ze=[cos(θ)for θ in θ,φ in φ]
    表面!(ax,xe,ye,ze;color=earth_img)
    meshscatter!(toPoints3D;color=1:长度(toPoints3D),markersize=0.005,colormap=:plasma)
    颜色=Makie。default_palettes。颜色[]
    C=迭代器。周期(颜色)
    foreach(((l,c),)->行!(ax,l;linewidth=2,color=c),zip(splitLines3D,c))
    斧头场景。camera_controls.眼位[]=Vec3f(1.5)
    返回ax。场景
结束

save("submarine_cables.png",场景)