Artery Support Package
|
Before you start, do the general preparation and setup from the article Running models on target hardware. It describes the general steps for launching models on the target hardware: environment preparation, connection, generation and assembly, as well as basic startup verification. |
This article describes the features of running models on Artery AT32 microcontrollers in the mode Target Hardware.
To work with Artery AT32 cards in the mode Target Hardware The block is being used EDM-Target-Artery. It provides code generation, firmware assembly and download, as well as running the model on a microcontroller.
Peripheral configuration (timers, USART, DMA, GPIO, ADC) is performed in the AT32 Workbench environment, the official Artery tool for project generation.
Parameters of the EDM-Target-Artery block
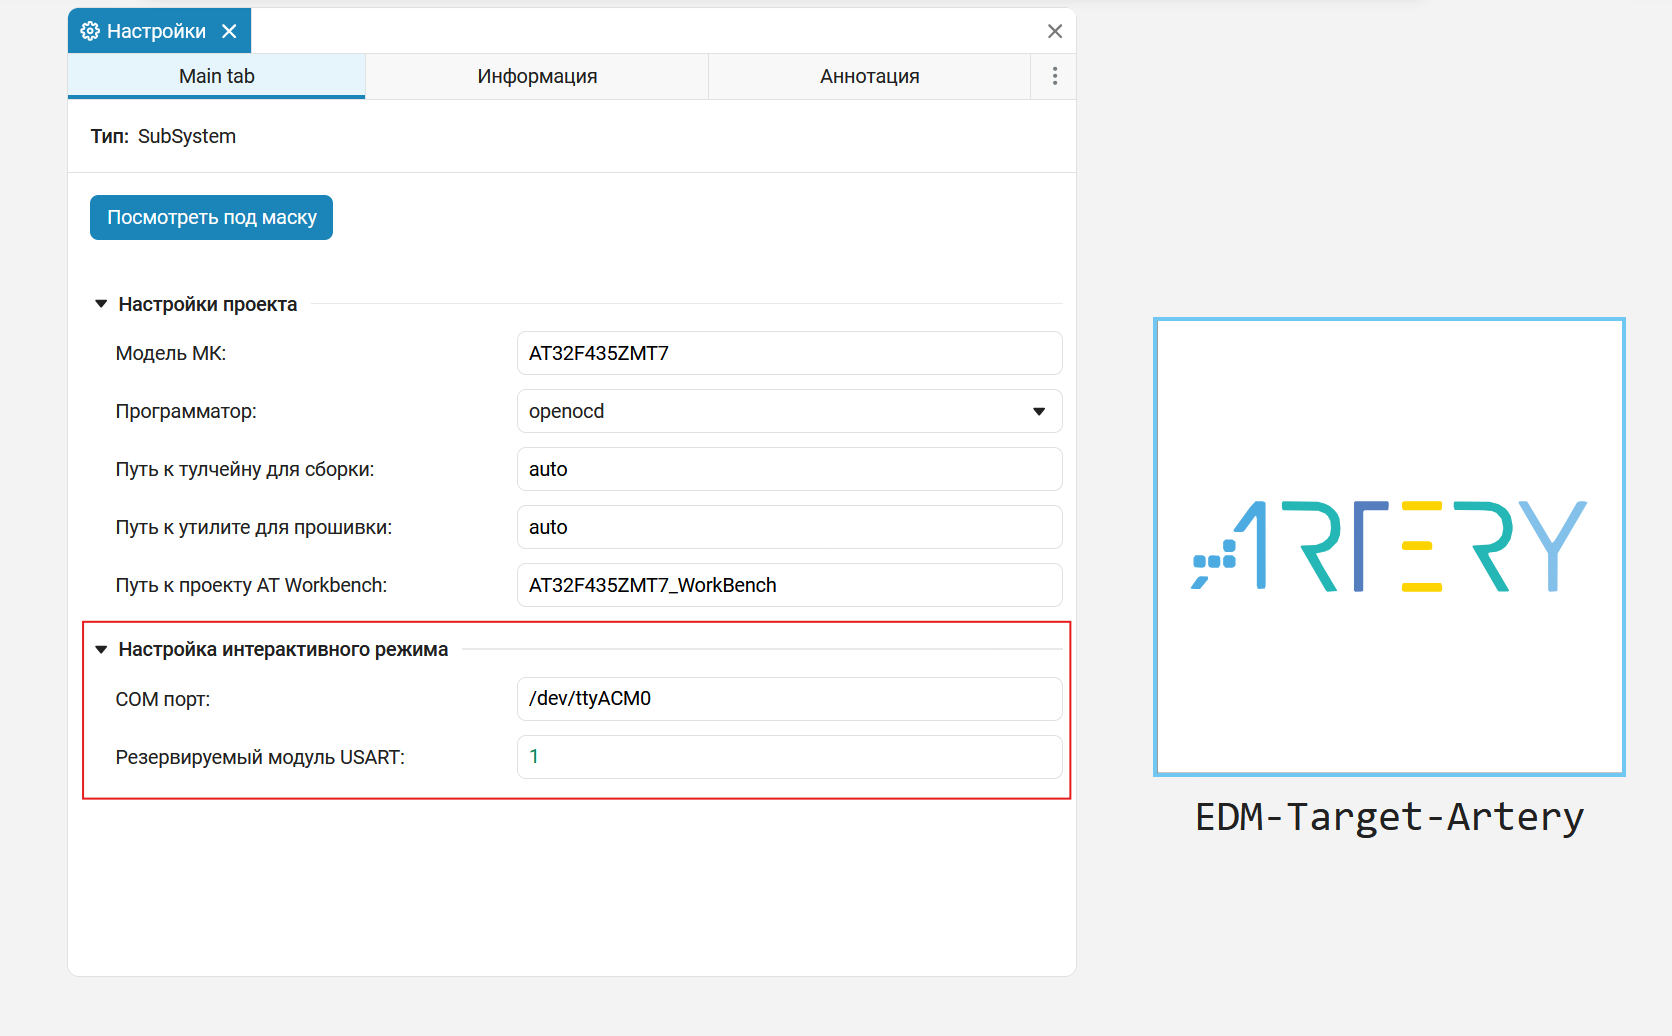
Block EDM-Target-Artery configures interaction with the microcontroller through the following parameters:
-
Модель МК: — the microcontroller model (for example,
AT32F435ZMT7). When specifyingautoIt is detected automatically from the AT32 Workbench project. -
Путь к проекту AT Workbench: — the full path to the folder of the generated AT32 Workbench project (contains
CMakeLists.txtand the file.ATWP). -
Путь к тулчейну для сборки: — full path to
arm-none-eabi-gcc. When specifyingautoThe search is performed automatically: first, by environment variables (ARM_NONE_EABI_PATH,ARM_GCC_TOOLCHAIN_PATH,GCC_ARM_NONE_EABI_PATH), then in the AT32 IDE paths, then inPATH. -
Программатор: — type of programmer:
openocdorat-link-console. -
Путь к утилите для прошивки: — full path to
ATLink_Console.exe(AT-Link Console) oropenocd.exe(OpenOCD). When specifyingautoThe search is performed automatically: first, by environment variables (ATLINK_CONSOLE_PATH,AT_LINK_CONSOLE_PATH), then in the AT32 IDE paths, then inPATH. -
COM порт: — serial port for interactive mode (for example,
COM3or/dev/ttyACM0). -
Резервируемый модуль USART: — the USART number used for the interactive mode. Must match the USART module (USART1–USART6, UART4–UART8) configured in AT32 Workbench.
Required Software
To work with Artery AT32, you need to install the following tools:
-
AT32 Workbench — for configuring the microcontroller peripherals and generating a project with the CMake build system. You can download it from official Artery website.
-
The compiler
arm-none-eabi-gcc— It is recommended to use the AT32 IDE version or install it separately. -
Programmer — OpenOCD with AT32 or AT-Link Console support.
It is allowed to work without the AT32 IDE. In this case, it must be installed separately.:
-
The compiler
arm-none-eabi-gcc. -
OpenOCD or AT-Link Console for firmware.
There are two ways to use utilities.:
-
Specifying utilities manually — specify the full path to the compiler and programmer in the block parameters EDM-Target-Artery.
-
Mode
auto— Engee it will search for utilities automatically. In this case, the environment variable is used.PATH, and utilities should be available through it.
Preparation Engee
Make sure that the hardware support package is installed and configured. Its installation is described in detail in the section Hardware connection.
If the support package is already installed, you can proceed to launch the client program and connect using the provided URL.
Preparation of the AT32 Workbench project
-
Install and configure AT32 Workbench.
-
Create a project for your microcontroller AT32:
-
Select the target microcontroller (for example,
AT32F435ZMT7). -
Set up the necessary peripherals.
-
-
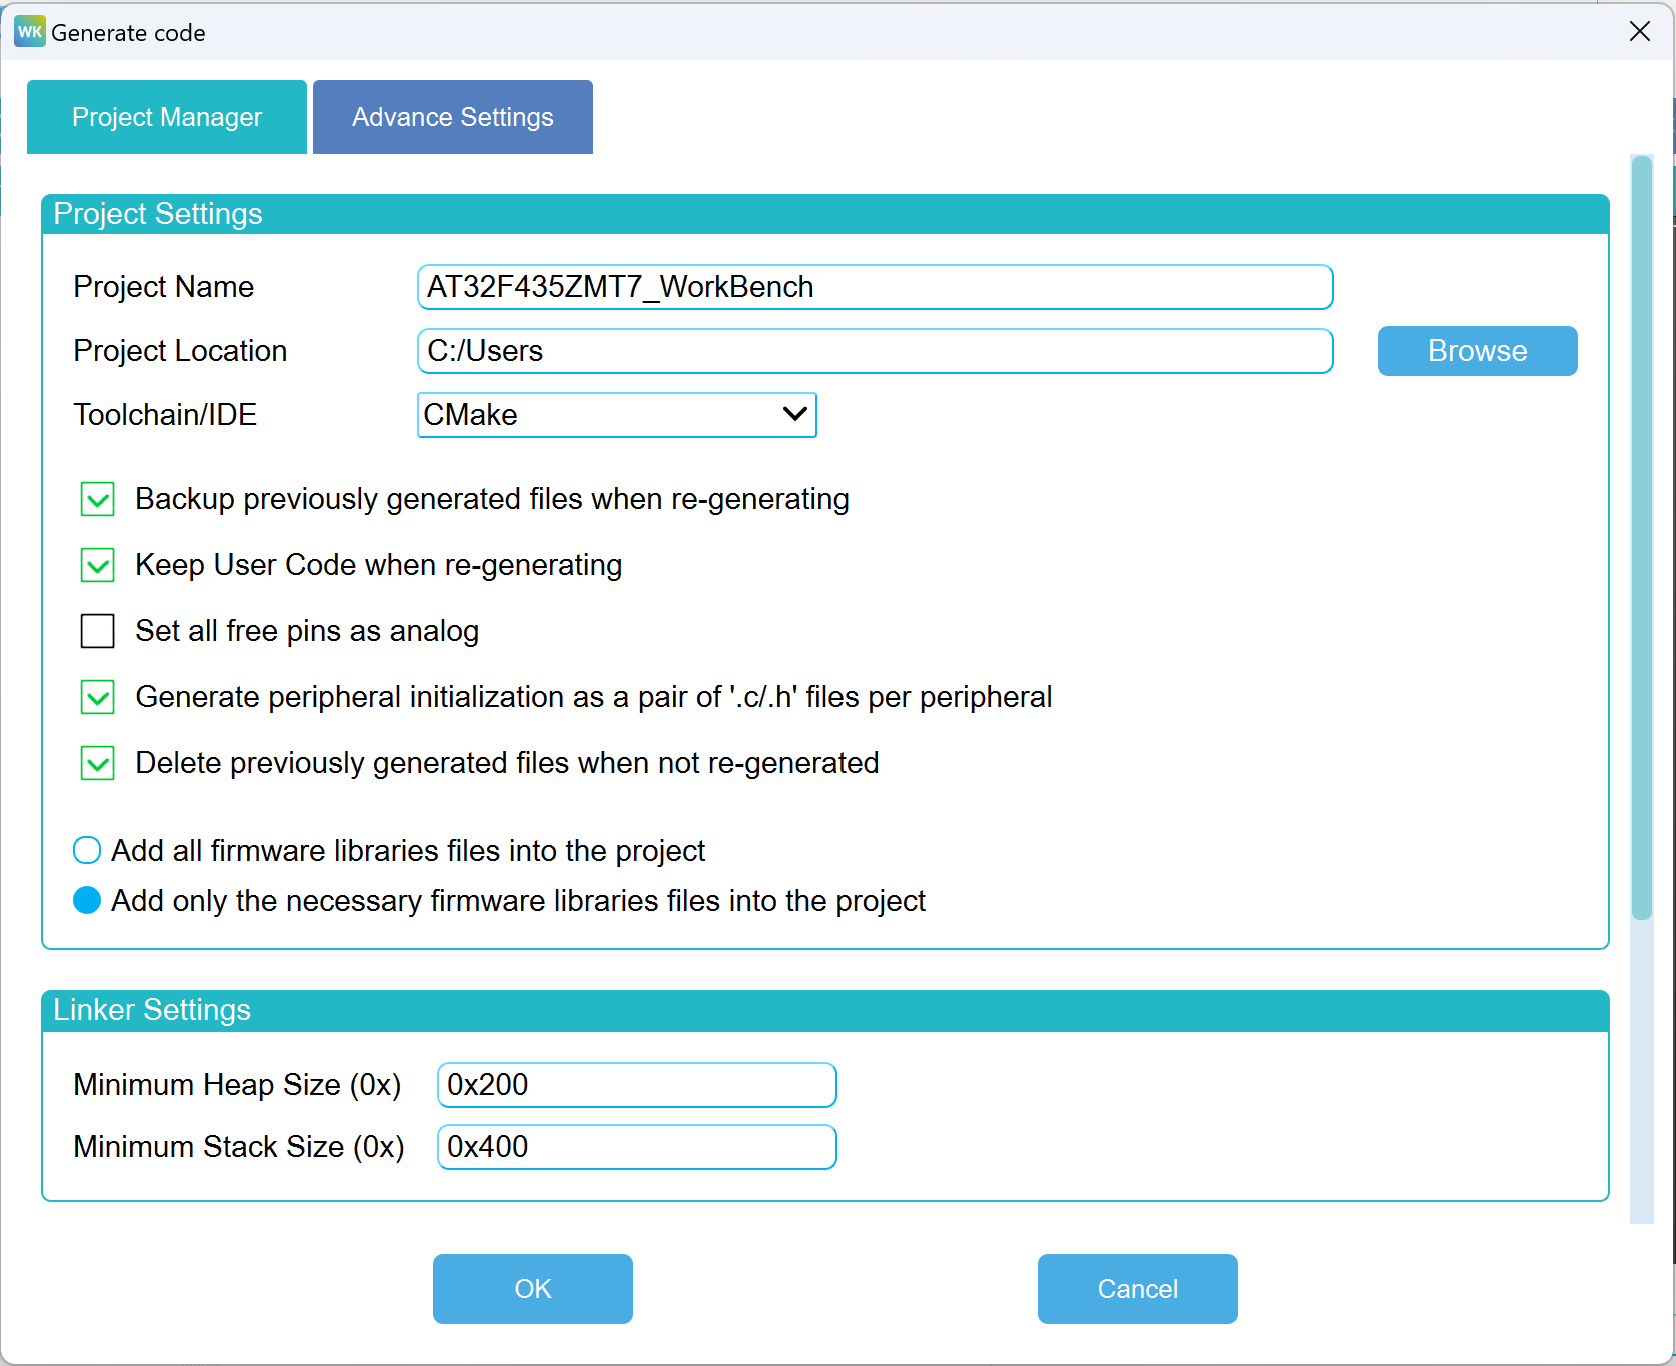
In the project settings, select the CMake build system and click Generate Code:
-
Save the project to a convenient directory. Make sure that there are files in the root of the project.:
-
CMakeLists.txt— the CMake build root file; -
<ProjectName>.ATWP— configuration file AT32 Workbench; -
cmake/at32_workbench/CMakeLists.txt— CMake toolchain file.
-
-
Make sure that
main.ccontains custom AT32 Workbench sections (added automatically during generation):/* add user code begin private includes */ /* add user code end private includes */ /* add user code begin 0 */ /* add user code end 0 */ /* add user code begin 2 */ /* add user code end 2 */ /* add user code begin 3 */ /* add user code end 3 */
Setting up and launching the model
-
Open the model Engee.
-
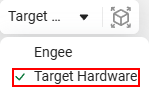
Click the target platform selection button and select Target Hardware:
-
Add a block EDM-Target-Artery from the library of blocks to the canvas Engee. If the block is missing, update the support package with the command:
engee.package.start("Engee-Device-Manager") -
Configure the block EDM-Target-Artery:
-
Модель МК: — specify the model of your MK or
autofor automatic detection; -
Путь к проекту AT Workbench: — specify the path to the project folder;
-
Путь к тулчейну для сборки: —
autoor the full path toarm-none-eabi-gcc; -
Путь к утилите для прошивки: —
autoor the full path to the programmer.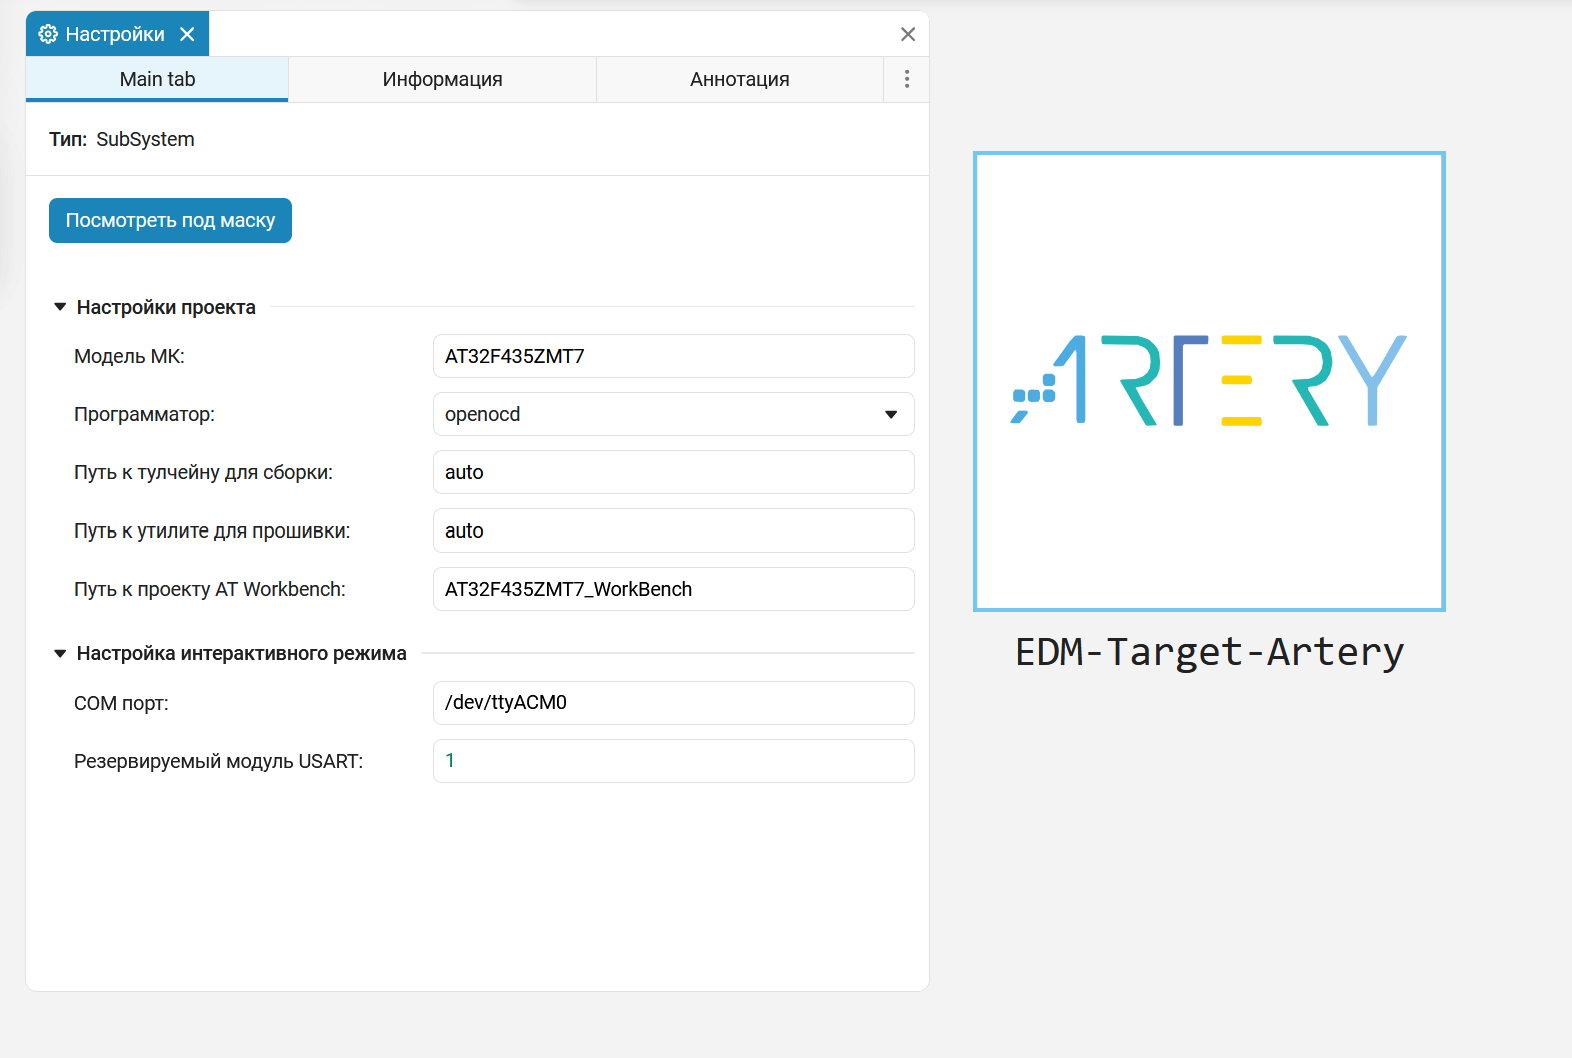
-
-
Select the model execution mode:
-
Run the model on hardware
 — interactive execution with control from Engee.
 -
Run in independent mode
 — offline execution without control from Engee.
-
-
Click the start button.
If the block EDM-Target-Artery not added to the model, an error will appear at startup: ErrorException("EDM-Target-Artery block not found. To start model in Target Hardware mode, the model must include an EDM-Target-Artery block.")
Interactive mode
Interactive mode uses a USART with DMA to communicate with Engee.
Model Execution Scheduler (timer) it is configured automatically. Engee He reserves a free timer, calculates the time limit and period, and adds a call. model_tick() — Manual timer setting in AT32 Workbench is not required.
-
In the AT32 Workbench, select the free USART module (USART1–USART6 or UART4–UART8). Turn it on:
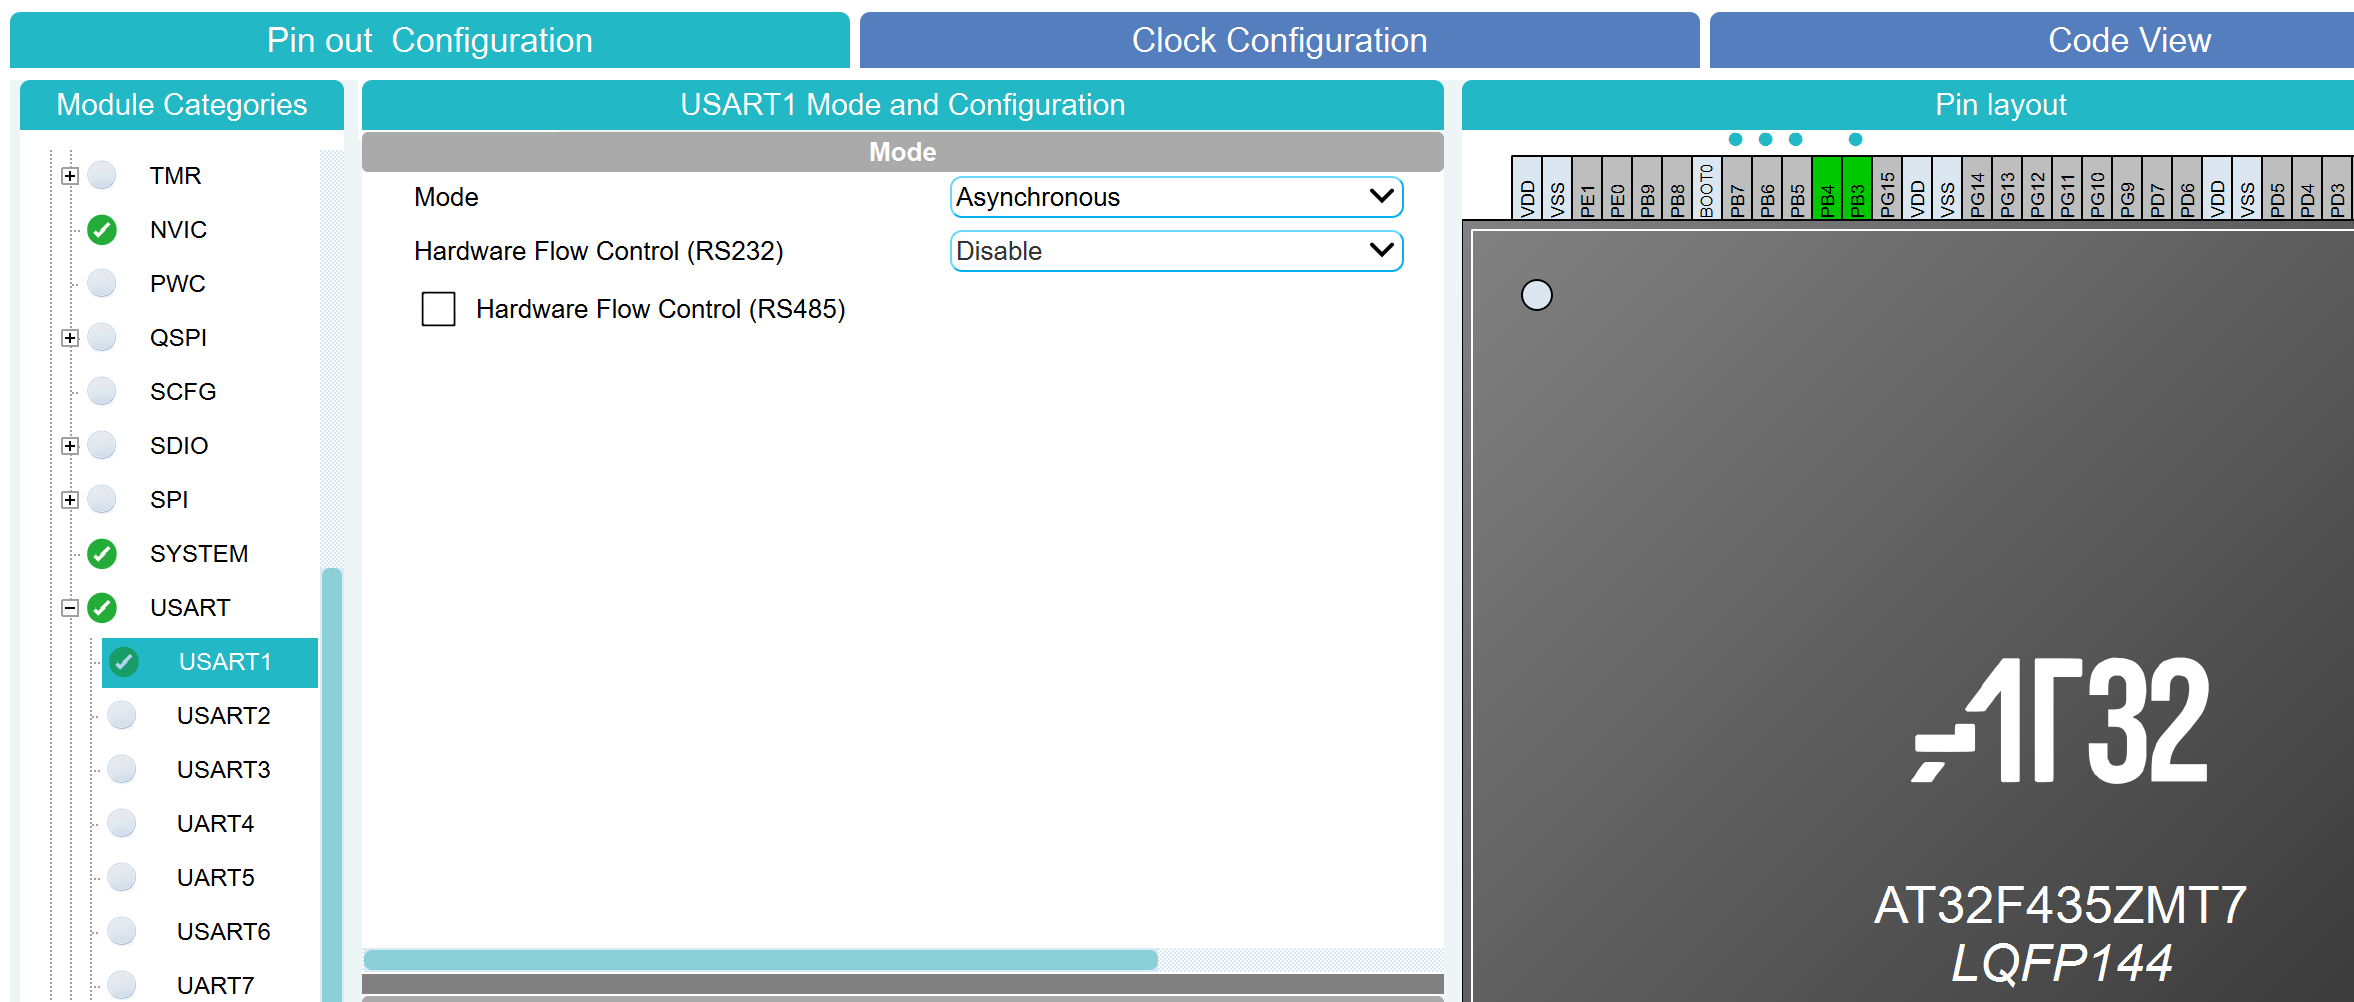
-
Configure the USART settings:
-
Mode —
Asynchronous; -
Baud Rate —
115200 Bit/s; -
Word Length —
8 Bits; -
Stop Bits —
1; -
Parity —
None.
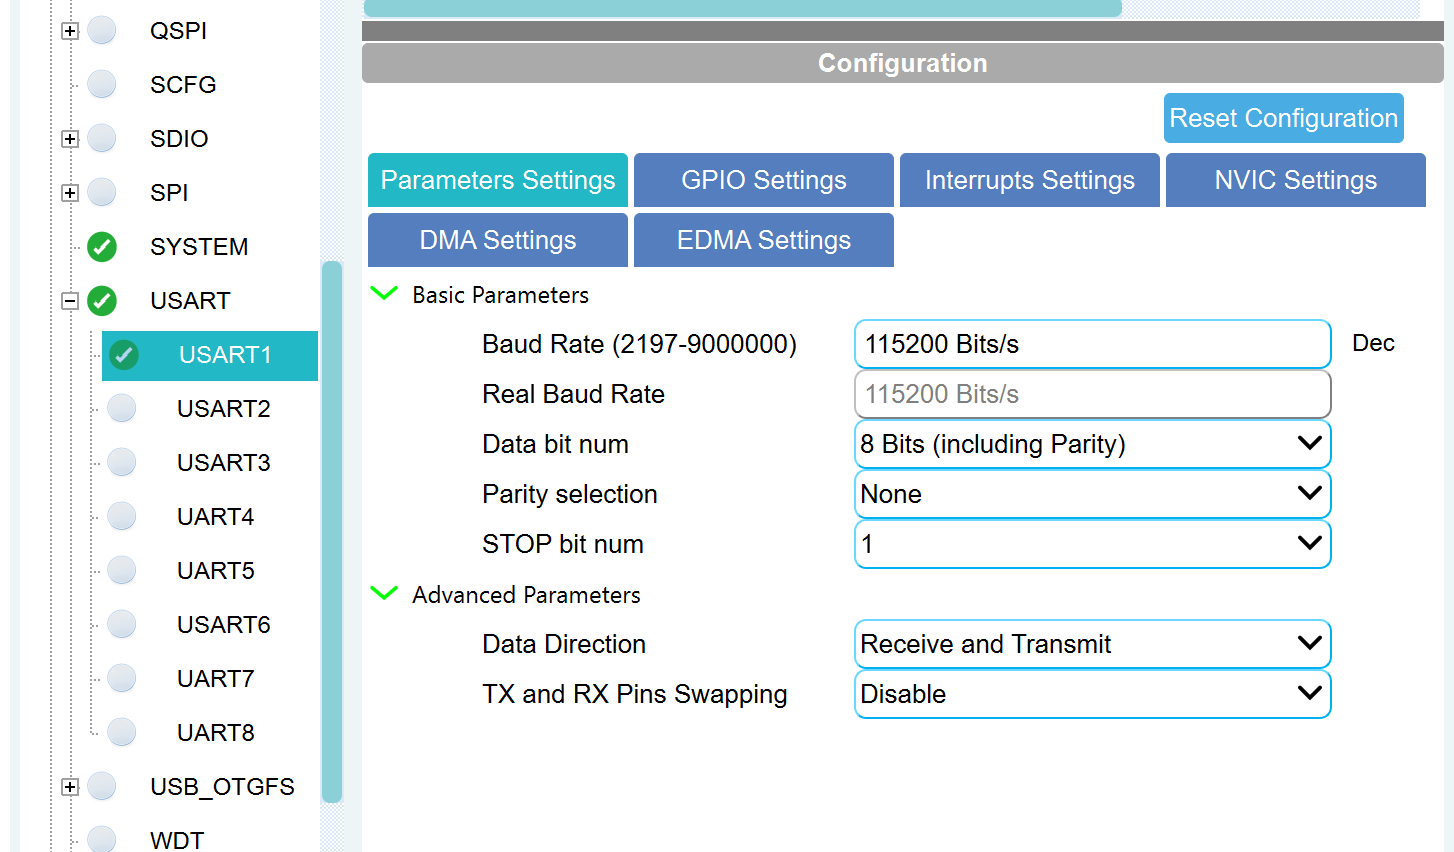
-
-
Enable DMA for the selected USART:
-
Go to the DMA tab.
-
Click Add and add DMA Request —
USARTx_RX, wherex— the number of the reserved USART module. -
In the Priority field, specify
High. In the DMA Request Settings, set Mode toCircular.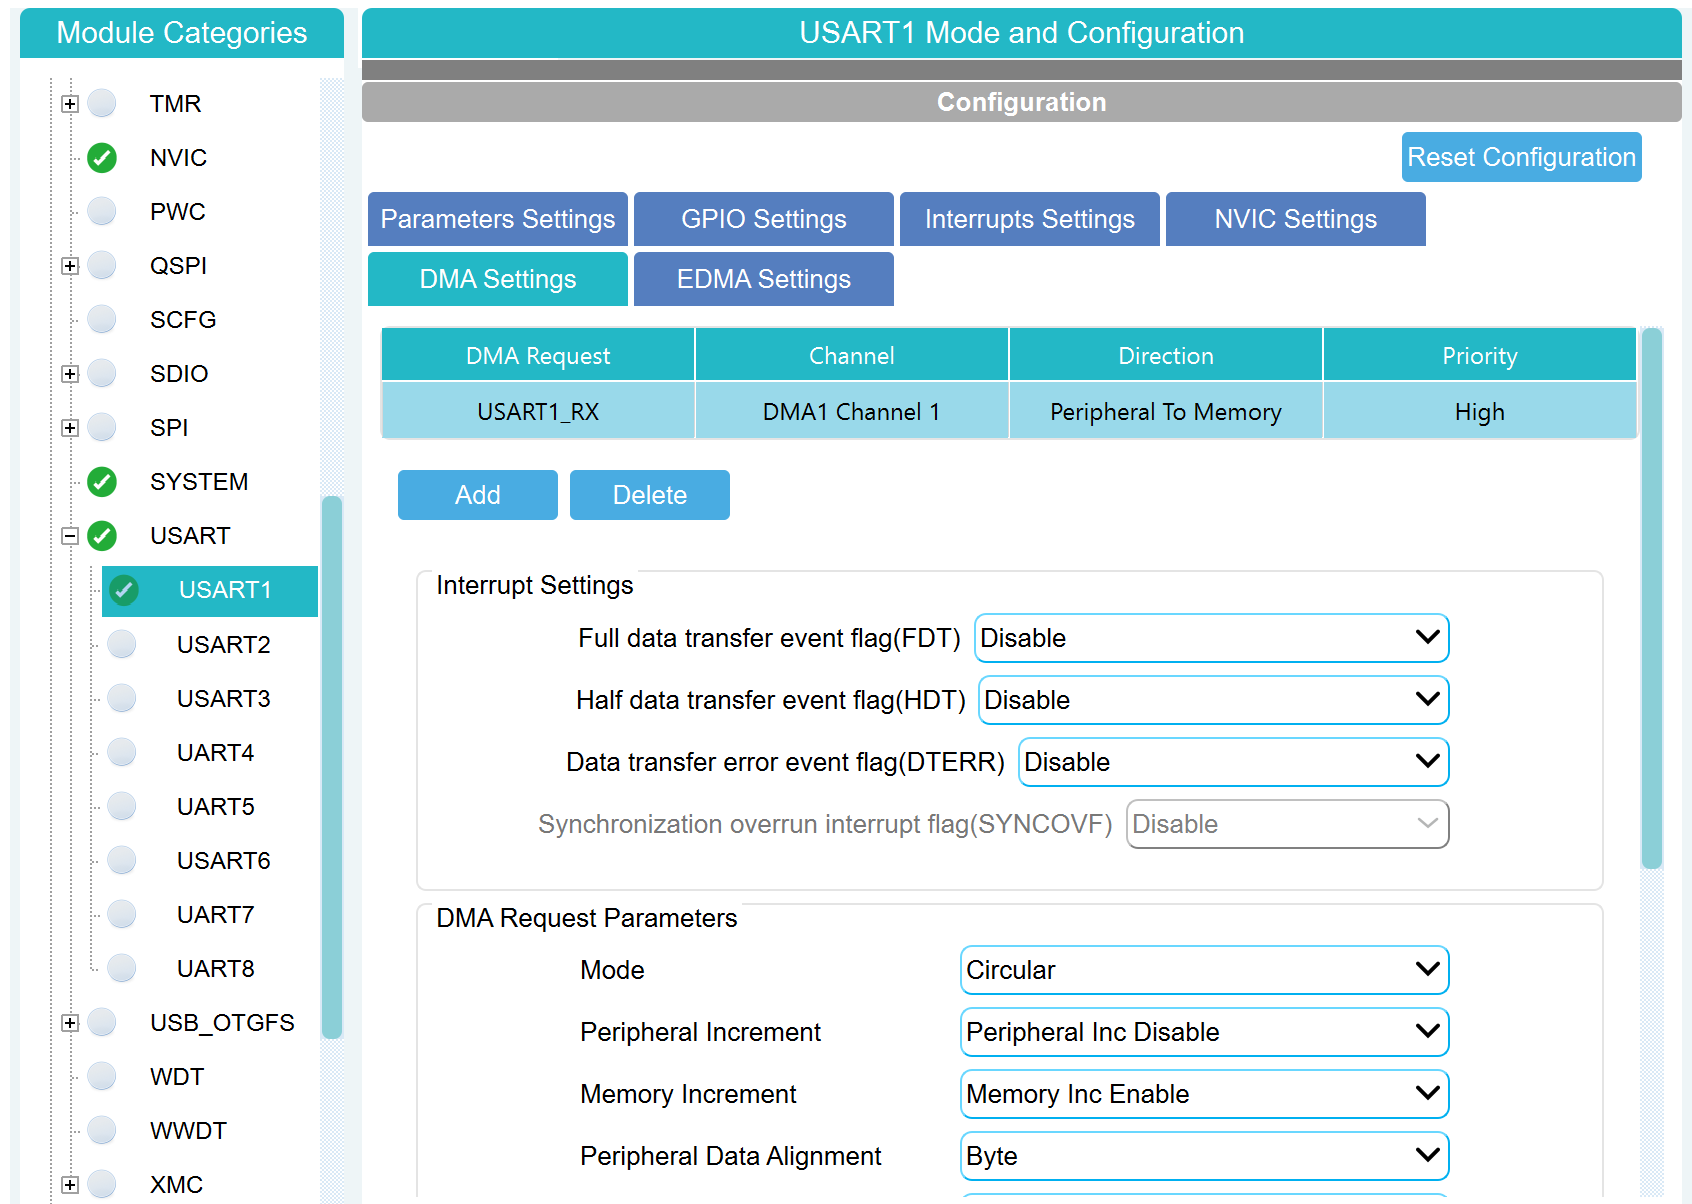
-
Add a second DMA Request —
USARTx_TX. In the Priority field, specifyHigh. In the DMA Request Settings, set Mode toNormal.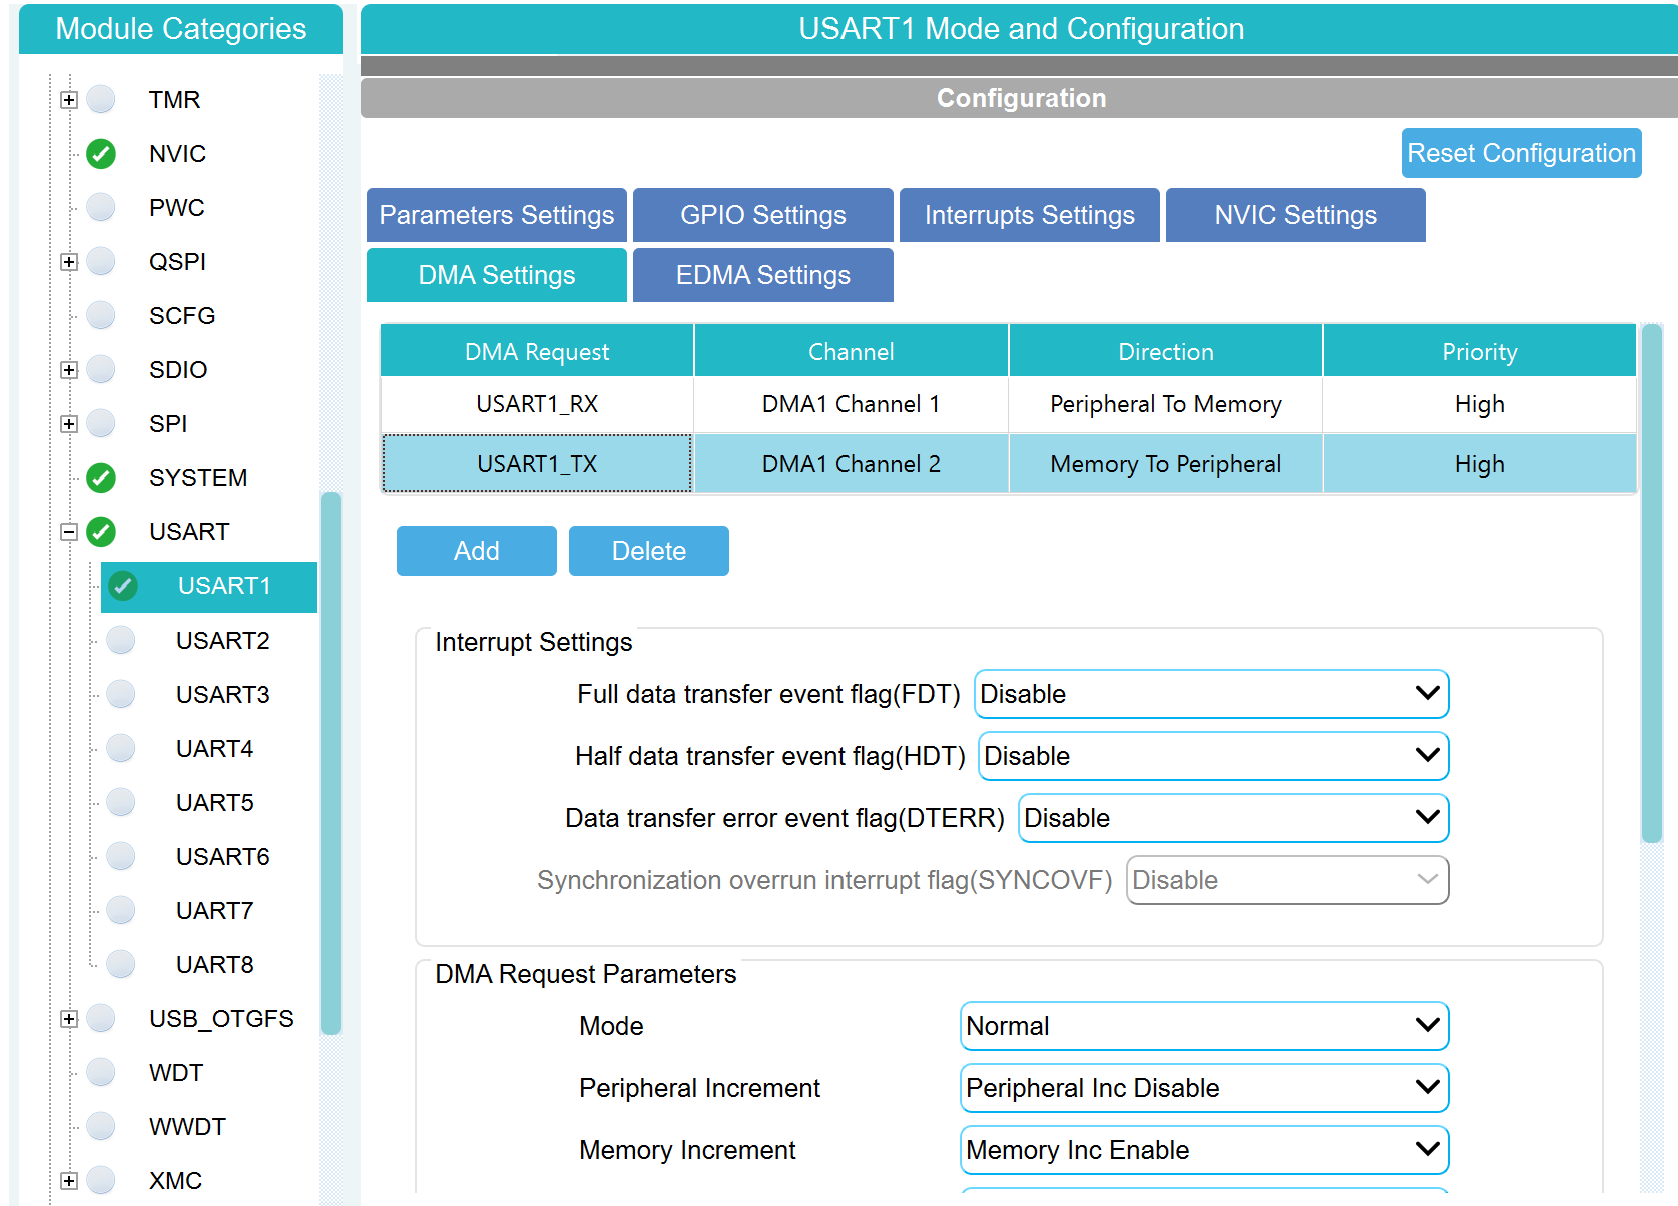
-
-
Generate the project again (Generate Code).
-
In the block parameters EDM-Target-Artery specify:
-
Redundant USART module — USART number (for example,
1for USART1); -
COM port is the device port.
-
Examples of COM ports:
-
Linux —
/dev/ttyACM0; -
Windows —
COM1.
Checking available ports:
-
Linux:
ls /dev | grep ttyACM; -
Windows: open «Device Manager» → «Ports (COM and LPT)» — the port number is specified in the device name (for example,
COM3).
Solving possible problems
Problems of tulchain detection
If an error appears stating that the compiler or programmer has not been found:
-
Specify the path manually in the block parameters EDM-Target-Artery Instead of
auto. -
Check that the utilities are available via a variable
PATH. -
Make sure that the AT32 IDE is installed (contains
arm-none-eabi-gccandATLink_Console.exe).
Assembly problems
-
Check that CMake is selected as the build system in AT32 Workbench.
-
Make sure that the root of the project has
CMakeLists.txt. -
Build errors are displayed in the interface of the client program with full output.
Firmware issues
-
Check the connection of the programmer (AT-Link or compatible).
-
Make sure that the microcontroller is powered and in debugging mode.
-
For OpenOCD, check for configuration files
interface/atlink.cfgandtarget/at32f435xx.cfg.