How to Enable Hardware Virtualization in Windows 10 and 11
|
Page in progress. |
What It Is and When You Need It
Hardware virtualization is a CPU feature (Intel VT-x or AMD-V/SVM) that allows you to run guest OSes[1] in virtualization applications (virtual machines, VMs), such as VMware Workstation/Player or Oracle VirtualBox.
If virtualization is disabled, you may not see 64-bit systems in the guest OS list and you can get compatibility errors (“VT-x/AMD-V is not available”, etc.).
Action Plan
-
Check whether virtualization is supported and whether it is enabled.
-
Enable virtualization in UEFI/BIOS (if it is disabled).
-
Configure Windows for VMware/VirtualBox (typically — disable Hyper-V and related features).
-
Recheck the status and start the VM.
Step 1. Check Virtualization Support and Status
The easiest way:
-
Open Task Manager (Ctrl+Alt+Del) → Performance tab → CPU → the Virtualization line:
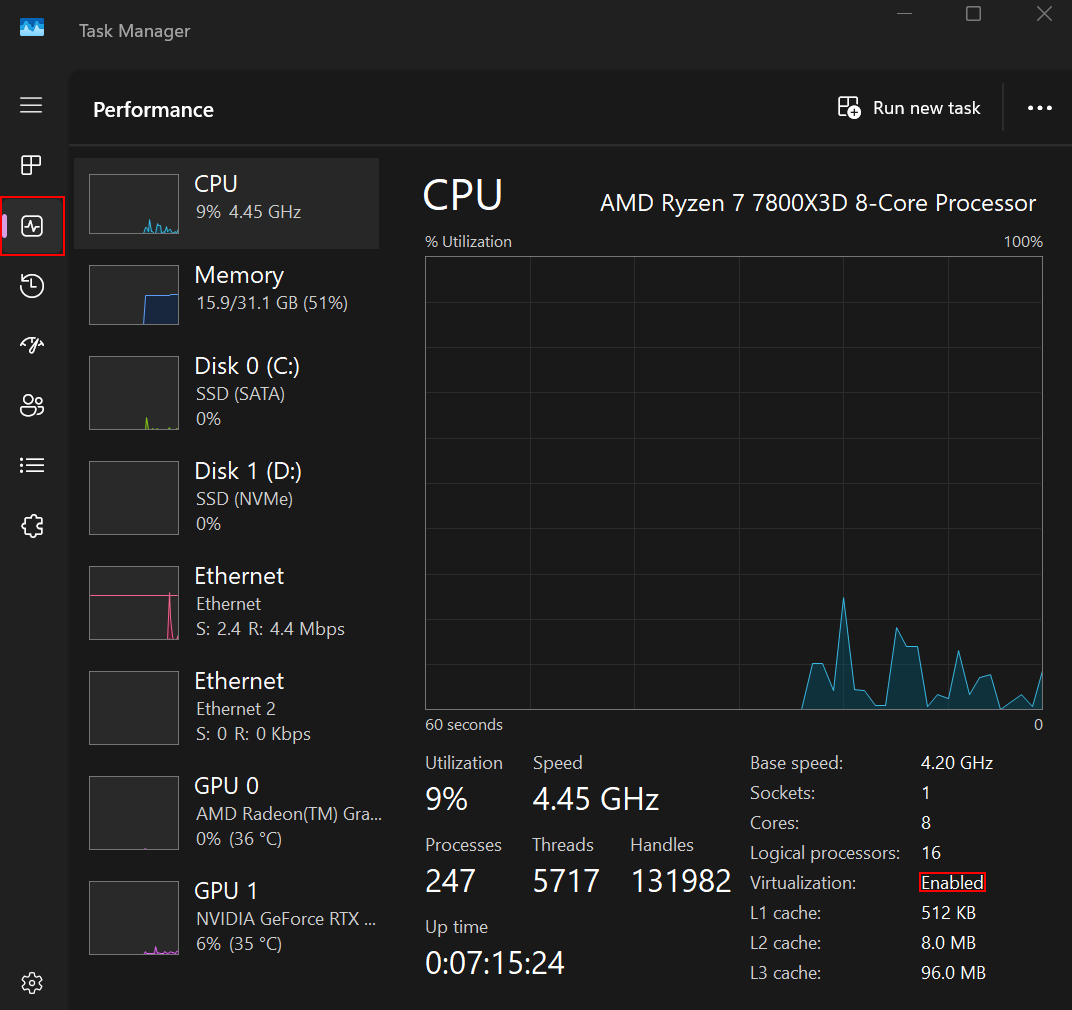
-
Enabled— hardware virtualization is enabled, and you are ready to work with VMs. -
Disabled— you need to enable hardware virtualization in UEFI/BIOS. -
No line — a rare case; verify your CPU model on the manufacturer website. In even rarer cases the issue can be caused by outdated Windows 10/11 updates—update the OS.
|
You can also check using vendor utilities:
|
Step 2. Enable Virtualization in UEFI/BIOS
You can enter UEFI/BIOS like this:
-
Windows 11: Settings → System → Recovery → Advanced startup → Restart now → Troubleshoot → Advanced options → UEFI Firmware Settings → Restart.
-
Windows 10: Settings → Update & Security → Recovery → Advanced startup → Restart now → then continue as above.
| If there is no UEFI firmware settings item, enter BIOS using a hotkey during startup/restart (Del, F2, F10, F12 depending on your motherboard vendor). |
Enable the required option:
-
For Intel: Intel Virtualization Technology (VT-x) → Enabled.
-
For AMD: SVM Mode (sometimes — AMD SVM / AMD-V) → Enabled.
Save the changes (Save & Exit) and let the computer reboot.
Step 3. Configure Windows for VMware/VirtualBox
VMware/VirtualBox usually work better when Hyper-V and related Windows features are disabled.
-
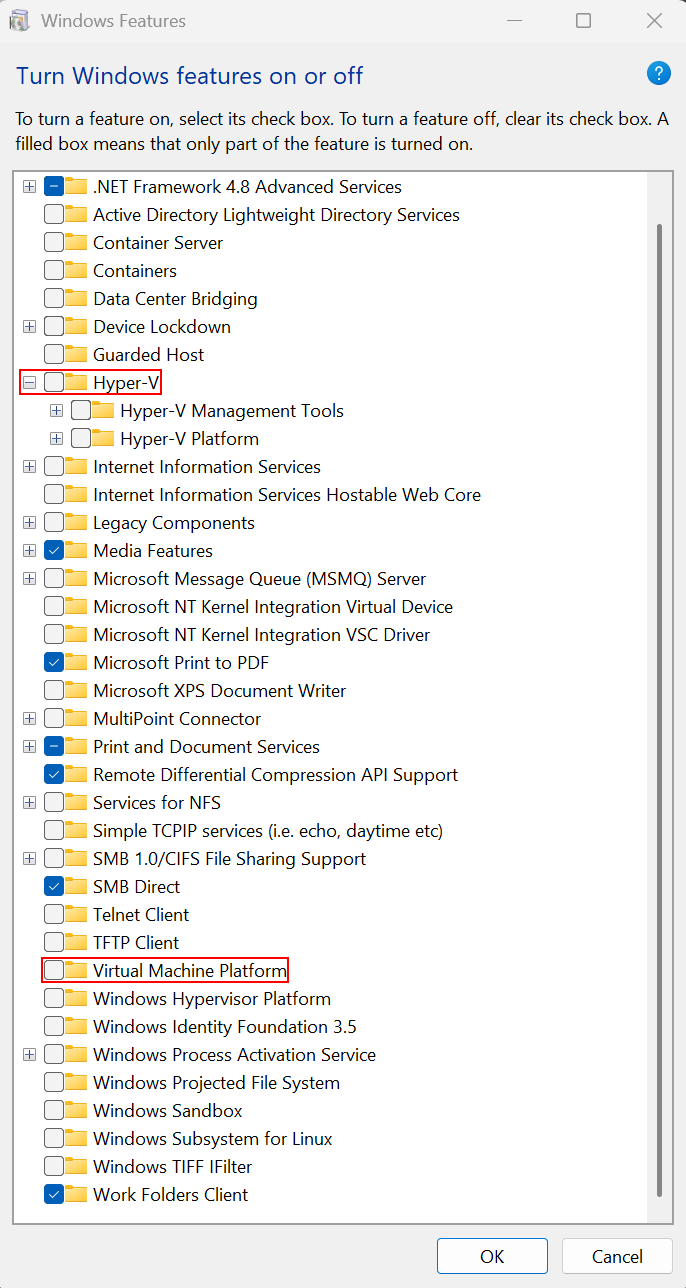
Open Windows Features:
Control Panel → Programs and Features → Turn Windows features on or off. On Windows 11, you can also access it via Settings → Apps → Optional features → More Windows features. -
Clear the checkboxes for:
-
Hyper-V
-
Virtual Machine Platform
-
-
Click OK and reboot the PC.
-
Check Core isolation[2]:
Windows Security → Device security → Core isolation → Memory integrity → set the toggle to Off → reboot the PC.
| Some VMware/VirtualBox versions can work with Hyper-V enabled, but they are often slower or may fail with errors. If you see “VT-x/AMD-V is not available”, “No 64-bit guest”, or error codes — disable the items above and reboot the PC. |
Step 4. Recheck the Result
-
Task Manager → Performance → CPU — Virtualization should show
Enabled. -
In VirtualBox, 64-bit guest OS options should appear (for example, Ubuntu (64-bit)).
-
In VMware Workstation/Player, starting a 64-bit guest OS should not show VT-x/AMD-V warnings.
If It Didn’t Work
-
Virtualization: Disabled — return to UEFI/BIOS and confirm the option is actually set to Enabled, then save (Save & Exit).
-
No such option in UEFI/BIOS — update the firmware or check your PC/motherboard model (sometimes the option is hidden).
-
Errors “VT-x/AMD-V is not available”/“No 64-bit guest” — disable Hyper-V, Windows Hypervisor Platform, Virtual Machine Platform, and Memory integrity again, then reboot.
-
Very old CPU — it may not support VT-x/AMD-V.