Arduino Support Package: configurable parameters
We continue to master Arduino programming without diving into the code with the Engee support package. In this example, let's dive into the interactive execution mode of the model in more detail: we will not only receive data from the Arduino, but also send it. We will also study in detail the debugging and information messages of the terminal.
Introduction
In the previous example we have mastered Arduino connection and operation in independent and interactive Engee modes. The capabilities of the latter are broader and more interesting in terms of interaction between Engee and a real-time application on Target Hardware, which will be discussed in this example.
For example, we changed the target device: instead of the Arduino Uno, we use the Arduino Mega (for variety and to demonstrate support for various board modifications).
The example model
The model of the example relative to the standard Blink is slightly modified. We are comparing two signals.:
SIN- sinusoidal with a frequency of 2 Hz from the Sine Wave unit with adjustable amplitude and offset,REF- constant from the Constant block with a configurable value.
The result of the comparison is converted to the type Float64 and as a signal LED it is transmitted to the digital PIN of the built-in LED.
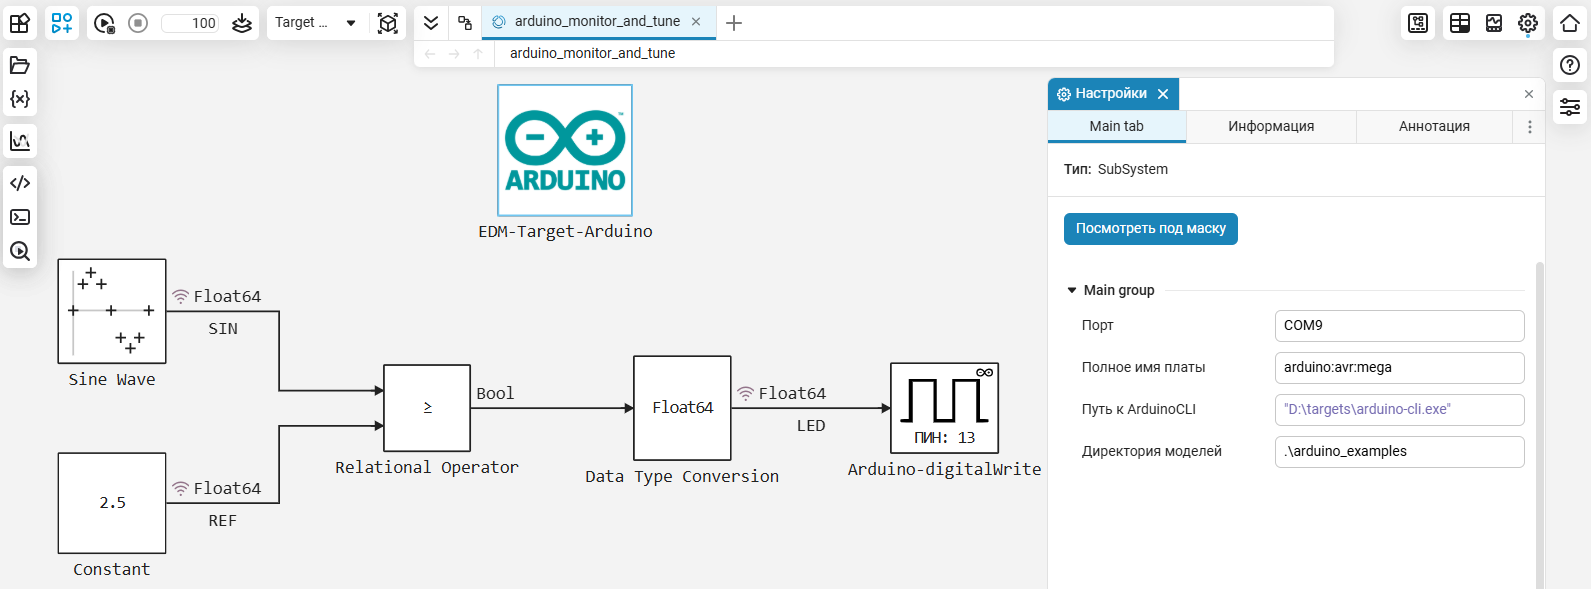
Since we are using a different controller, it is necessary to change the port value in the EDM-Target-Arduino block (in the case of this example - COM9) and the name of the board (arduino:avr:mega for Arduino Mega2560). We will leave the tulchain paths and models unchanged.
Preparation
To get more information and opportunities, we'll do a little preparation.:
Terminal
To a greater extent, this step is relevant for Windows users - you need to launch the Engee client application.Integration via the terminal with the command:
engee-device-manager.exe -d
Naturally, the terminal must be opened in the program folder, or first go to it.
To run, use a UNIX-like command-line shell, such as Cygwin or Git Bash. Windows PowerShell, by default, "unlocks" the process and will not output the messages we are interested in.
After launching the client program and establishing a connection, you can start the interactive execution mode of the model, after which we will see the output of debugging messages in the terminal.:
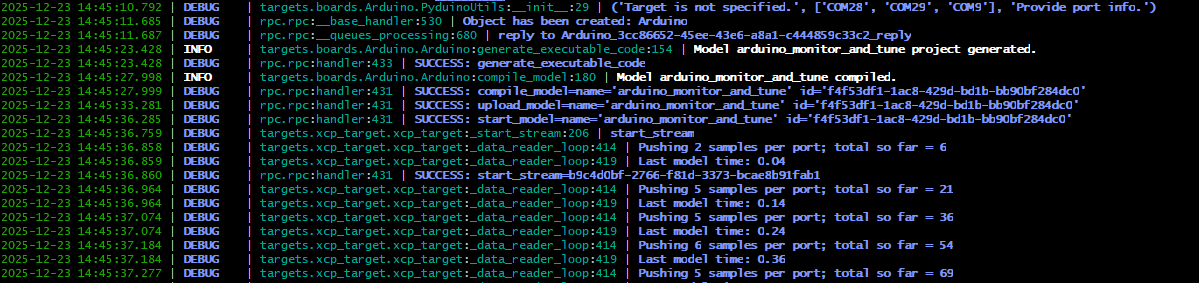
Let's analyze some of the messages in the terminal output:
-
DEBUG | rpc.rpc:__queues_processing:680 | reply to Arduino_3cc86652-45ee-43e6-a8a1-c444859c33c2_reply
An Arduino object has been created on the client side.
-
INFO | targets.boards.Arduino.Arduino:generate_executable_code:154 | Model arduino_monitor_and_tune project generated.
-
DEBUG | rpc.rpc:handler:433 | SUCCESS: generate_executable_code
-
INFO | targets.boards.Arduino.Arduino:compile_model:180 | Model arduino_monitor_and_tune compiled.
-
DEBUG | rpc.rpc:handler:431 | SUCCESS: compile_model=name='arduino_monitor_and_tune' id='f4f53df1-1ac8-429d-bd1b-bb90bf284dc0'
-
DEBUG | rpc.rpc:handler:431 | SUCCESS: upload_model=name='arduino_monitor_and_tune' id='f4f53df1-1ac8-429d-bd1b-bb90bf284dc0'
-
DEBUG | rpc.rpc:handler:431 | SUCCESS: start_model=name='arduino_monitor_and_tune' id='f4f53df1-1ac8-429d-bd1b-bb90bf284dc0'
The model project has been created, executable code has been generated, the model has been compiled, loaded, and the real-time application is running.
-
DEBUG | targets.xcp_target.xcp_target:_start_stream:206 | start_stream
Starting data transfer to Engee
-
DEBUG | targets.xcp_target.xcp_target:_data_reader_loop:414 | Pushing 2 samples per port; total so far = 6
-
DEBUG | targets.xcp_target.xcp_target:_data_reader_loop:419 | Last model time: 0.04
Buffered data was sent in 2 simulation steps, a total of 6 values were sent, the model calculation step is 0.04 s
-
DEBUG | rpc.rpc:handler:431 | SUCCESS: start_stream=b9c4d0bf-2766-f81d-3373-bcae8b91fab1
Interactive mode is running in Engee
-
DEBUG | targets.xcp_target.xcp_target:_data_reader_loop:414 | Pushing 5 samples per port; total so far = 21
-
DEBUG | targets.xcp_target.xcp_target:_data_reader_loop:419 | Last model time: 0.14
Buffered data was sent in 5 simulation steps, a total of 21 values have been sent since the start of transmission, the current model calculation step is 0.14 s
In the line
name='arduino_monitor_and_tune' id='f4f53df1-1ac8-429d-bd1b-bb90bf284dc0'the name and ID of the current model are specified. By this ID in the folder/user/codegen_target/f4f53df1-1ac8-429d-bd1b-bb90bf284dc0you can find the results of model code generation - C and codeinfo files.json
readdir("/user/codegen_target/f4f53df1-1ac8-429d-bd1b-bb90bf284dc0")
Right now, the real-time application sends data to Engee for visualization, and as we know, you can control the execution of the application from Engee.
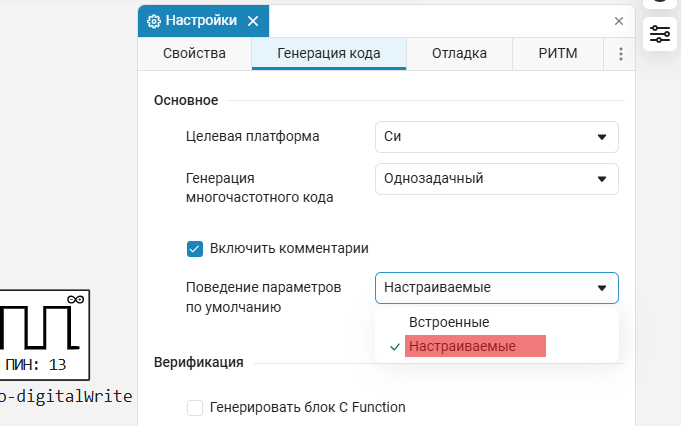
In addition, we can change the model parameters on the fly in the Engee model. But first you need to do them. "настраиваемыми".
Configurable parameters
Go to the "Code generation" tab of the model, and change the behavior of the parameters.
Now, after launching the model, we will see a new file with configurable parameters in the folder with the code generation results. Let's read it to find out the parameters that can be changed on the fly.:
;cat /user/codegen_target/f4f53df1-1ac8-429d-bd1b-bb90bf284dc0/arduino_monitor_and_tune_data.c
Built-in parameters
If you do not change the behavior of the model parameters, then when editing the values in the message window of the client program and the terminal, you can see error messages about missing parameters. At the same time, changes will occur in the Engee model, but not in the real-time application.


If we still remember to change the behavior of the parameters, there will be no errors, and the Arduino model and application will respond identically to parameter changes.
Changing parameters on the fly
Below you can see how it works.:
The full terminal output for this example is written to a file terminal.txt for familiarization.
In addition to the debug messages that have already been disassembled, you can see a new type of message in the terminal.:
Terminal Messages
-
DEBUG | rpc.rpc:handler:431 | SUCCESS: change_param=['b66d92a7-374b-47d6-a220-15b648840886', 'Value', 1]
The Value parameter has been changed to "1"
-
DEBUG | rpc.rpc:handler:431 | SUCCESS: change_param=['dfbca8b4-535b-4ec5-8d15-c0deea70a7cf', 'Amplitude', 1.5]
The Amplitude parameter has been changed to "1.5"
The first value in the vector change_param - this is the block ID. It can also be easily found in the generated codeinfo.json for the corresponding configurable parameters:
filename = joinpath("/user/codegen_target/f4f53df1-1ac8-429d-bd1b-bb90bf284dc0/","codeinfo.json")
(start_line, end_line) = 30,91

open(filename, "r") do file
    for (i, line) in enumerate(eachline(file))
        if i > end_line
            break
        elseif i >= start_line
            println(line)
        end
    end
end
Conclusion
Using a simple example, we got acquainted with the advantages of the interactive model execution mode on Target Hardware for the Arduino support package. We figured out how to analyze the data exchange process in this mode using the terminal, as well as how to change model parameters on the fly and confirm such changes.