Working with variables in Engee
To create a new variable, enter a name (the name of the variable) in command prompt  / script editor
 ![]() and the assignment operator = (equal sign) assign the desired value.
and the assignment operator = (equal sign) assign the desired value.
Variables in Engee can be set in different ways. Let’s look at the main assignment methods based on the following code and three variables — a, b, c:
a = 1 # Simple assignment
a::Float64 = 1.0 # Assignment with explicit data type indication
b = 1 + 2 # Assignment through evaluation of an expression
c = b = 5 # Multiple assignment
a,b,c = (10,20,30) # Unpacking the tuple
As a result of executing the code, we can get the following:
-
Variable
athe value is assigned1. This is the simplest assignment of a value to a variable.; -
Variable
athe value is assigned1, but with explicit indication of the Float64 (floating point) data type; Now its valid value —1.0; -
Variable b is assigned the result of the expression
1 + 2That is ,3; -
Meaning
5assigned to variables b and c; -
Values from the tuple
(10, 20, 30)they are decompressed and assigned to variables a, b, and c, respectively.;
Note that variables in Engee can be scalar, vector, and matrix.:
-
Scalar — has a single data value. It is set using variables in the form of integers and real numbers, logical values, and character strings. For example:
v = 1 # Integer, Int64 data type v = 1.0 # Real number, Float64 data type v = true # Boolean value, data type Bool v = "a" # Character string, data type String -
A vector is an ordered collection of elements that can be represented as a one—dimensional array. It is set using variables that contain integers or real numbers, boolean values, or character strings. For example:
v = [1, 2, 3] # Vector of integers, data type Vector{Int64} v = [1.0, 2.0, 3.0] # Vector of real numbers, data type Vector{Float64} v = [true, false] # Vector of logical values, data type Vector{Bool} v = ["a", "b", "with"] # Vector of character strings, data type Vector{String} -
Matrix is a two—dimensional data array consisting of rows and columns. A matrix can be used to represent multiple variables simultaneously. Each element of the matrix can be a scalar value, such as an integer, a real number, a boolean value, or a character string. For example:
v = [1 2 3] # Matrix of integers, data type Matrix{Int64}
v = [1.0 2.0 3.0] # Matrix of real numbers, data type Matrix{Float64}
v = [true false] # Matrix of logical values, data type Matrix{Bool}
v = ["a" "b" "with"] # The matrix of character strings, the data type Matrix{String}
v = ([1 2 3; 4 5 6; 7 8 9]) # Multiline matrix, data type Matrix{Int64}
To create arrays with a dimension greater than three, you can use the value undef, which indicates that the array has not been initialized. The elements of such an array can contain arbitrary data. Let’s choose one of the two structures to create an array.:
Array{T}(undef, dims)
Array{T,N}(undef, dims)
where:
-
T— the data type of the array. -
N— the dimension of the array. It can be set explicitly or it can be determined by length and quantity.dims. If specified explicitly, it must match the length and quantity.dims. -
dims— a tuple or a series of integer arguments corresponding to the length in each dimension.
For example:
A = Array{Float64, 3}(undef, 2, 3, 4)

# or

A = Array{Float64}(undef, 2, 3, 4) # We get a three-dimensional array with the dimension 2*3*4 , the data type is Float64, the dimension is set automatically
The output of the array creation result
2×3×4 Array{Float64, 3}:
[:, :, 1] =
6.94241e-310  6.94267e-310  6.94267e-310
6.94272e-310  6.94267e-310  6.94267e-310

[:, :, 2] =
6.94267e-310  6.94267e-310  6.94267e-310
6.94267e-310  6.94267e-310  6.94267e-310

[:, :, 3] =
6.94267e-310  6.94267e-310  6.94267e-310
6.94267e-310  6.94267e-310  6.94267e-310

[:, :, 4] =
6.94267e-310  6.94267e-310  6.94267e-310
6.94267e-310 6.94267e-310 6.94267e-310Typing variables
Engee supports explicit and implicit variable typing, which means that the data type of a variable can be explicitly specified (forcibly assigned) or determined based on the content during program execution. The main types of data include:
-
Integer — represents integers, for example
1,100,−1. -
Float — represents real numbers (with floating point), for example
1.0,−3.14. -
String — represents text enclosed in quotation marks, for example
"Hello, world!". -
Array — represents an ordered set of elements, for example,
[1, 2, 3].
Consider explicitly specifying the data type of variables in the following example:
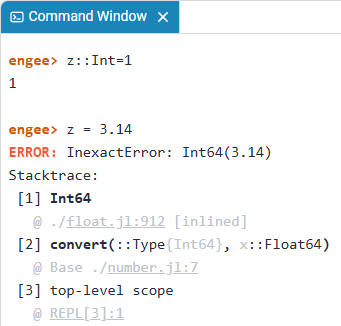
Here for the variable z the Int64 data type was explicitly specified, which contains only integers. Attempt to assign a variable z a real number 3.14 (corresponding to the Float64 data type`) caused an error (InexactError: Int64).
|
An attempt to assign an inappropriate data type to a variable results in an error and the creation of a variable. |

Tuples
Tuples in Engee are an ordered and immutable data structure. Tuples are created using parentheses ( ) and commas.
Tuples are described using a parameterized data type. MyType{ParamType1, ParamType2, ParamType3, …} and represent the data type of the elements in a direct sequence. However, the tuple elements can have different data types. For example, a tuple can contain an integer, a real number, and quoted text at the same time. Consider such a tuple:
tuple = (1, 3.14, "Hello, world!")In this case, the tuple has the data type Tuple(Int64, Float64, String).
Tuples can be regular or named:
-
A regular tuple is an ordered and immutable data structure. Each element of a regular tuple can be of any data type. Its elements are arranged in a certain order. The elements are accessed through their indexes. Consider such a tuple using the example:
x = (1, 3.14, "Hello, world!")
x[3]
In the example, the variable
xcontains three values —1,3.14and"Hello, world!". Ordinal indexes correspond to these values.[1],[2]and[3]accordingly. Using a variablexcontaining the values of a regular tuple and index[3], got a specific variable value —"Hello, World!", rather than the entire tuple.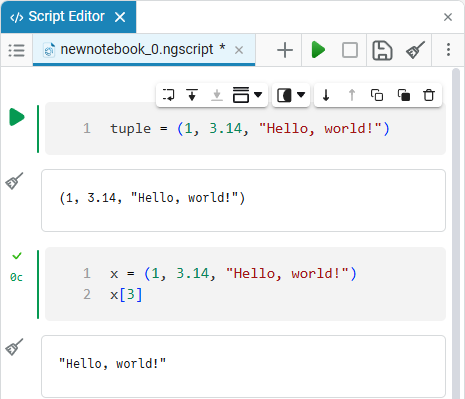
-
A named tuple is a special type of tuple, similar to a regular tuple, but in which each element has its own name. Instead of accessing elements by index as in regular tuples, named tuples can also access elements by their names. Example of a named tuple:
x = (a=1, b=3.14, c="Hello, world!")

println(x.a)
println(x.b)
println(x.c)

println(x[1])
println(x[2])
println(x[3])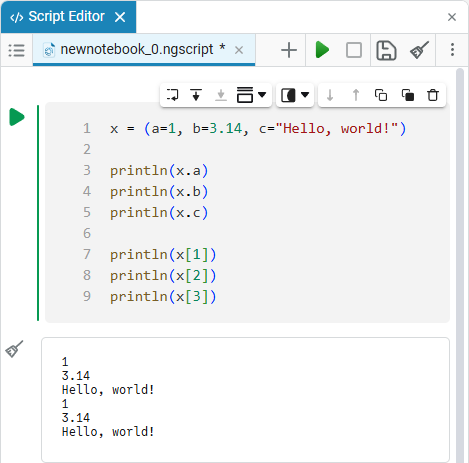
This example supports accessing tuple elements not only through indexes (as in a regular tuple [1],…,[n]), but also through variable names — x.a, x.b, x.c etc.
| Since a tuple is an immutable structure, the order of its elements matters and is preserved. The immutability of the tuple allows you to work with multiple assignments. |
Multiple assignment is a feature that allows you to assign values to multiple variables simultaneously using a tuple. This feature avoids temporary variables and improves code readability. For example:
tuple = (1, 3.14, "Hello, world!")
a, b, c = tuple
A tuple is being created here tuple with three elements:
-
An integer
1. -
A real number
3.14. -
Line
"Hello, world!".
Next, the values of the tuple are assigned to three variables in parallel a, b and c accordingly. After executing the code, the variable a will contain the value 1, a variable b — 3.14, and the variable c — line "Hello, world!". This way, you can assign multiple variables at the same time without explicitly specifying tuple values using string interpolation.:
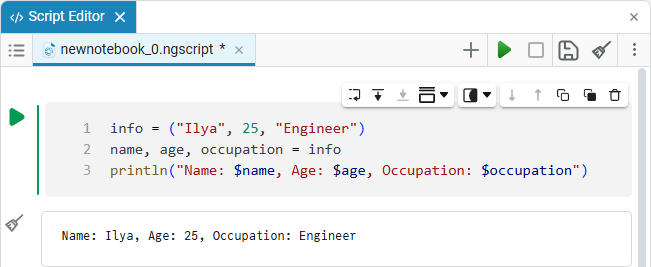
info = ("Ilya", 25, "Engineer")
name, age, occupation = info
println("Name: $name, Age: $age, Occupation: $occupation")
In this code, a tuple is used to store information, and parallel assignment is used to decompress tuple values into separate variables. Then string interpolation using a literal is used to output information about a person. $:
-
info = ("Ilya", 25, "Engineer")— a tuple is being createdinfowith three elements: as a string"Ilya"(name), as an integer25(age) and a string"Engineer"(occupation). -
name, age, occupation = info— using parallel assignment, tuple values are decompressed into three variables:name,ageandoccupation. Now the name variable contains the value"Ilya", age contains an integer25, and occupation contains occupation"Engineer". -
println("Name: $name, Age: $age, Occupation: $occupation")— a string is output using string interpolation (used$name,$age, and$occupationto insert variable values into a string). As a result of executing this line of code, it will be output:
Name: Ilya, Age: 25, Occupation: EngineerThus, the code creates a tuple with information about a person, and then decompresses this tuple into separate variables for easier access to the data and outputs the information to the script editor or command line.
For more information about working with tuples in Engee, see the article Features in Julia. You can find out about interpolation in Julia from the article Lines in Julia.
Field of view
By a block of code, we will understand a fragment of code enclosed in a syntactic construction. function (function) or let … end. Inside such code blocks, you can declare local variables that will be visible only inside this block and will not conflict with variables in other parts of the code (for example, with global variables).
|
Scope defines where in the code you can use a variable. So, there are local and global variables.:
-
Local (internal) variable — a variable is considered local if it is declared and defined inside its parent element, for example, a function, object, block of code (in which it is defined), etc. Local variables are visible only inside the scope in which they are defined and are inaccessible outside it. Let’s take a local variable as an example:
function example_function()
    x = 10
    println(x)
end
Here function example_function() defines a function with the name example_function containing a local variable x in the local viewport.
Further function call with the command example_function() outputs the value of the variable x, equal to 10:
example_function()
Executing the code also created a variable example-function with the Function data type in the Engee variable window.
|
After executing the function, the local variable x goes out of scope, and becomes inaccessible outside the function. This means that the variable exists only within the block in which it was defined.
Let’s try to call a variable outside the local scope using the following code:
println(x)
As a result of executing the code, we received an error that the variable x not defined. We conclude that the local variable is limited to the scope inside the code block (in which it is defined) and is not determined from the outside.
| The external code does not have access to the local variable and returns an error that the local variable is not defined. |
Global (external) variable — a variable is considered global if it is defined outside of functions, loops, and code blocks with a local scope. The global variable is accessible from any part of the code and is located in the global scope, which by default is the Main module. Inside the Main module, you can define submodules that will have their own global variables. Let’s take a global variable as an example:
global_var = 20
function example_function()
    println(global_var)
end
This code sets a global variable global_var and defines the function example_function(). example_function() outputs the value of a global variable. To output the result of the function, enter the following code:
example_function()
println(global_var)# you can use a global variable outside of the function.
After the call example_function() the value of the global variable is output global_var equal 20. The println function outputs two variable values at the same time, one time from the function and the other time outside it.
| Using such a variable can be difficult due to the shadowing problem when there is a variable with the same name in the local scope. |
Shadowing variables is a situation where a variable with the same name as in the global scope is used inside a specific scope (for example, inside a function or code block). As a result, a variable inside the scope "obscures" (overwrites) a variable with the same name from the outer scope.
| Be careful when specifying variables with the same name. Due to shadowing, a variable inside a limited scope may have a different value or type than a variable with the same name in other parts of the program. |
For example, consider the code with the creation of two variables with the same names and values, and without shadowing:
global_var = 10  # creating a global variable

function example_function()
    global_var = 20  # creating a local variable (inside a function) with the same name as the global one
    println(global_var)  # a local variable inside the function will be used.
end

example_function()  # function call
println(global_var)  # The global variable has not been changed inside the function, so its value is output.
A local variable with the same name is created inside the function. global_var, which is global. This does not change the global variable, but creates a new local one, visible only inside the function. As a result, the values of both variables are displayed, equal to 20 (global) and 10 (local), respectively. Thus, creating variables in different scopes helps to avoid problems with overwriting variables with the same names.
Variables in the Simulation Environment
Variables as model parameters
In Engee, variables can be set as model parameters. Consider the following example:
engee.create("model")Using the method create a model has been created in Engee named model. Next, assign the variable:
m = engee.gcm()By the method gcm we access the created model and return the object representing this model (in our case, GCM, Get Current Model, getting the current model). The resulting object is assigned to a variable m.
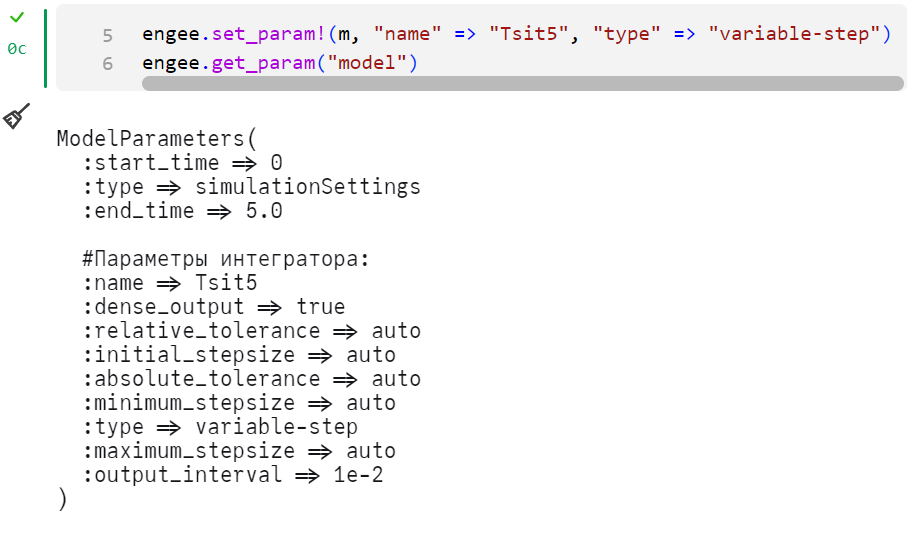
Next, we will replace the modeling parameters with set_param!:
engee.set_param!(m, "name" => "Tsit5", "type" => "variable-step")The parameters of the solver and its step change from constant to variable in the code.
See if the model parameters have changed using the method gcm:
engee.get_param("model")The model parameters have been changed to new ones due to the variable m:
Next, using the method run let’s run the simulation of the model through a variable:
engee.run("m")After successful simulation, save the Engee model with the properties of the object (variable m) on the specified path to the file browser. In our case:
engee.save(m,"/user/start/examples/base_simulation/command_control/model.engee"; force=true)If a file with that name already exists (in our case, model.engee) — option force=true overwrites the model with data from the variable m without requesting confirmation. This is useful if you need to overwrite existing files while saving the model.
The Engee model will appear in the file browser only after saving it. Saving the model will allow you to work with it in the future and apply all the functionality. file browser  . .
|
Even more possibilities for working with variables in the modeling environment are presented in the article. Software control of modelling.
Variables as block parameters
You can control block parameters without programmatic methods, simply by setting individual parameter values as variables. Let’s look at an example with the model presented in the article. Software processing of simulation results in Engee. The model consists of blocks Sine Wave and Terminator, recording is enabled for the signal between them:
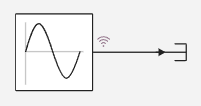
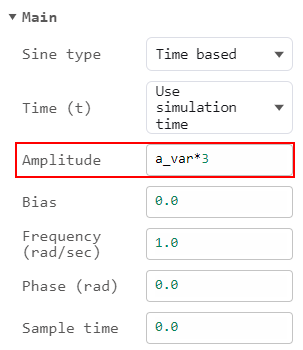
Block Sine Wave – the only block in the model whose parameters can be adjusted. Left-click on the block and set the variables for each parameter according to the drawing.:
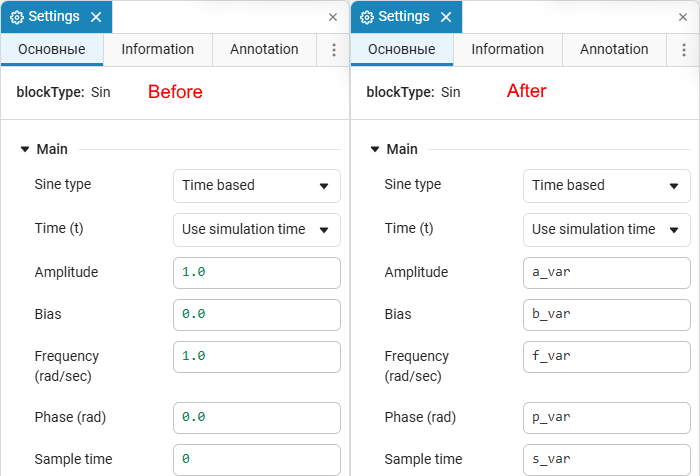
After setting the variable names for the block values, we will assign values to each of these variables.:
a_var = 1 # The Amplitude becomes equal to 1
b_var = 2 # Bias becomes equal to 2
f_var = 3 # Frequency becomes 3
p_var = 1 # Phase becomes equal to 1
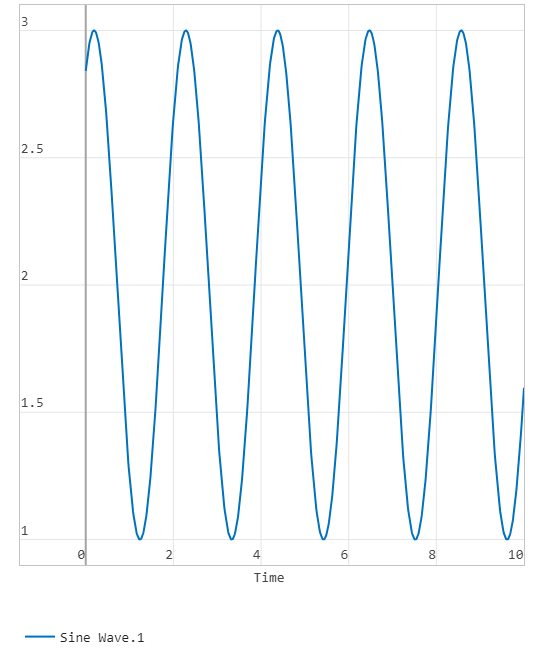
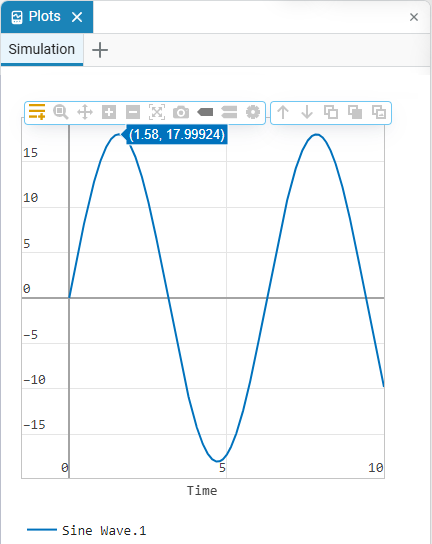
s_var = 1 # The sample time becomes 1Let’s run a simulation of the model by setting the model name to a separate variable (earlier in the article m) and using the method engee.run, or manually, via the button Start  . The graph will show that the block Sine Wave I changed my parameters and the simulation went correctly.:
It is useful to set variables as block parameters if the block has dependencies that affect a particular parameter.:
a_var = (2*f_var) # The Amplitude becomes equal to 6
b_var = (6/f_var) # Bias becomes equal to 2
f_var = 3 # Frequency is equal to 3
p_var = (1 + f_var) # Phase becomes 4
s_var = 1 # The sample time is 1
Algebraic expressions, including those with variables, can be used as block parameters.:
Output
Variable a_var equal to 6, then the amplitude after multiplication by 3 will be equal to 18 Let’s see this in the graph of the simulation results .:
| Using different sets of variable values (stored in different scripts) allows you to model objects with the same structure but different parameters. |
Saving simulation results
You can save the simulation results of the model to the Engee RAM using the variable simout. The variable is created automatically after the simulation of the model is completed when recording the model signals is enabled. Let’s look at the example with the model from the previous paragraph, but use the previously created variable. m.
After the simulation of the model is completed, a variable will appear in the file browser simout, which stores the simulation results. Download the data from simout to a variable m:
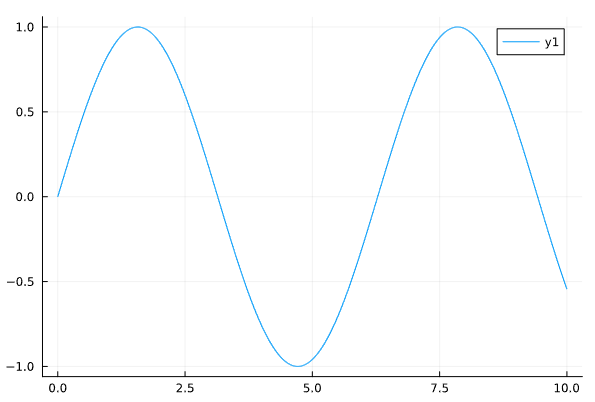
m = collect(simout["newmodel_1/Sine Wave.1"])We visualize the simulation results using the Plots library and our variable:
using Plots # connecting the Plots module
plot(m.time, m.value) # output of time and value from the m variable
After the code is completed, we will see the following graph:
Information about the process of saving simulation results is described in the article about Software processing of simulation results in Engee.