Neural network image recognition and embedding
This example will allow you to take the first steps in a project where image classification is needed or where it is planned to use the ResNet neural network to extract features from an image or matrix.
Task description
Many of the most complex problems of computer vision can be solved using "foundational" neural networks, and one of the outstanding achievements of the last decade was the ResNet network, on whose calculations, or even on their intermediate results, many modern methods are based.
To work with this neural network, it is best to use a library that provides access to a solid fleet of pre-trained neural networks., Metalhead. Neural networks in this library are created in the format Flux The commands of this library will allow you to easily work with the topology of models. Finally, we'll need a library. DataAugmentation to simplify operations on images, although all the same operations (scaling and rasterization) can be performed using conventional matrix additions and multiplications.
Pkg.add( ["Flux", "Metalhead", "DataAugmentation"] )
Recognizing a single image
Let's perform a small calculation on the pre-trained ResNet neural network, which will allow us to determine the class of the object represented in the image.
using Flux, Metalhead
model = ResNet(18; pretrain = true);
The ResNet neural network was created to work with RGB images. Therefore, in addition to uploading the image itself, we convert it to a three-channel format, getting rid of the alpha channel, using a simple command RGB applied to each pixel of the image matrix.
using Images
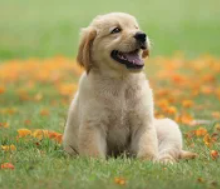
img = RGB.(load( "dog.png" ))

using DataAugmentation
DATA_MEAN = (0.485, 0.456, 0.406)
DATA_STD = (0.229, 0.224, 0.225)
augmentations = CenterResizeCrop((224, 224)) |> ImageToTensor() |> Normalize(DATA_MEAN, DATA_STD)

data = apply(augmentations, Image(img)) |> itemdata
labels = readlines( "imagenet_classes_ru.txt" )
img_labels = Flux.onecold( model(Flux.unsqueeze(data, 4)), labels )
print( img_labels )
Note that we have obtained a vector. Subsequently, we will take the first element of this vector.
So, if the image is not too unusual from the point of view of the ImageNet dataset, then the neural network that was trained on this dataset recognizes it with predictable accuracy. We used the smallest of the "textbook" ResNet implementations with a size of 18 layers.
To find out the size of other ResNet neural networks available in the library, you can simply call help using this command:
# ?ResNet
Recognizing multiple images
To perform this operation on multiple images, you can simply package a neural network call into a loop. for. A small neural network of 18 layers, even on a CPU, will run in a matter of seconds.
using Flux, Metalhead, Images, DataAugmentation
Classifying a number of images:
# The preprocessing chain includes standard ImageNet normalization
DATA_MEAN = (0.485, 0.456, 0.406)
DATA_STD = (0.229, 0.224, 0.225)
augmentations = CenterResizeCrop((224, 224)) |> ImageToTensor() |> Normalize(DATA_MEAN, DATA_STD)

# Uploading images using the Images library
imgs = load.("imgs/" .* ["dog1.png", "dog2.png", "cat1.png", "cat2.png", "chair1.png", "chair2.png", "rocket.png", "airplane.png"])
imgs = [ RGB.(img) for img in imgs ]

# Download the pre-trained model from Metalhead
model = ResNet(18; pretrain = true);

# Transform each image
imgs_data = [ apply(augmentations, Image(img)) |> itemdata for img in imgs ]

# Download the list of classes from a text file
labels = readlines("imagenet_classes_ru.txt")

# We send each image to the neural network and get the index of the most likely label.
img_labels = [Flux.onecold(model(Flux.unsqueeze(data, 4)), labels)[1] for data in imgs_data]

# Output of images and captions to them
println(img_labels)
imgs
 |  |  |  |  |  |  |  |
Obviously, not all labels in this list are perfectly matched. As always, the limitations of the training sample are affected and the last image goes beyond the boundaries of reliable recognition.
Intermediate latency representation
For more complex work with ResNet neural networks, you can use an intermediate representation of the objects that these neural networks create during the calculation of the result. One option is to exclude the final layer and work only with backbone a part of a model (a basic model?) that can be used as a feature generator for some other task.
# The first part of ResNet, called the backbone model, accepts images of any size.
backbone_model = Metalhead.backbone( model );
img_embeddings = Flux.activations(backbone_model, Flux.unsqueeze(data[1], 4))
length( img_embeddings )
Why aren't there 18 layers? In addition to the fact that we are working with a shortened version of ResNet, some layers of this matrix are combined. For example, Conv and MeanPool they form one layer of the type Chain. Function activations analyzes only the object Chain the top level.
What size object does the neural network generate on the last layer? backbone parts?
size(img_embeddings[end])
You can make sure that we have 512 7-by-7 images in front of us. The last dimension is the batch number, but we sent the images to the neural network one by one, so the dimension in the 4th dimension is 1.
Let's build an illustration where we will see all 512 layers of the image obtained by the convolutional part of the network.
# Suppose img_embeddings[end] has a size of (7, 7, 512, 1)
img_activations = dropdims(img_embeddings[end], dims=4)  # Removing the last dimension -> (7, 7, 512)

# Tile parameters, the number of tiles in a row and column
tile_height, tile_width, n_tiles_per_row, n_tiles_per_col = 7, 7, 32, 16

# Creating an empty matrix for tilemap
tilemap = zeros(Float32, tile_height * n_tiles_per_col, tile_width * n_tiles_per_row)

# Filling out the tilemap
for k in 1:min(512, n_tiles_per_row * n_tiles_per_col)  # In case there are fewer than 512 activations
    i = div(k - 1, n_tiles_per_row) + 1  # Line number in tilemap
    j = mod(k - 1, n_tiles_per_row) + 1  # Column number in tilemap

    # Calculating the coordinates in tilemap
    row_range = (1:tile_height) .+ (i-1)*tile_height
    col_range = (1:tile_width) .+ (j-1)*tile_width

    # Inserting activations
    tilemap[row_range, col_range] = img_activations[:, :, k]
end

# Visualization
heatmap(tilemap,
       aspect_ratio=:equal, color=:viridis, cbar=false,
       title="Activation map of the penultimate layer (7×7×512 → 224×112)")
We see a lot of small "images". In fact, the neural network transformed the three-layer image into a 512-layer one, simultaneously reducing the original image to a size of 7 by 7.
This representation is useful for studying the internal structure of a neural network, but to work with a "raw" feature description, you need to apply a MeanPool-like operation to this representation and work with a feature vector rather than a multitude of small images.
# Adding a mean pooling layer - The pooling size must match the output of the feature extractor
pool_model = Chain(
    backbone_model,
    AdaptiveMeanPool((1, 1)),
    Flux.flatten
)

# Loading and preprocessing
imgs = load.("imgs/" .* ["dog1.png", "dog2.png", "cat1.png", "cat2.png", "chair1.png", "chair2.png", "rocket.png", "airplane.png"])
imgs = [ RGB.(img) for img in imgs ]
imgs_data = [ apply(augmentations, Image(img)) |> itemdata for img in imgs ]

# Classification by the `model' model (to get class labels)
img_labels = [Flux.onecold(model(Flux.unsqueeze(data, 4)), labels)[1] for data in imgs_data]

# Another classification by the `pool_model' model (just to get the embeddings)
mlp_activations_512 = [Flux.activations( pool_model, Flux.unsqueeze(data, 4) )[end] for data in imgs_data];
plot(
    ([heatmap(reshape( activation, :, 32 ), cbar=false, title=title) for (activation,title) in zip(mlp_activations_512, img_labels)])...,
    layout=( 1,: ), size=(900,200)
)
The final latent representation
Latent representation (embedding) can be considered information on any slice of a neural network.
The last layer of ResNet-18 transforms 512 features that we saw in the last graph into 1000 features, and the most intensely expressed of them characterizes the object class.
The distribution of labels between other "pixels" can also tell us something about the confidence of the neural network in its prediction or about the class of the object, but since the neural network did not learn to classify high-level concepts (dog/cat), but learned to put specific labels, the intra-class proximity between all breeds of dogs and all breeds of cats may be low.
DATA_MEAN = (0.485, 0.456, 0.406)
DATA_STD = (0.229, 0.224, 0.225)
augmentations = CenterResizeCrop((224, 224)) |> ImageToTensor() |> Normalize(DATA_MEAN, DATA_STD)

imgs = load.("imgs/" .* ["dog1.png", "dog2.png", "cat1.png", "cat2.png", "chair1.png", "chair2.png", "rocket.png", "airplane.png"])
imgs = [ RGB.(img) for img in imgs ]

model = ResNet(18; pretrain = true);

imgs_data = [ apply(augmentations, Image(img)) |> itemdata for img in imgs ]
labels = readlines("imagenet_classes_ru.txt")
img_labels = [Flux.onecold(model(Flux.unsqueeze(data, 4)), labels)[1] for data in imgs_data]

mlp_activations = [Flux.activations( model.layers, Flux.unsqueeze(data, 4) )[end] for data in imgs_data];
plot(
    ([heatmap(reshape( activation, 20, : ), cbar=false, title=title) for (activation,title) in zip(mlp_activations, img_labels)])...,
    layout=( 1,: ), size=(900,300), titlefont = Plots.font(9)
)
On the CPU, the execution of the previous cell takes 10-15 seconds. Using batches could speed up classification.
Finally, let's build a correlation diagram. If we had classified the spectra using a pre-trained neural network, this result might have been of interest already before any machine learning.
plot( heatmap( cor( hcat(mlp_activations_512...) ), title="512 signs", c=:viridis, yflip=true, xticks=(1:8, img_labels), yticks=(1:8, img_labels)),
      heatmap( cor( hcat(mlp_activations...) ), title="1000 signs", c=:viridis, yflip=true, xticks=(1:8, img_labels), yticks=(1:8, img_labels) ),
      size=(1000,500))
Judging by this illustration, the objects of the furniture group are closer to each other than the objects of the animal world, but more objects are needed for a full-fledged study. Note that the image of a chihuahua is the least similar to furniture from the point of view of a neural network.
Up to this layer, the neural network has been trained to extract features relevant for classification into the declared 1000 classes, so that the distribution of the final embedding can be informative. But since the ultimate goal of the training was to maximize the response of a relevant logit, one out of 1,000 (rather than studying the class distribution), there may not be the expected proximity of distributions between semantically close objects (different dog breeds), and we may not see anything on the correlation diagram.
Conclusion
We dived a little into the classification of images by the ResNet neural network and studied what the embeddings (latent representations) of this neural network look like and how they can be useful to us in data analysis.