Masks in Engee
Mask — This is a customizable user interface for creating custom blocks. Blocks can be created based on any blocks. Engee libraries and subsystems.
Mask simplifies the use and reuse of blocks. The masked block (with the mask applied) has its own settings window in which you can change the block parameters. Masks allow you to transfer parameters not only to the block or subsystem, but also to the source code of the blocks. Engee Function and C Function.
The mask allows you to:
-
Create your own parameters dialog box for quick configuration of the unit/subsystem.
-
Change the appearance of the block/subsystem.
-
Hide the contents of the block/subsystem.
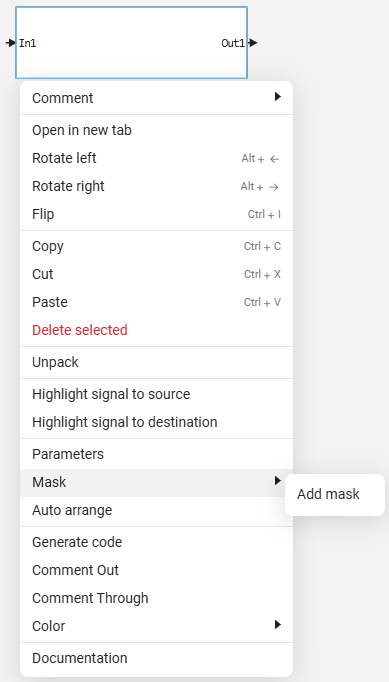
Mask Editor is a tool for customizing masks. To open the editor, right-click on the block and select Mask → Add mask:
The editor opens in a new browser window:

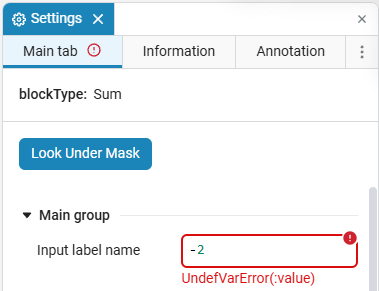
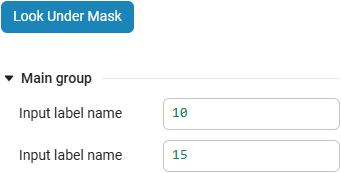
After saving the mask, the mask parameters are displayed in the block settings. To see the parameters of the block itself, click Look Under Mask. To return, click Look Mask:
| For subsystems, the option Look Under Mask it transfers it inside the subsystem, rather than showing the block parameters. Use Navigation panel for models to exit the subsystem. |
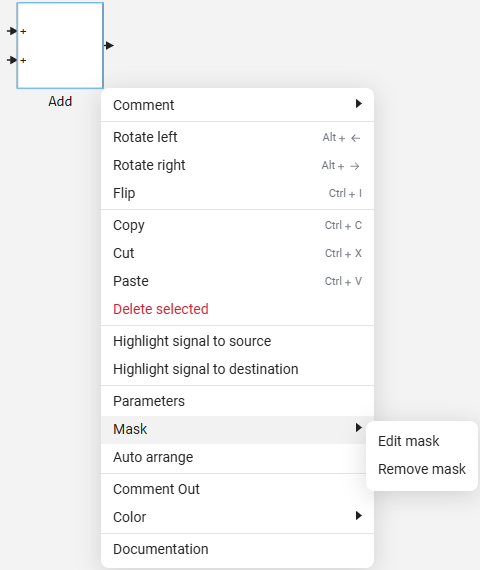
To edit or delete a mask, right-click on the icon of the block with the mask you have already created and select Edit mask or Remove mask:
| The mask can be easily adjusted so that when the values of its parameters change, the values of the block parameters automatically change. However, the opposite effect is impossible: the values of the block parameters cannot change the values of the mask parameters. This restriction provides control over the block settings through the mask and prevents accidental changes to the mask itself. |
Interface of the mask editor
The mask editor contains two sets of tabs:
-
Interface Editor
-
Code Editor
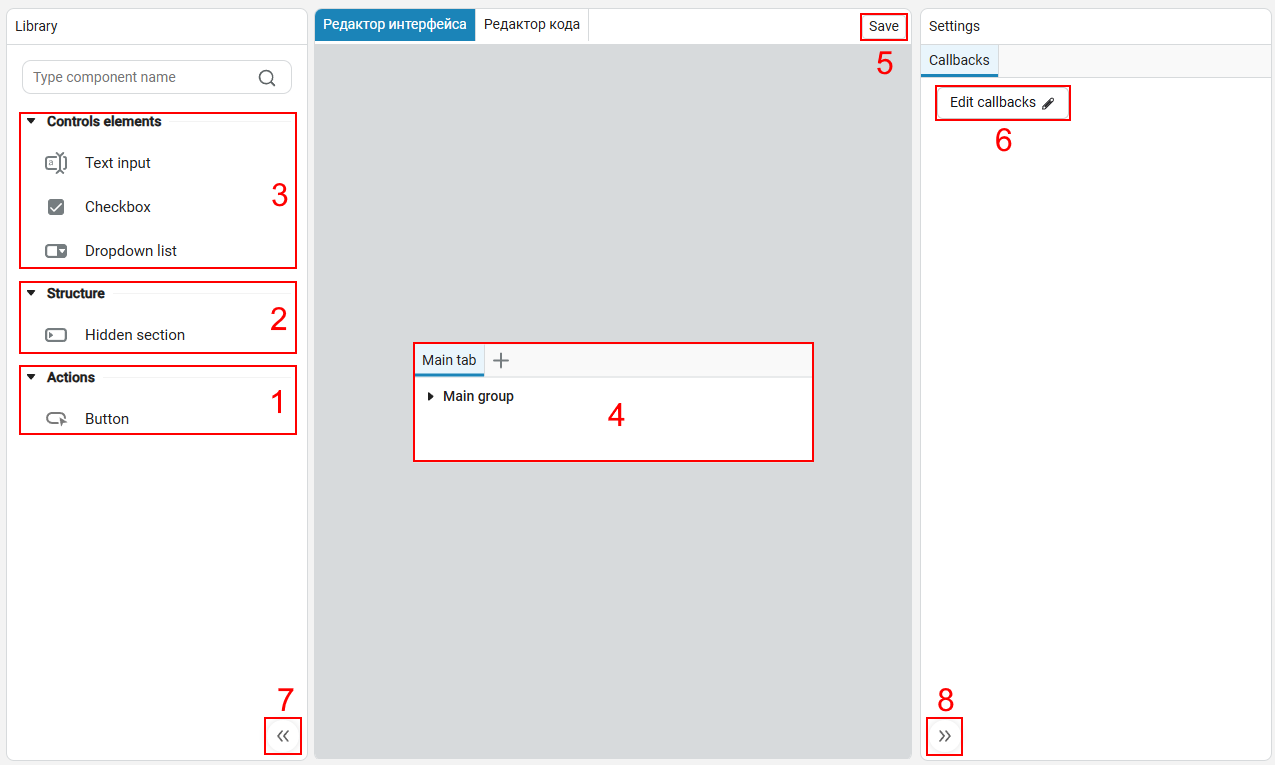
Interface Editor
Interface Editor — the section for adding masks of controls, structural elements and tabs to the settings window.
-
Actions — controls that are used to perform actions according to specified conditions.
-
1.1 Button
 — a control that performs the specified actions when clicked. The logic of the button is set in the callback clickedCallback.
-
-
Structure — containers for placing and hiding controls:
-
2.1. Hidden section
 — a container that can be hidden or opened by clicking, allowing you to control the display of several elements simultaneously.
Hidden section without the added controls, it will not be shown in the mask. The default section can be renamed.
-
-
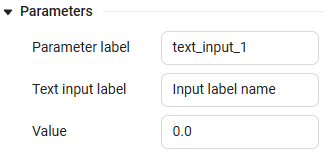
Controls elements — the main components of the interface from which the block mask is formed. Each control has three parameters:
-
Parameter name — must match the name of the variable in the mask that needs to be configured;
-
Label — will be displayed in the settings window;
-
Value or list item — defines the default value.
In addition to the parameters, you can configure the attributes:
-
Hidden — hides the control;
-
Evaluate — analyzes the entered value, interprets it, and stores the appropriate data type (for example, a number, string, or array). If you enter an incorrect data type, the system will return an error.
-
-
3.1. Text input
 — adds a mask parameter with an input text or numeric value. Data type: Any;
 -
3.2. Checkbox
 — the area for marking the box. Data type: Bool;
 -
3.3. Select
 — displays a list of available options, from which one is selected. To add items to the drop-down list, enter them one at a time in the List Items field and press Enter after each value. Data type: String;
The drop-down list without parameters returns an error and does not allow you to save the mask.
-
Mask space is an area for creating masks using controls and structural elements. All the elements added to the area will be exactly transferred to the mask after saving. To add items, drag them with the mouse.:

To delete an item, select it and press Delete.
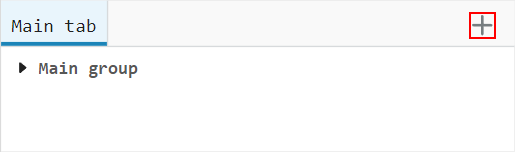
To add a new tab, click + in the right corner of the mask space.:
-
Save button — saves the mask. Alternatively, you can use keyboard shortcuts. Ctrl+S (Win/Linux) and ⌘+S (macOS).
-
The callback editor button opens the section Code editor.
-
Hide the left panel/show the left panel.
-
Hide the right panel/show the right panel.
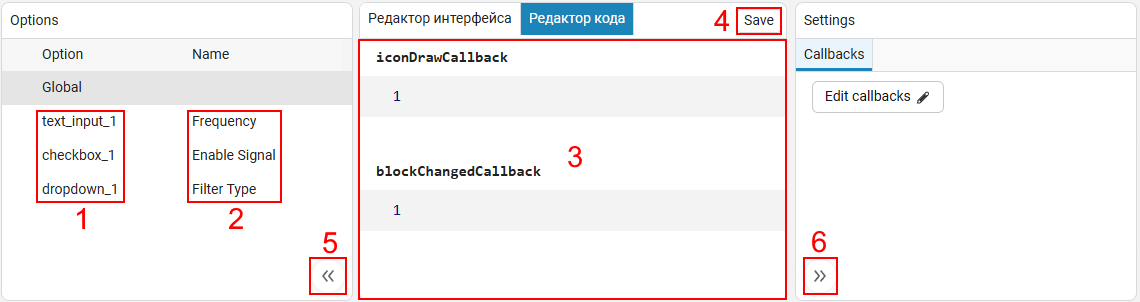
The code editor
Code editor — control settings section using callback functions (callbacks). Each control element has its own unique callbacks.
-
The names of the mask parameters (can be changed in the interface editor).
-
Field name — indicates the label or type of the parameter field (you can change it in the interface editor). It provides a more detailed description of the parameter’s purpose or function.
-
Callback Code space is an area for configuring callbacks for a specific mask parameter.
-
Save button — saves the mask. Alternatively, you can use keyboard shortcuts. Ctrl+S (Win/Linux) and ⌘+S (macOS).
-
Hide the left panel/show the left panel.
-
Hide the right panel/show the right panel.
Callbacks
Callbacks are functions that are called automatically in response to actions in the mask settings window. Callbacks in Engee are written in Julia, are not executed during the simulation and are used to adjust the behavior of the mask and block elements.
By scope, callbacks are divided into:
-
Global (Global) — refers to the entire mask. The global callbacks are iconDrawCallback and blockChangedCallback.
-
blockChangedCallback It is performed after one or more mask parameters have been changed.
-
iconDrawCallback called when you need to redraw the block icon based on the current parameter values. Global callbacks don’t "see" other callbacks — they only work with parameters (via local variables or an object
mask) and software control functions.
-
-
Local settings are linked to a specific mask parameter and are triggered when the value of this parameter has changed in the interface. All callbacks except iconDrawCallback and blockChangedCallback, are local. The local callback can change any mask parameters (via
mask.parameters…) and call software control functions — restrictions only at the time of launch (a specific parameter), not in access.
To work with the mask parameter, you first need to get it. For this purpose, a special parameter object is used, which is stored in a variable. mask. For example, to get the parameter Text input with a name text_input_1, you can use the following code:
mask.parameters.text_input_1The parameter object has three main properties:
-
name::String— field name (read-only); -
value::Any— parameter value (available for reading and writing); -
hidden::Bool— visibility of the parameter (available for reading and writing).
|
To change a parameter, always assign a new value to an attribute.
|
To get the path to the block with the mask, use the function engee.gcb(). The path is returned as a string. This allows you to control the block and its internal components using code. Let’s say you need to pass a value from a parameter Dropdown list (dropdown_1) to the indoor unit LDL Factorization:
LDLPath = engee.gcb() * "/LDL Factorization"
engee.set_param!(LDLPath, "NonPositive" => mask.parameters.dropdown_1.value)
Here engee.gcb() gets the path to the current block. The path is used to find the LDL Factorization block, after the value from dropdown_1 passed to the parameter NonPositive the block. Thus, the function engee.gcb() helps to link the mask parameters to other parts of the model.
Besides engee.gcb() to get the current block, the following are also used engee.gcm() to get the current model and engee.gcs() to get the current system.
|
Configuring the appearance of the mask
To customize the appearance of the mask, use the function engee.show(…). It is called from the global callback [icondraw] (iconDrawCallback), which is executed last and forms the final icon appearance.
|
Signatures and parameters:
# Text
engee.show(text::AbstractString; x::Real=50, y::Real=50,
           h_align::Symbol=:center, v_align::Symbol=:middle)

# LaTeX (use L"...")
engee.show(text::LaTeXString; x::Real=50, y::Real=50,
           h_align::Symbol=:center, v_align::Symbol=:middle)

# SVG (svg string"..." or a ready-made SVG object)
engee.show(svg; x::Real=50, y::Real=50)

# Graph (for example, the shape from Plots.jl)
engee.show(fig; x::Real=50, y::Real=50)

# Bitmap image (Images.jl object)
engee.show(img; x::Real=50, y::Real=50)
Here:
-
x,y— the position of the reference point of the layer (in percent). -
h_align— horizontal alignment of the text/LaTeX relative to(x, y)::left,:center(by default),:right. -
v_align— vertical text alignment/LaTeX::top,:middle(by default),:bottom.
|
|
|
Values |
Examples:
-
Centered multiline text (default values). For the example to work, fields with parameters must be added to the mask editor.
m_comandm_baudRate:engee.show("SERIAL PORT\nPort name: $(m_com)\nBaud rate: $(m_baudRate)") -
The title is in the lower right corner:
engee.show("RITM-COM"; x=100, y=0, h_align=:right, v_align=:bottom) -
Two SVG layers, one above the other (top and center):
engee.show(svg"..."; y=100) engee.show(svg"...") -
LaTeX formula in the upper-right corner:
engee.show(L"\lvert u \rvert"; x=98, y=98, h_align=:right, v_align=:top)
Engee uses one normalized coordinate system (0-100) for all content types. Challenge engee.show without coordinates , it is equivalent to x=50, y=50 (for text/LaTeX as well h_align=:center, v_align=:middle).
|
Overview of callbacks
The procedure for launching mask callbacks when manually changing parameter values in the settings window (without pressing buttons) is as follows:
-
For each changed parameter, it is called validateCallback. It runs first and checks the correctness of the entered value.
-
If the check is successful and the value has actually changed, then it is called valueChangedCallback for the corresponding parameter.
-
After all local callbacks are completed, the global one is started once. blockChangedCallback.
-
At the end, it is executed iconDrawCallback, which generates the appearance of the icon based on the current parameter values.
|
The callback is handled separately clickedCallback:
-
It is called only when the corresponding button is clicked in the mask settings window.;
-
It is suitable for one-time actions: file generation, configuration of internal blocks, synchronization of parameters, etc.;
-
It has access to the mask parameters as to ordinary variables, to the object.
maskand to the software control functions (engee.gcb()and others).
|
If inside |
Knowing the order in which callbacks are run is important for the block mask to work correctly, as changing one parameter may affect others. Following the sequence ensures that all dependencies are taken into account and the block is working correctly.
iconDrawCallback — formation of the block appearance
Details
|
Callback
Through |
To work with iconDrawCallback The function must be used engee.show(). The icon with the wrong name iconDrawCallback it looks like this:
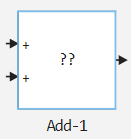
iconDrawCallback It can display text, a number, a graph, an image, or a formula (LaTeX). For example:
-
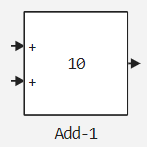
Number output (similar for text):
engee.show(text_input_1)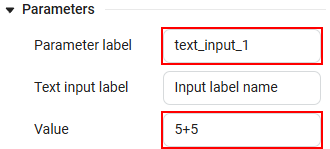 →
→ 
-
SVG output:
engee.show(
    svg"""
    <svg xmlns="http://www.w3.org/2000/svg"
         width="78%" height="80%"
         viewBox="0 0 26 27"
         preserveAspectRatio="none">
        <path vector-effect="non-scaling-stroke"
              d="M13 0.5L13 25.7282"
              stroke="#DDDDDD"
              stroke-linecap="round" />
        <path vector-effect="non-scaling-stroke"
              d="M0.5 13H25.5"
              stroke="#DDDDDD"
              stroke-linecap="round" />
        <path vector-effect="non-scaling-stroke"
              d="M24.1894 8.46273L13 8.46273L13 17.4628L2.18942 17.4627"
              stroke="#212121"
              stroke-linecap="round" />
    </svg>
    """
)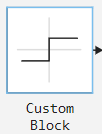
The following rules are used for SVG icons:
-
viewBoxmust match the original size of the block icon.; -
width/height:-
100%— for blocks withwithoutBorder: true; -
Equal to the block size — for all other cases;
-
-
The SVG root element must have
preserveAspectRatio="none"; -
If the icon is to rotate with the block, the root SVG must have an attribute
style=""; -
All elements that draw lines must have
vector-effect="non-scaling-stroke"— This preserves the thickness of the lines when zooming and rotating.
Violation of these rules may cause the icon to distort when the block size or orientation changes.
It is recommended to use SVG icons for blocks, as they take up less space and automatically adjust to the block size without loss of quality. -
-
The output of the LaTeX formula. To do this, use a capital letter and the quotation marks
"". The formula is written in quotation marks according to the classic LaTeX syntax.:engee.show(L"\lvert u \rvert")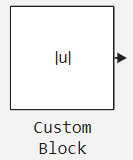
-
Graph output:
x = range(0, 2*pi, 1000);
y = sin.(x);
engee.show(plot(x, y))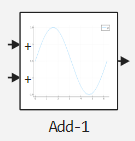
-
Image output:
img = "...base64-text..."
engee.show(Images.load(IOBuffer(base64decode(img))))
You can change the signature of the block port using the function engee.port_label() through the callback mechanism. The example below shows how to display text on the block icon and set signatures for different ports.:
engee.show("Some text")                 # Text output on the block icon
engee.port_label("input", 1, "foo_1")   # Signature 'foo_1' for the first input port
engee.port_label("input", 2, "foo_2")   # Signature 'foo_2' for the second input port
engee.port_label("output", 1, "bar") # The 'bar' signature for the output port| If the mask can add or remove ports (the set of block ports varies depending on the mask parameters), see the section Updating blocks and restoring port connections. |
blockChangedCallback — performed after changing any mask parameter
Details
It starts when any mask parameter is changed, but after all other callbacks are executed. Being a global callback, it has access to both variables and the mask object. Examples:
-
Changing a parameter in a subsystem:
LDLPath = engee.gcb() * "/LDL Factorization"

mode = dropdown_1
if mode == "Ignore"
    engee.set_param!(LDLPath, "NonPositive" => "Ignore")
elseif mode == "Warning"
    engee.set_param!(LDLPath, "NonPositive" => "Warning")
elseif mode == "Error"
    engee.set_param!(LDLPath, "NonPositive" => "Error")
end
here, the value of the mask parameter is synchronized with the parameter of the LDL Factorization block.
mode— a variable that stores the current value of the parameterdropdown_1. For example, if you change the parameter value in the drop-down list fromWarningonError, then the same parameter will similarly change for the LDL Factorization block in the subsystem.
valueChangedCallback — performed when the parameter value is changed
Details
valueChangedCallback it is needed to hide parameters or to change subsystem states using the function engee.gcb(). The callback is triggered when the value of the associated parameter is changed. The parameters are linked if the parameter name of the corresponding control matches the callback code, for example:
 →
→  Examples:
-
Hiding parameters:
mask.parameters.text_input_1.hidden = checkbox_1here the parameter is hidden when pressed Checkbox and it is visible when Checkbox pressed.
-
Changing the subsystem state (using software control functions):
if checkbox
    mask.parameters.checkbox.hidden = false
    engee.add_block("/Basic/Ports & Subsystems/Model", engee.gcb() * "/Model")
else
    mask.parameters.checkbox.hidden = true
    engee.delete_block(engee.gcb() * "/Model")
end
the connection is set here with Checkbox (
checkbox_1), when enabled (the checkbox is active) which adds the Model block to the subsystem and is deleted when turned off (the checkbox is unchecked).
validateCallback — checks the correctness of the parameter value (validation)
Details
The callback verifies the validity of the value validateCallback and, in case of an incorrect value, it shows an error. All error messages except AssertionError will be considered an error of the callback itself, and not an error of the entered data.:
The correctness of the parameter value is checked using a variable value. validateCallback it always starts with a macro @assert.
validateCallback available only for the control Text input and it is attached to his callback. valueChangedCallback.
Examples:
-
Checking the correctness of the value:
@assert value > 0 "The value must be greater than zero" -
Checking the entered type:
@assert value isa Number "The value must be a number."
clickedCallback — executed at the touch of a button
Details
The callback is called once each time the button is clicked in the settings window of the masked block. It is suitable for one-time actions: file generation, software configuration of internal blocks, synchronization of parameters, etc. It does not store a state and is not bound to a mask variable.
Example:
try
    path = joinpath(pwd(), "hello.txt")
    open(path, "w") do io
        write(io, "hello from button_1\n")
    end
    engee.info("Saved: hello.txt")
catch e
    engee.warning("Couldn't save hello.txt : $(e)")
end
Here:
-
When you click on the button, a file is created.
hello.txtin the current working folder of the model (pwd()). -
A string is written to the file
hello from button_1. -
The diagnostic window displays:
-
Information message via
engee.info(…)— if the file is saved successfully; -
Warning via
engee.warning(…)— if an error occurred while saving.
-
To display information on the block icon, use engee.show(…) inside the iconDrawCallback. To send messages to the diagnostic window, use engee.info(…) and engee.warning(…) in callbacks (for example, clickedCallback, blockChangedCallback and so on).
|
Updating blocks and restoring port connections
When the model is opened, the mask editor automatically updates the blocks according to their current versions in the library. After the update, the mask callbacks are performed, and the block takes the form specified by the mask parameters. This is especially important for masks that add or remove ports — that is, for blocks where the set of ports may vary depending on the mask parameters.
The upgrade process includes three steps:
-
Updating the library block. The block configuration is synchronized with its current definition.
-
Repeat mask callbacks. The mask is applied as if you had just changed its parameters. At this step, the mask can add or remove ports, as well as change the structure of subsystems.
-
Restore connections. The mask editor tries to return the lines connected to the ports before the update. To do this, each port needs a stable program name (see below).
The software name of the port (short and practical)
| What it is and why it is needed |
The software port name is a stable port identifier that does not depend on its position on the icon and is used by the editor to automatically restore connections when the block structure changes. |
| When it is used |
This is important if you are creating a subsystem—based block in which the mask can add or remove ports, or if you are working with the Chart block (state machines) - in these cases, the restoration of lines depends on stable port names. |
Where does the program name come from and what can you change?:
-
In the atomic blocks of the library — the program names of the ports are already set in the library itself (for example, in the blocks Sine Wave, Gain, Engee Function, C Function). These names are fixed and cannot be changed.
-
In masked subsystems — the program name of the port matches the name of the internal block of the port (
Inport,Outport,Connection Port). You can set or change it by renaming the corresponding internal block port. -
In masked Chart blocks — the program name corresponds to the name of the signal in the symbol table. You can also control this name by editing the characters in the Chart block settings.
| Do not rename the program names of ports in blocks that are already used in the models.: this may disrupt connection recovery during updates, especially if the mask adds or deletes ports. |
Backward compatibility
The editor tries to automatically restore connections after updating the block. However, if the program name of the port has changed or is missing, then it may not be possible to return all the lines (communications).
|
If you are creating a subsystem-based block in which the mask can add or remove ports, follow simple rules.:
|
Messages in the diagnostic window
In mask callbacks, you can send messages to model diagnostic window  using the functions:
-
engee.info(msg)— information message; -
engee.warning(msg)— warning message;
These functions only work inside callbacks (masks and models). The message can be collected through string interpolation ("Value = $(value)") or string(…).
|
examples of using masks in callbacks
-
Notify about parameter changes (blockChangedCallback):
LDLPath = engee.gcb() * "/LDL Factorization" mode = dropdown_1 engee.set_param!(LDLPath, "NonPositive" => mode) engee.info("LDL NonPositive updated: $(mode)") -
Warn about a potentially unwanted value (valueChangedCallback):
if checkbox_1 engee.warning("Experimental mode is enabled") else engee.info("Experimental mode is disabled") end -
Report the results of a one-time action (clickedCallback):
try
    path = joinpath(pwd(), "hello.txt")
    open(path, "w") do io
        write(io, "hello from button_1\n")
    end
    engee.info("File saved: $(abspath(path))")
catch e
    engee.warning("Couldn't save file: $(e)")
end
Examples
|
When using masked blocks (for example, a block 3DOF (Body Axes)) it is important to consider the specifics of parameter validation:
|

example of passing the mask parameter to the source code of the C Function block
-
Put the C Function block in the Engee workspace. Right-click on the block and select Mask → Add mask.
-
In the Mask interface editor, add the Input field
. -
Go to the mask code editor and select the option in the left options menu Text input (by default it is
text_input_1) and move it to the mask space. Do this twice so that each parameter of the C Function block has its own input field.: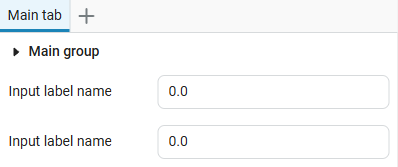
-
In the callback blockChangedCallback use the following code:
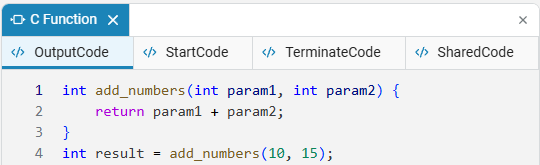
# Setting the path to the current block
CFunctionPath = engee.gcb()

# Getting mask parameter values
param1 = text_input_1
param2 = text_input_2

# C code generation depending on parameter
values c_code = """
int add_numbers(int param1, int param2) {
return param1 + param2;
}
int result = add_numbers($param1, $param2);
"""

# Setting the "OutputCode" parameter in the block C Function
engee.set_param!(CFunctionPath, "OutputCode" => c_code)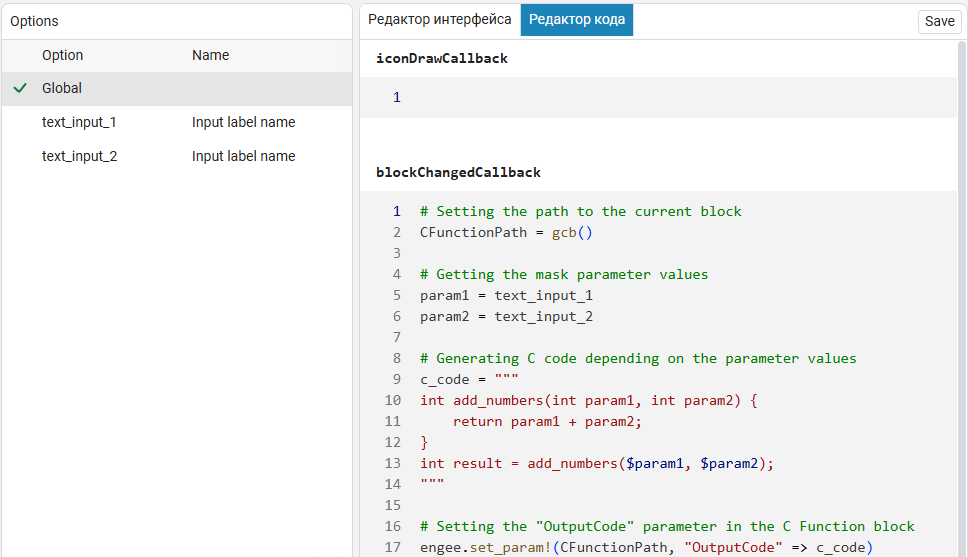
In this code, the path to the current C Function block is set using the function
engee.gcb(), after which the values are read fromtext_input_1andtext_input_2, which correspond to the block parametersparam1andparam2. Then a line of C code is created that defines the functionadd_numbers, adds two integers, and uses the entered values to calculate the result. With the helpengee.set_param!The "OutputCode" parameter of the C Function block is updated, setting the generated code. -
Now, when editing the mask parameters, the parameters of the C Function block also change, and their changed values end up in the source code in the OutputCode tab.:
|
|
A similar approach is implemented for other tabs of the source code of the C Function block. - StartCode and TerminalCode, as well as for the tabs of the Engee Function block — ExeCode and InhMethodsCode.
|
You can use more than just numeric values, for example:
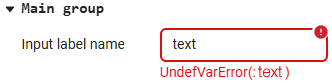
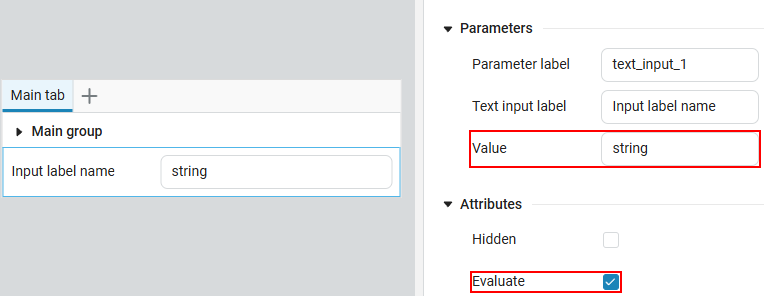
engee.set_param!(engee.gcb(), "OutputCode"=>"print($text_input_1)")When working with text fields, it is important to understand how the checkbox works. Evaluate ("Calculate"):
-
If the ** checkbox is selected, the entered value is interpreted as a Julia expression. The callback contains the result of the calculation of this expression. For example, the string
1:5it will turn into a range1:5. -
If the ** checkbox is unchecked, the entered value is considered a regular string and is passed to the callback unchanged.
If an expression with the "Calculate" checkbox cannot be calculated correctly (for example, an undeclared variable or a syntax error is used), the system will display an error.:
example of passing the mask parameter to the source code of the Engee Function block
-
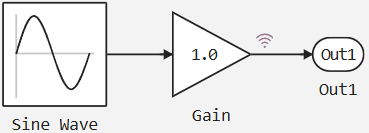
Assemble the model from blocks Sine Wave, Engee Function and Terminator and turn on recording
 The signal is as shown in the figure:
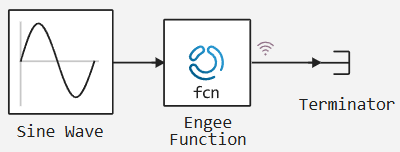
-
In the source code of the Engee Function block, add the following code:
struct Block <: AbstractCausalComponent end function (c::Block)(t::Real, x) return gain .* x end -
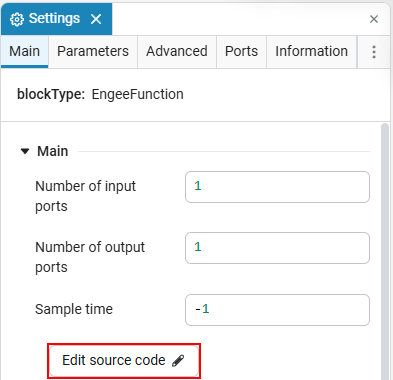
Open the mask editor for the Engee Function block, to do this, click on the block, select Mask → Add mask. In the mask editor, add Text input
, name the Gain parameter and set its value, for example 3: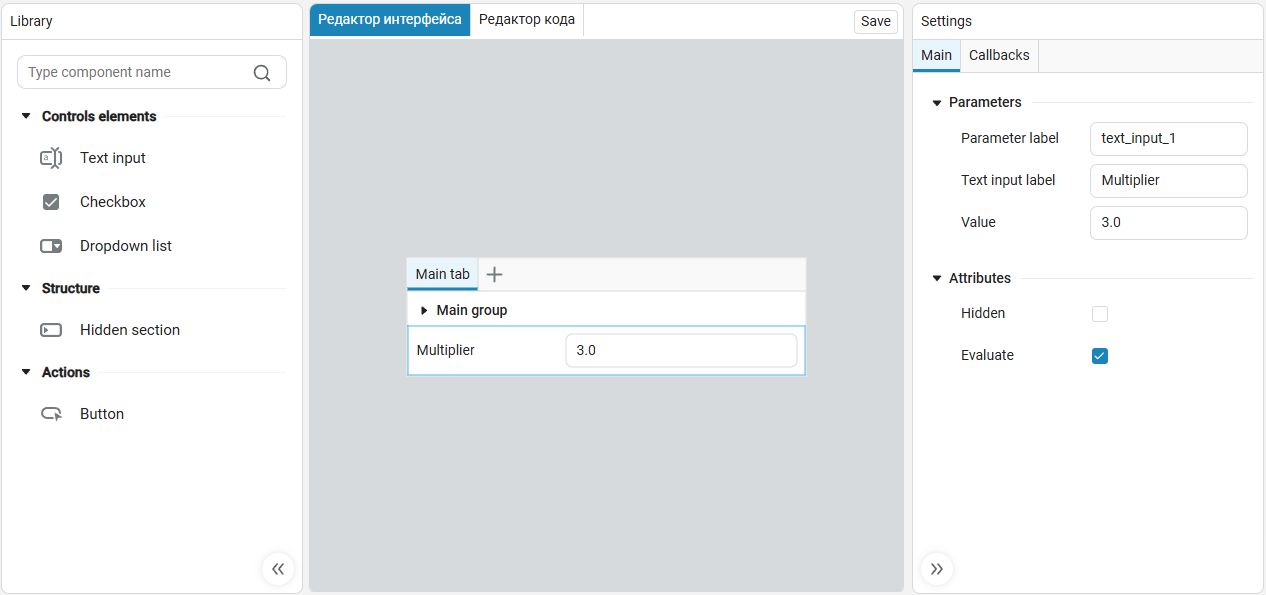
-
In the parameters of the Engee Function block, set the value of the gain parameter as shown in the figure:
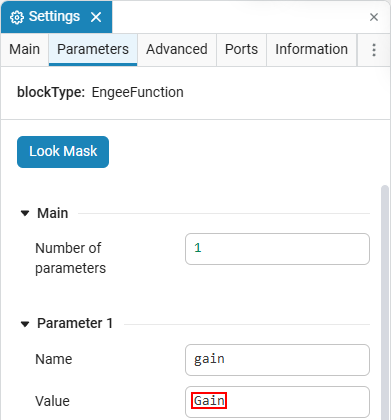
This approach allows you to use the value of the mask parameter from the block settings, adding it to the source code and applying the parameter name to get the specified value.:

-
Let’s test this approach using a graph by running a simulation of the model.:
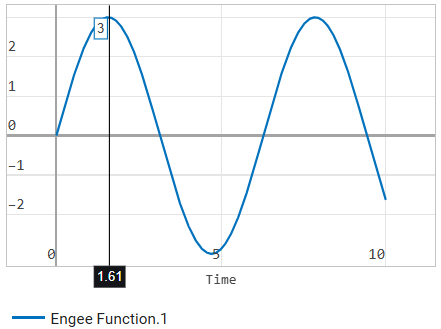
-
The value of the gain parameter is indeed 3, which means that the mask works perfectly with the source code of the Engee Function block.
example of a configurable subsystem (the Subsystem block)
Masks can be applied on top of blocks. Subsystem. Let’s consider a case in which it is required to control the parameters of subsystem blocks. If a numeric parameter is passed to the mask, then the usual functions (arithmetic, sin, abs, round, etc.) can be applied to it. For example, block parameters Sine Wave:
-
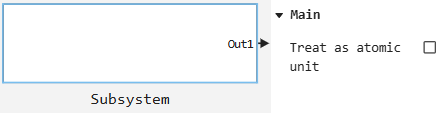
By default, the subsystem has no parameters other than Treat as atomic unit:
Go to the subsystem and add the Sine Wave block to it.
-
Right-click on the subsystem icon and select Mask → Add mask.
-
In the mask interface editor, add Dropdown list
. Add the Sample based and Time based parameters to the list.: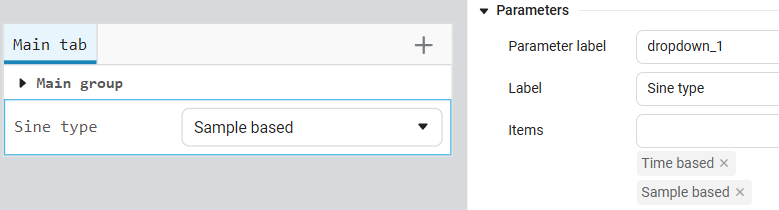
-
In the Mask code editor, go to the Global tab and in the callback iconDrawCallback add the following code:
engee.show(dropdown_1)This code will display the current value of the dropdown_1 parameter (dropdown list parameter) on the subsystem icon.
-
In the callback blockChangedCallback use the following code:
SinePath = engee.gcb() * "/Sine Wave"

mode = dropdown_1
if mode == "Time based"
engee.set_param!(SinePath, "SineType" => "Time based")
elseif mode == "Sample based"
engee.set_param!(SinePath, "SineType" => "Sample based")
end
This code changes the parameter
"SineType"of the Sine Wave block in the subsystem, depending on the value of the dropdown_1 mask parameter: if selected"Time based", is being installed"SineType"⇒"Time based"if"Sample based"Then"SineType"⇒"Sample based".
By changing the value of the Sine type parameter in the masked subsystem, this parameter is automatically changed in the Sine Wave block.
Time based is selected |
Sample based is selected |
|
|


example of passing the mask parameter to the Chart block
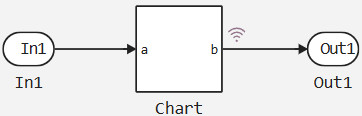
The mask parameters can be passed to the block Chart. For example, create a model from blocks Constant, Subsystem and To CSV as shown in the picture:

Add the Chart block to the subsystem. To connect it to the input (In1) and exit (Out1) subsystems, open the Chart block and create input) and (output ports via settings window ![]() . Also add two local variables:
. Also add two local variables:
-
local_input with the value
input; -
local_c with the value
c.
These variables will receive values from the subsystem mask.
After that, create condition  . give it a name and write an expression using local variables, inputs and outputs. Make sure that the names of the variables in the state match those specified in the settings of the Chart block. The result is a finite state machine model with configured inputs, outputs, and variables.:
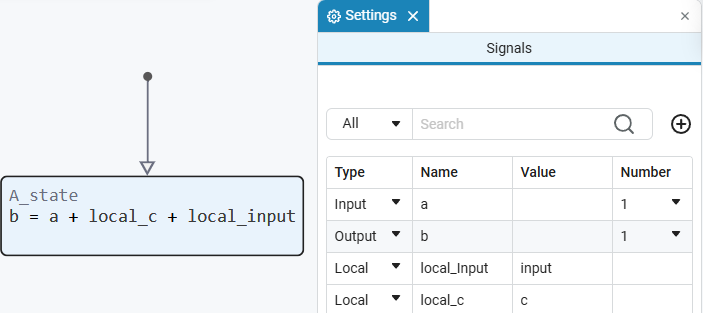
Now the model inside the subsystem will look like this:
Using masks, create the following Text input for the Chart block:
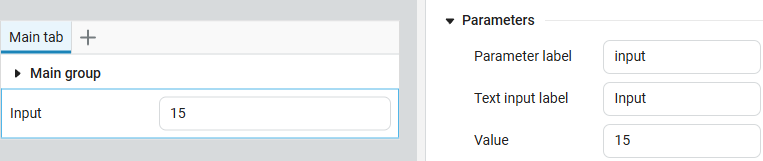
Navigate to the top level of the model using navigation bars and for the Subsystem block, create a mask with the following Text input :

Run the model  . At the end of the simulation in file browser
  A CSV file will be created showing the results of the time simulation.:
time,1
0.0,22.0
0.01,22.0
0.02,22.0
0.03,22.0
0.04,22.0
0.05,22.0
0.06,22.0
0.07,22.0
0.08,22.0
...
9.96,22.0
9.97,22.0
9.98,22.0
9.99,22.0
10.0,22.0
The result is 22, which confirms the correctness of the expression calculation in the state of the Chart block: local_c = c = 6 (from the Subsystem mask), local_input = input = 15 (from the Chart block mask), their sum is 21, and the Constant block adds more 1, getting the final value 22.