Programming the STM32 from Engee
This example examines the execution of the Engee model on the STM32F407VGT6 microcontroller on the Discovery debugging board. The work is explained for two available frameworks for STM32: stm32duino and stm32cube. Examples of models and the results of their implementation are given.
Introduction
Engee integration with embedded systems, as well as with external devices/interfaces is carried out through the Engee platform.Integration.
First of all, you need to install this Engee component according to документации. And connect the client program to the Engee server.
In this example, we will need two sections of the Engee block library. Оборудование -> Target:
Arduino- to work through the stm32duino frameworkSTM32- for working through the stm32cube framework
The microcontroller used in the example is the STM32F407VGT6 on the Discovery debugging board (STM32F407G-DISC1). The board has a built-in STLink debugger, which we will use to flash the controller.
To demonstrate the operation, we will use 4 digital outputs connected to the built-in LD3-LD6 (PD12-15) LEDs on the board.
To exchange data between the microcontroller and Engee interactively, we use USART2 (RX - PA3, TX - PA2). A CP2102-based converter is used as a UART<=>USB converter. The connection diagram is shown below.
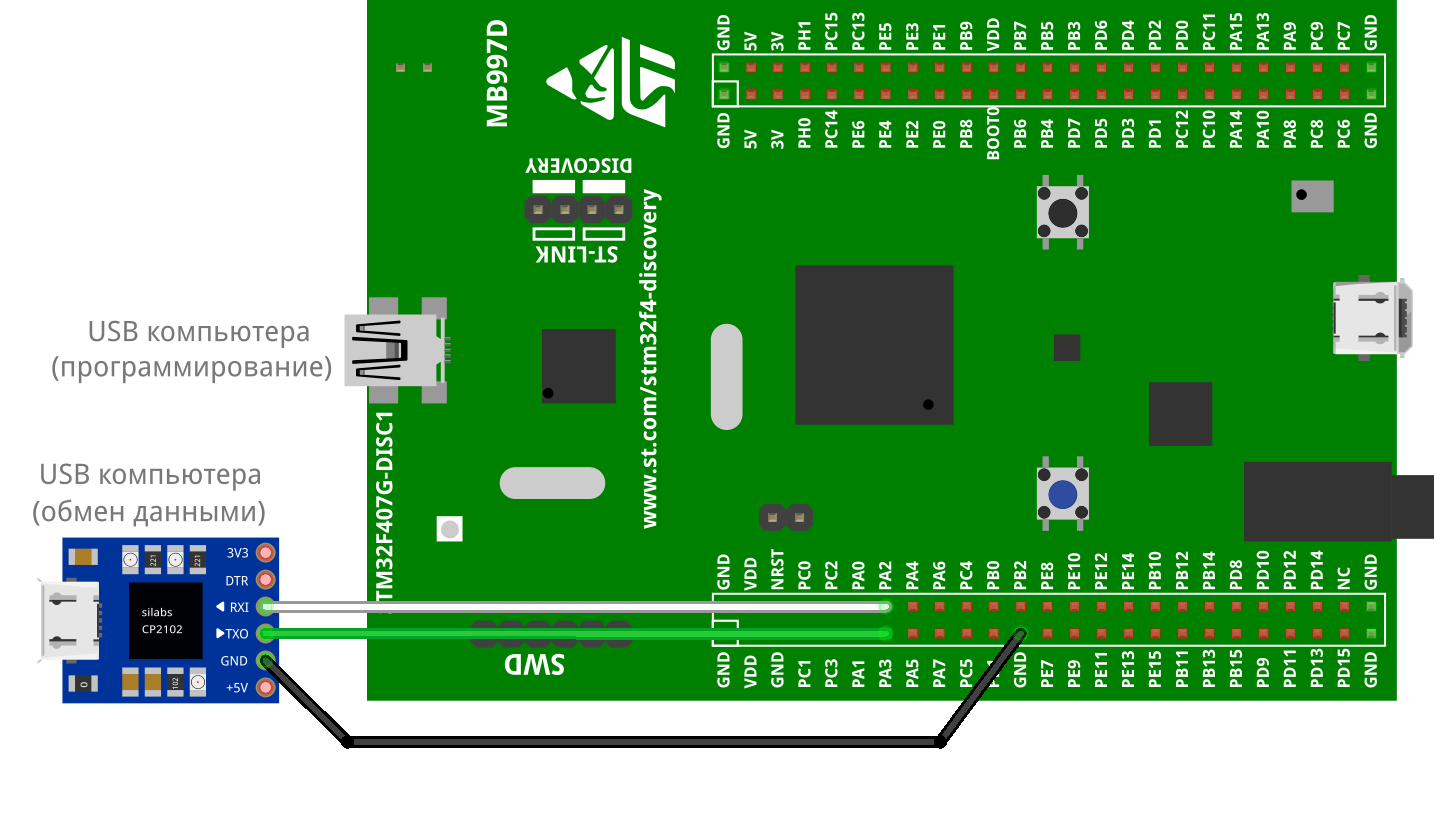
Connect the debugging board to the computer and install all the necessary drivers (STLink and CP2102).
stm32duino (EDM-Target-Arduino)
Preparation of necessary components
When working through the Arduino support package, it is required:
-
Download and install arduino-cli.exe
-
add arduino-cli to system paths, initialize configuration, update index платформ
-
Download and install the STM32 library:
arduino-cli core install STMicroelectronics:stm32 --additional-urls https://github.com/stm32duino/BoardManagerFiles/raw/main/package_stmicroelectronics_index.json
Now, when calling the command
arduino-cli board listall
A similar conclusion can be observed:
Наименование платы               FQBN
.
.
.
Blues boards                     STMicroelectronics:stm32:Blues
Discovery                        STMicroelectronics:stm32:Disco
.
.
.
Generic STM32C0 series           STMicroelectronics:stm32:GenC0
Generic STM32F0 series           STMicroelectronics:stm32:GenF0
Generic STM32F1 series           STMicroelectronics:stm32:GenF1
Generic STM32F2 series           STMicroelectronics:stm32:GenF2
Generic STM32F3 series           STMicroelectronics:stm32:GenF3
Generic STM32F4 series           STMicroelectronics:stm32:GenF4
Generic STM32F7 series           STMicroelectronics:stm32:GenF7
Generic STM32G0 series           STMicroelectronics:stm32:GenG0
Generic STM32G4 series           STMicroelectronics:stm32:GenG4
Generic STM32H5 series           STMicroelectronics:stm32:GenH5
Generic STM32H7 Series           STMicroelectronics:stm32:GenH7
Generic STM32L0 series           STMicroelectronics:stm32:GenL0
Generic STM32L1 series           STMicroelectronics:stm32:GenL1
Generic STM32L4 series           STMicroelectronics:stm32:GenL4
Generic STM32L5 series           STMicroelectronics:stm32:GenL5
Generic STM32U0 series           STMicroelectronics:stm32:GenU0
Generic STM32U3 series           STMicroelectronics:stm32:GenU3
Generic STM32U5 series           STMicroelectronics:stm32:GenU5
Generic STM32WB series           STMicroelectronics:stm32:GenWB
Generic STM32WB0 series          STMicroelectronics:stm32:GenWB0
Generic STM32WBA series          STMicroelectronics:stm32:GenWBA
Generic STM32WL series           STMicroelectronics:stm32:GenWL
Generic STM32WL3 series          STMicroelectronics:stm32:GenWL3
.
.
.
This means that the arduino-cli is ready to work with the STM32.
The example model
Now let's implement the running lights model.
The example model - stm32duino_running_lights.engee.
.png)
It implements an elementary algorithm for alternately transmitting a vector of on and off LEDs to a demultiplexer with four outputs.
To program the target Arduino device, you need to install the block EDM-Target-Arduino.
To work with the STM32 in this block, you need to set the following settings:
- Manufacturer:
STMicroelectronics. - Architecture:
stm32. - Payment ID:
Disco.
These three parameters (the full name of the board) are the FQBN that we saw when calling the command arduino-cli board listall. You can also find it out when calling arduino-cli board list.
In the Environment settings section, you should pay attention to the following:
- The path to ArduinoCLI can be specified explicitly
"D:\targets\engee-device-manager.exe", or you can specifyautothen the path to the arduino-cli will be taken from the system paths. - COM port - the name of the port used for interactive data exchange. In our case, this is
COM8, which includes the CP2102 converter. - The Model directory is a folder on your computer where the C-code generated from the model, the .ino script, and binary files will be saved.
To work with peripherals - digital outputs, we use the block Arduino-digitalWrite.
It is enough to specify the corresponding channel numbers/ port names for the STM32 in symbolic form. In our case:
:PD12, :PD13, :PD14, :PD15
Model Execution
To execute the model, you need to switch the environment выполнения: Engee -> Targer Hardware.
After that, you can run the model in independent (without data exchange), or in interactive mode (with data exchange).
In the second case, we get the opportunity to observe the recorded signals in Engee and change the model parameters on the fly.
Below is a demonstration of the model's operation in independent mode on the STM32:
stm32cube (EDM-Target-STM32)
Preparation of necessary components
When working through the Arduino support package, it is required:
-
Download and install STM32CubeMX - it will be used for peripheral configuration and code generation of the CubeMX project.
-
Download and install STM32CubeIDE - it will be used to compile the code and firmware of the controller.
- STM32CubeIDE can be replaced by using a compiler
gcc-arm-none-eabiand utilities for firmwareSTM32CubeProgrammerCLI.
- STM32CubeIDE can be replaced by using a compiler
-
download, install and add to system paths [CMake](https://cmake.org /)to generate the project code.
-
prepare a CubeMX project with the configuration of the used peripherals and generate the code.
Preparation of the CubeMX project
Detailed instructions for correctly configuring the CubeMX project are provided in документации.
In this example, we use:
- GPIO PD12-15.
- USART2 interface for data exchange according to рекомендациям.
- FREERTOS scheduler according to рекомендациям.
Below are images of pin selection on the controller card.:
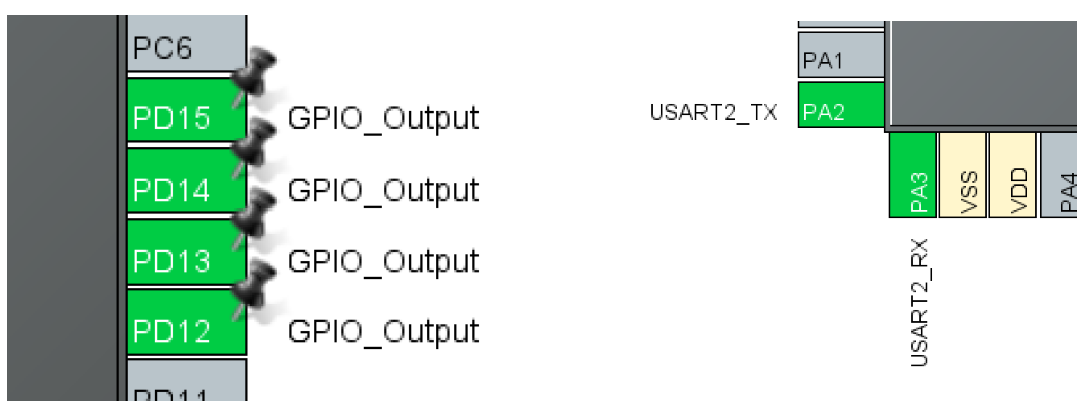
CubeMX project file - stm32cube_running_lights.ioc it is attached in the project files.
The example model
The example model - stm32duino_running_lights.engee.
The model in question differs from the previous one only in the blocks of the STM32 support package:
.png)
Project configuration block EDM-Target-STM32 requires defining the following settings for our example:
- Family:
f4xx(for F407VGT6 controller) - Programmer:
stlink(since we use the STLink programmer built into the board) - Path to the build toolchain:
C:\ST\STM32CubeIDE_2.1.1\STM32CubeIDE\plugins\com.st.stm32cube.ide.mcu.externaltools.gnu-tools-for-stm32.14.3.rel1.win32_1.0.100.202602081740\tools\bin\arm-none-eabi-gcc.exe(the path to the locationarm-none-eabi-gccon the computer, you can specify<auto>f) - The path to the firmware utility:
C:\ST\STM32CubeIDE_2.1.1\STM32CubeIDE\plugins\com.st.stm32cube.ide.mcu.externaltools.cubeprogrammer.win32_2.2.400.202601091506\tools\bin\STM32_Programmer_CLI.exe(the path to the locationSTM32_Programmer_CLIon the computer, you can specify<auto>) - Path to the CubeMX project:
D:\targets\stm32cube\stm32cube_running_lights\(the path where the project was saved and generated from CubeMX) - Planner:
freeRTOS(defined in the CubeMX project) - COM port:
COM8(name of the port for interactive data exchange) - Redundant USART module:
2(defined in the CubeMX project)
After these settings, you can proceed to the execution of the model on the STM32.
Model Execution
Similar to the previous execution, you need to switch the execution environment of the model and you can use both modes. Thanks to the FreeRTOS scheduler, the step size of the model will be maintained when executing code on the controller.
A demonstration of the operation of the STM32 model in independent mode is shown in the recording below.:
Conclusion
In the example, we reviewed and tested the programming of STM32 from Engee in two frameworks: stm32duino and stm32cube, and, accordingly, for two support packages - Arduino and STM32.
The model project files and the CubeMX project are convenient to use to start user projects with STM32.