Code generation for MIC32 (Hello, Engee!)
This demo shows the development of the Engee model for transmitting a message in Morse code on a flashing LED, followed by code generation and execution on the MIK32 NUKE V0.3 debugging board.
Introduction
In this example, the MIK32 NUKE V0 debugging board is used as the target device.3 based on microcontroller [K1948VK018 MIK32 Amur](https://mikron.ru/products/mikrokontrollery/mk32-amur /). Engee has developed a model for generating and delivering pulses of a Morse code-encoded message. Since the "Blink" program for embedded programming is an analog of the first "Hello, World!" program, in this example we will combine both programs, and the LED of the debugging board will flash us the message "Hello, Engee!". The GPIO 9 is used as the digital output for transmitting the message, with the VD3 LED built into the debugging board connected to it.
The code was compiled and uploaded to the microcontroller from VS Code with the PlatformIO extension.
Description of the model
The model of this example - mik32_blink.engee. Blocks C Function - "systemClockConfig" and "HAL_GPIO_WritePin_9" are used to configure the clock system and work with the peripheral (digital output), respectively. Block Repeating Sequence Stair "Sequence" generates an encoded message - a sequence of binary code specified by a variable Код_Морзе.
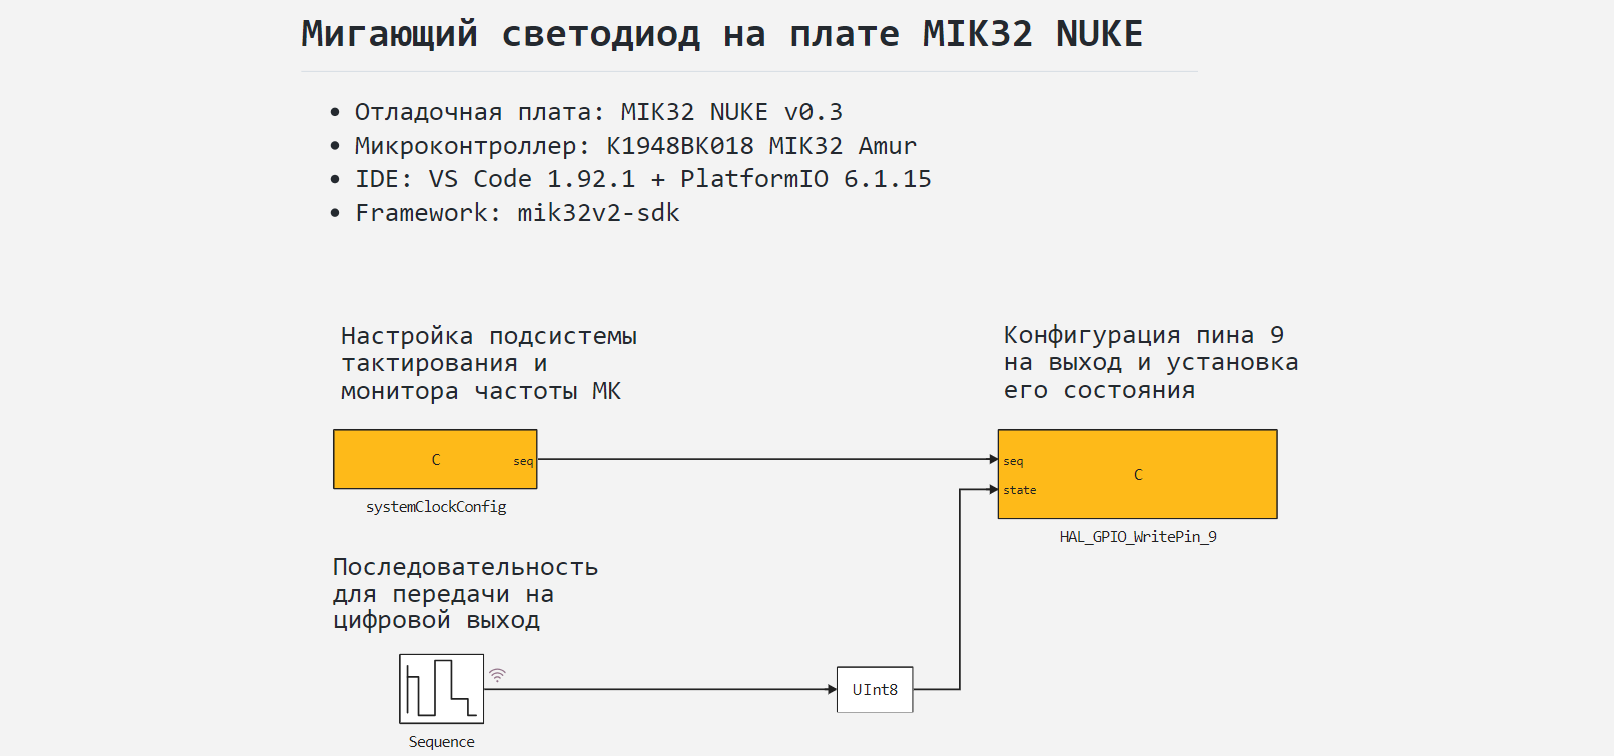
Also, to convert the signal at the output of the "Sequence" block, a data type conversion block is used, in this case from Float64 in UInt8.
Connecting peripherals
Block C Function "systemClockConfig" contains meaningful code only on the tab <\> StartCode, which is used to configure the clock subsystem of the microcontroller frequency monitor. The function generated from this block is called only during initialization. Ports seq blocks C Function It is used only to establish a clear sequence of blocks during code generation. To call functions from the standard library of hardware abstractions of the microcontroller MIC32 (mik32_hal), used in the code of peripheral connection blocks, in the block settings C Function "systemClockConfig" header files are attached mik32_hal_pcc.h and mik32_hal_gpio.h. These files are contained in a subfolder include the project.
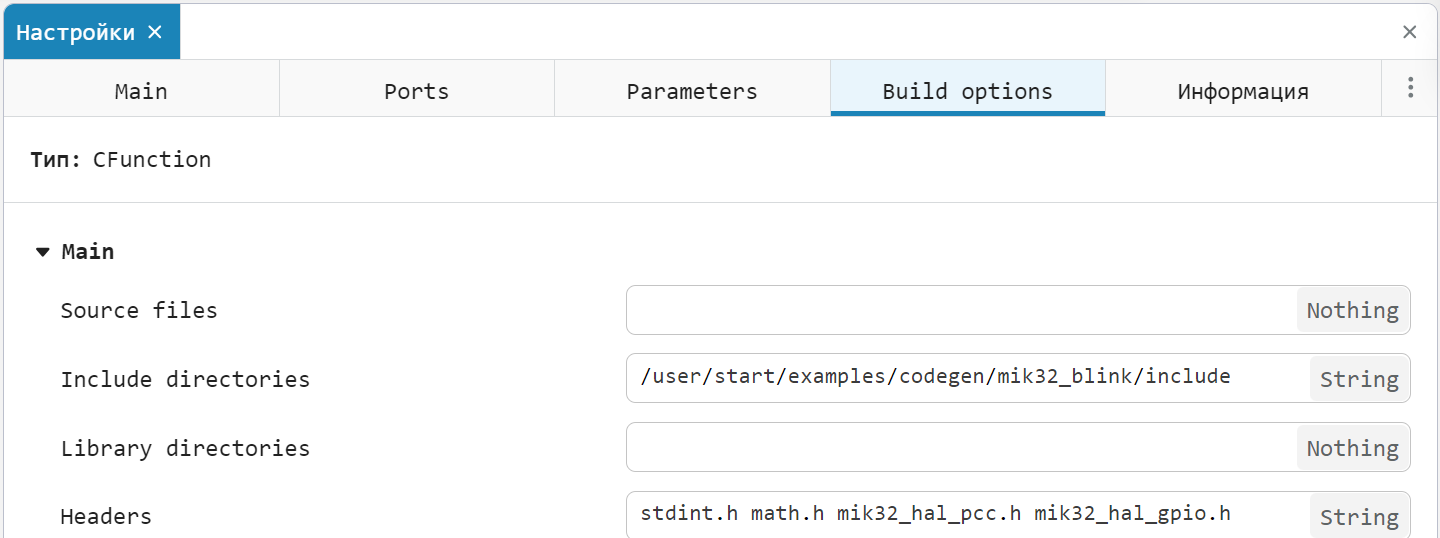
You do not need to download these files and connect them to the project in the VS Code environment, since if the environment is configured correctly, they are already contained in the corresponding PlatformIO packages.
A detailed description of the principles of the code embedded in C Function given in the comments to the block code.
Sequence formation
Set for encoding in alphabet Морзе We will simplify the message "Hello, Engee!" - the message "HELLO" is a common abbreviation for greeting in radio broadcasts. And since it will be continuously cyclically repeated, we will add a space at the end of it. Thus, our entire message will now look like this: "HELLO, ENGEE! ".
Morse code encoding is performed according to the following rules:
- the element with the shortest duration is a dot,
- a dash is equal in duration to three dots,
- the gap between the elements in one letter is equal in length to the point,
- the gap between letters (signs) in one word is equal to three dots in length.,
- the gap between words is 7 dots,
- With an average transmission rate of ~60-140 letters (characters) per minute, the dot duration is approximately 100 ms.
The spaces between letters are formed at the end of the letter. It also follows that a space of 4 dots is used to separate words. The signs used in the message are encoded by the following sequences of elements:
| Symbol | Morse code | Binary code |
| D or D | $-\cdot\cdot$ | 111 0 1 0 1 000 |
| E or E | $\cdot$ | 1 000 |
| G or Z | $--\cdot$ | 111 0 111 0 1 000 |
| N or H | $-\cdot$ | 111 0 1 000 |
| R or P | $\cdot-\cdot$ | 1 0 111 0 1 000 |
| Z or Z | $--\cdot\cdot$ | 111 0 111 0 1 0 1 000 |
| , | $\cdot-\cdot-\cdot-$ | 1 0 111 0 1 0 111 0 1 0 111 000 |
| ! | $--\cdot\cdot--$ | 111 0 111 0 1 0 1 0 111 0 111 000 |
| space bar | 0000 |
To write an encoded message to a block Repeating Sequence Stair The dots and dashes will be converted to units with a duration of 1 and 3, respectively. The gaps will be converted to zeros: between the elements - 1 zero, between the letters - 3 zeros, between the words - 3 zeros at the end of the letter and 4 zeros spaces.
Knowing all the codes for the characters in the message, you can encode the entire message.:
Символы = collect("HELLO, ENGEE! ")
Morse_script = (Int64)[];

for Iteration in 1:size(Characters, 1)

    if (Символы[Итерация] == 'D')||(Символы[Итерация] == 'D')
        Character_code = [1,1,1,0,1,0,1,0,0,0];
    elseif (Символы[Итерация] == 'E')||(Символы[Итерация] == 'E')
        Character_code = [1,0,0,0];
    elseif (Символы[Итерация] == 'G')||(Символы[Итерация] == 'G')
        Character_code = [1,1,1,0,1,1,1,0,1,0,0,0];
    elseif (Символы[Итерация] == 'N')||(Символы[Итерация] == 'N')
        Character_code = [1,1,1,0,1,0,0,0];
    elseif (Символы[Итерация] == 'R')||(Символы[Итерация] == 'R')
        Character_code = [1,0,1,1,1,0,1,0,0,0];
    elseif (Символы[Итерация] == 'Z')||(Символы[Итерация] == 'Z')
        Character_code = [1,1,1,0,1,1,0,1,0,1,0,0,0];
    elseif Символы[Итерация] == ' '
        Character_code = [0,0,0,0];
    elseif Символы[Итерация] == ','
        Character_code = [1,0,1,1,1,0,1,0,1,1,0,1,0,1,0,1,1,0,0];
    elseif Символы[Итерация] == '!'
        Character_code = [1,1,1,0,1,1,1,0,1,0,1,0,1,1,1,0,1,1,0,1,1,0,0];
    end

code_morse_script = vcat(Code_Morse_script, Character_code);
end
Now the variable Код_Морзе_скрипт from the Engee workspace, our encoded message can be passed to the model.
Simulation results
To simulate a flashing LED with an encoded message, load and run the model mik32_blink.engee:
if "mik32_blink" in [m.name for m in engee.get_all_models()]
    m = engee.open( "mik32_blink" );
else
    m = engee.load( "$(@__DIR__)/mik32_blink.engee" );
end

# we are transmitting a message encoded in the script for modeling -
# thus, we replace the variable `Code'._Morse code`, loaded in callbacks
Morse Code = Code_Morse_script

data = engee.run(m);
From the obtained simulation data, we will plot the signal graph Sequence.1 - sequence shaper output:
using Plots
gr()

plot(данные["Sequence.1"].time, данные["Sequence.1"].value;
     label = :none, st = :step, lw = 2, size = (800, 150),
     title = "HELLO, ENGEE! ")

As can be seen from the simulated graph, the encoded message is formed successfully and according to the specified rules. Now you can proceed to code generation and model code execution on the target device.
Code generation
We will generate the code from the model for subsequent loading of the control algorithm into the microcontroller.:
engee.generate_code( "$(@__DIR__)/mik32_blink.engee",
                     "$(@__DIR__)/mik32_blink_code")
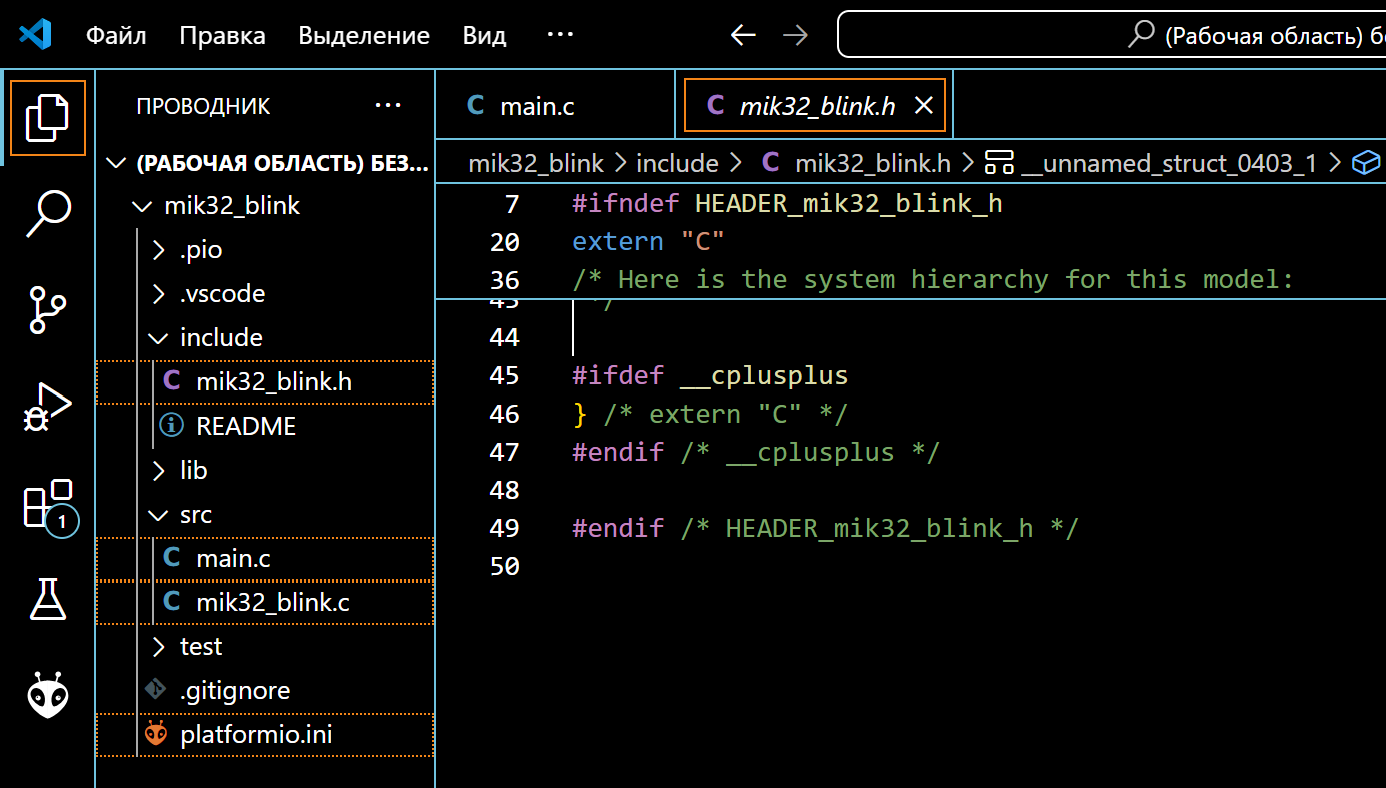
Created in the folder mik32_blink_code header files mik32_blink.h and the original mik32_blink.c we continue to use it when building the project. Generated main program file main.c It will not be used in the project. It has been prepared for code execution in the development environment. main.c located in the root folder mik32_blink an example.
Project preparation in the development environment
The development environment through which the project is built and uploaded to the target device is VS Code with the PlatformIO add-on. The environment and connection configurations are not considered in this example, as they are described in detail on ресурсах the developer of the controller.
From the sample directory, we will transfer the generated files to the PlatformIO project., main.c and the configuration file platformio.ini.
After that, you can proceed to build the project and download the program.
Code execution on MIC32
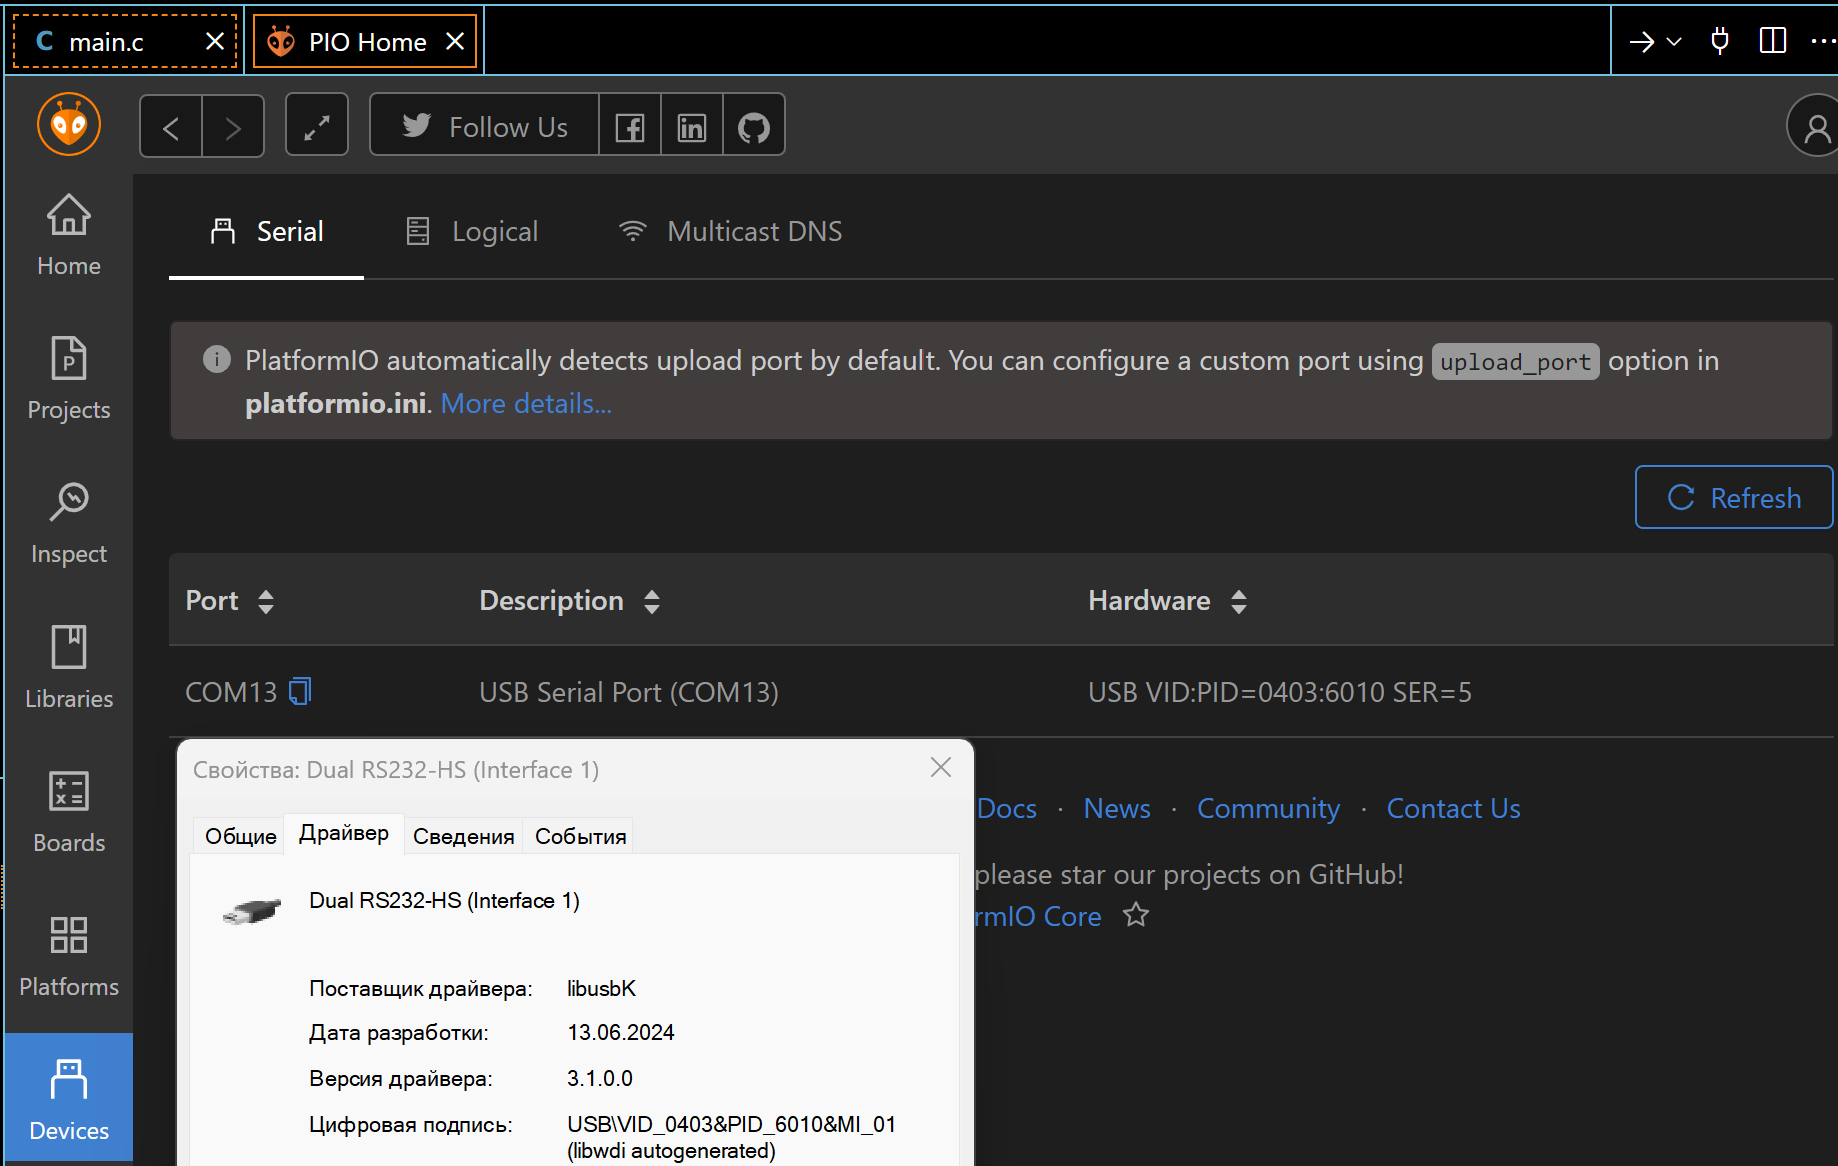
Connect the debugging board MIK32 NUKE V0.3 to the USB port of the computer, after which we can observe the connected device in PlatformIO. A USB driver is required to correctly identify the connection of this card. The example uses the driver libusbK.
After successful activation, we will proceed to building the project.:
“PLATFORMIO -> PROJECT TASKS -> mik32v2 -> General -> Build”.
If there are no build errors, we will upload the compiled code to the microcontroller.:
“PLATFORMIO -> PROJECT TASKS -> mik32v2 -> General -> Upload”.
As a result of executing the code generated from the Engee model, it is possible to observe the formation of a Morse code-encoded message by a flashing LED.
Conclusion
In this example, we examined the development of the Engee model for a built-in LED control program for issuing an encoded message on the K1948VK018 MIK32 Amur microcontroller as part of the MIK32 NUKE V0.3 debugging board. The developed model is embedded with the generated files in the PlatformIO environment project for VS Code, followed by assembly, download, and execution on the target device.