MPU6050 Position Sensor Joystick for STM32F4
This demo example examines the Engee model for reading axial rotation angles with a Kalman filter, converting the resulting angles, and transmitting limited rotation angles to a serial port.
Introduction
A project based on the Engee model stm32_mpu6050.engee, performs the following tasks:
- receiving via the I2C controller STM32F446RE acceleration and rotation speeds along three axes of rotation from the sensor MPU6050;
- conversion of these values into axial rotations - roll, pitch, yaw with Kalman filter;
- receiving discrete signals "Fixation", "Scale switching";
- conversion of axial rotations into deviations of the coordinates of the joystick normal vector in the Cartesian coordinate system;
- conversion of coordinate deviations into angles turning the joystick in spherical coordinates;
- limitation of the angles obtained accordingly;
- output of variables: angles , "Fixing", "Switching scale" to the universal receiver-transmitter (USART).
Elements and environment:
- Debugging board: NUCLEO-F446RE
- Microcontroller: STM32F446RE
- Input channels: I2C, 2 DI
- Output channels: USART (COM)
- Three-axis accelerometer-gyroscope sensor: MPU6050 (GY-521)
- Development Environment: Engee -> VS Code 1.92.1 + PlatformIO 6.1.15
- Framework PlatformIO: stm32duino
The used framework PlatformIO - stm32duino is used due to the availability of ready-made debugged plug-in files for working with the MPU6050 sensor and the Kalman filter for Arduino microcontrollers.
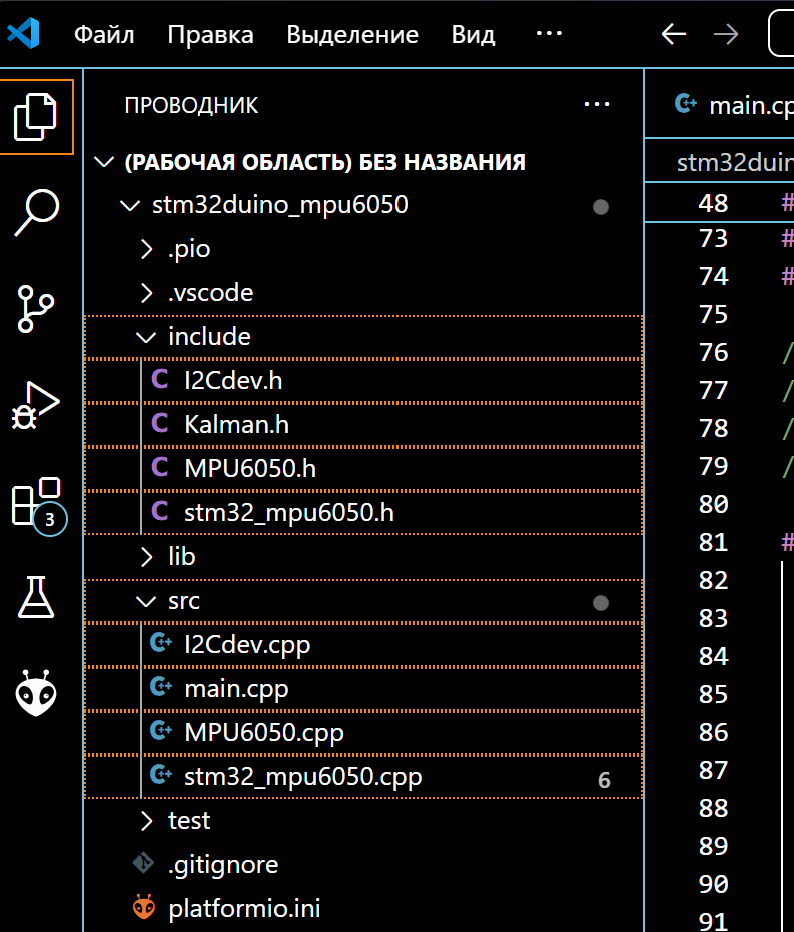
Project Files
The project directory in the file browser:
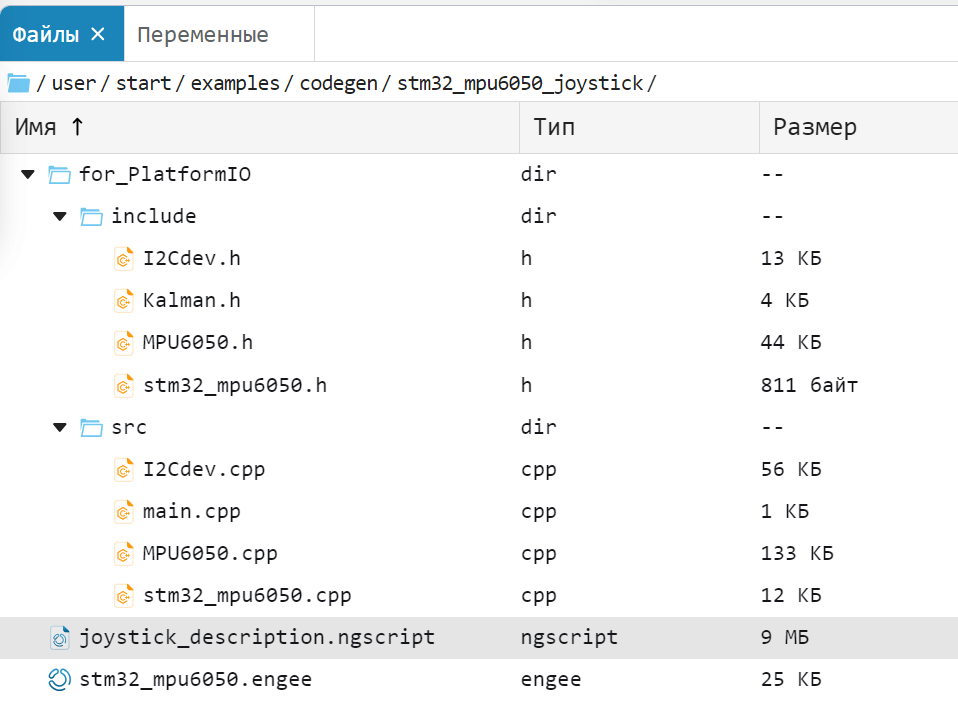
for_PlatformIO- a folder with files for the PlatformIO project:-
include- folder with pluggable files:
-
-
I2Cdev.h- header file of the I2C interface;
-
-
-
Kalman.h- the header file of the Kalman filter (** is also included in the model!**);
-
-
-
MPU6050.h- sensor header file MPU6050 (is also included in the model!);
-
-
-
stm32_mpu6050.h- generated Engee model header file;
-
-
source- folder with C/C++ source files:
-
-
I2Cdev.cpp- the I2C interface source file;
-
-
-
main.cpp- the main user program file;
-
-
-
MPU6050.cpp- sensor source file MPU6050;
-
-
-
stm32_mpu6050.cpp- renamed generated source file of the Engee model;
-
joystick_description.ngscript- current Engee script;stm32_mpu6050.engee- the Engee model of this project.
We will add paths and names of some files and folders for team management of modeling, code generation and working with files.
Pkg.add(["FilePathsBase"])
имя_модели = "stm32_mpu6050";
папка_проекта = "$(@__DIR__)/";
путь_модели = папка_проекта * имя_модели * ".engee";
путь_генератора_кода = папка_проекта * "model_code/";
путь_platformIO_CPP = папка_проекта * "for_PlatformIO/src/";
путь_platformIO_H = папка_проекта * "for_PlatformIO/include/";
Description of the model
Model stm32_mpu6050.engee This project can be divided into the following functional groups of blocks:
- blocks for converting axial rotation angles,
- blocks of interaction with the microcontroller peripherals.
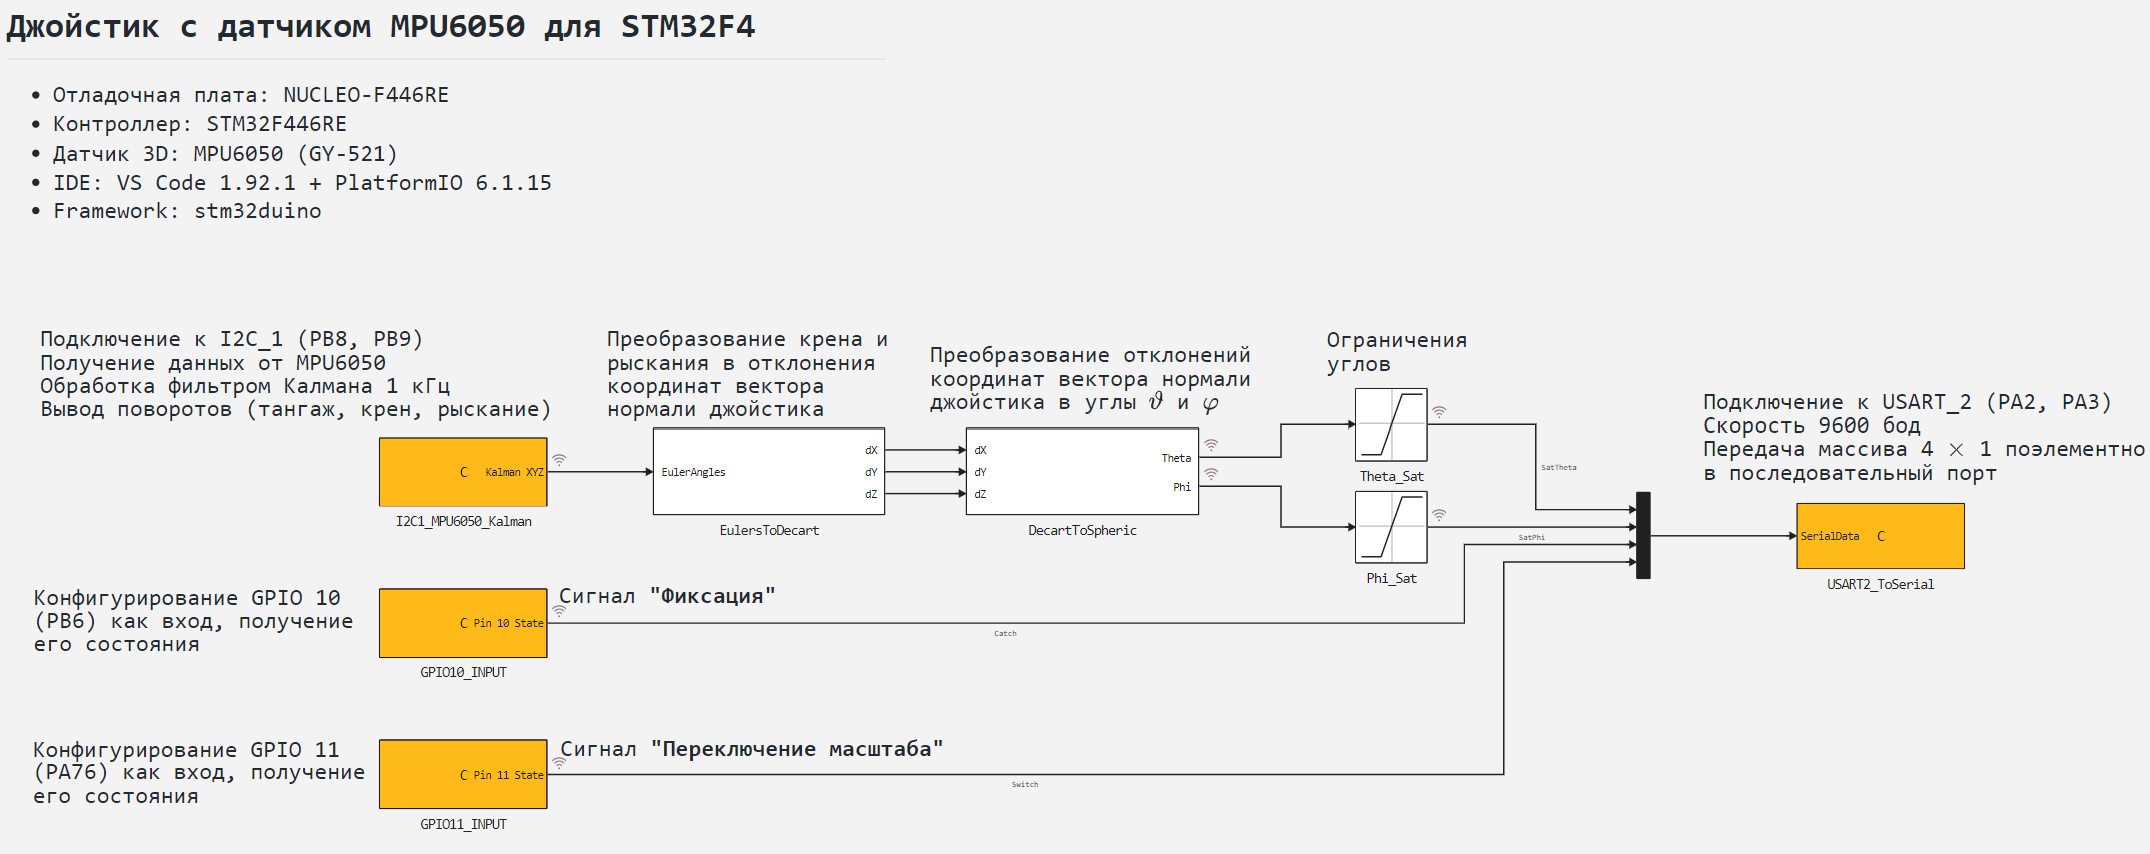
Calculations implemented by the subsystem EulersToDecart the values of the rotation angles along the axes obtained by the Kalman filter are converted into deviations in Cartesian coordinates of the normal vector of the joystick originating from the origin:
Subsystem DecartToSpheric in fact, it performs reverse transformations.:
After converting the received signals into the joystick rotation angles, they are limited in accordance with the specified ranges.
Peripheral Blocks
The project model contains 4 microcontroller peripheral units implemented using blocks C Function:
I2C1_MPU6050_Kalman- to initialize the I2C_1 interface, receive data from MPU6050 and filter angles by rotation axes;GPIO10_INPUT- to initialize the PB6 contact as a digital input, to obtain its status;GPIO11_INPUT- to initialize the contact PA7 as a digital input, to obtain its status;USART2_ToSerial- to initialize the USART_2 interface and transmit over the serial port at a speed of 9600 baud, output an array of values to the serial port.
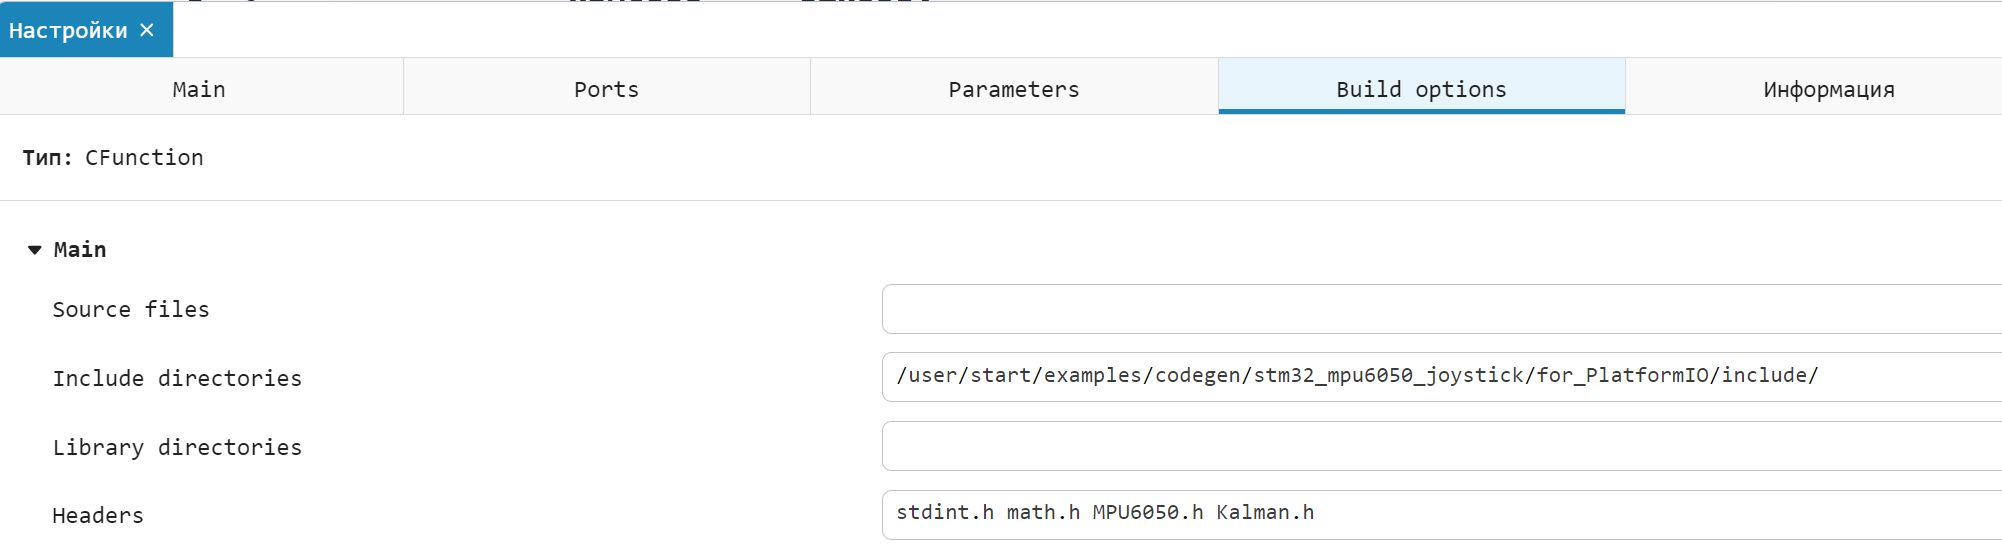
To include ready-made code for I2C, MPU6050 and the Kalman filter in the code generation results files, these files and the path to them are specified in the block C_Function "I2C1_MPU6050_Kalman":
Also the block C Function "I2C1_MPU6050_Kalman" generates a change in the rotation angles of the sensor around the Y and Z axes during the simulation.
Detailed description of how the code from the blocks works C Function given in his comments.
The results of the model's work
To simulate the transformation of rotation angle values, load and run the model stm32_mpu6050.engee:
if the model name is in [m.name for m in engee.get_all_models()]
    m = engee.open(model name);
else
    m = engee.load(model path);
end

data = engee.run(m);
From the obtained simulation data, we extract variables for constructing signals.:
KalmanY- the simulated rotation angle around the Y axis,KalmanZ- simulated rotation angle around the Z axis,SatTheta- calculated angle ,SatPhi- calculated angle .
# we extract variables from the model data to build
KalmanY = Base.stack(данные["KalmanXYZ"].value, dims = 1)[:, 2];
KalmanZ = Base.stack(данные["KalmanXYZ"].value, dims = 1)[:, 3];
SatTheta = данные["SatTheta"].value;
SatPhi = данные["SatPhi"].value;
using Plots;
gr();
plot(
     plot(данные["KalmanXYZ"].time, [KalmanY, KalmanZ];
          label=["Y-rotation, rad" "Z rotation, rad"], lw=1, legend=:bottomright),
     plot(данные["SatTheta"].time, [SatTheta, SatPhi];
          label=["Angle ϑ, rad" "Angle φ, rad"], lw=1, legend=:bottomright);
     layout=(1,2), size=(900,300)
)
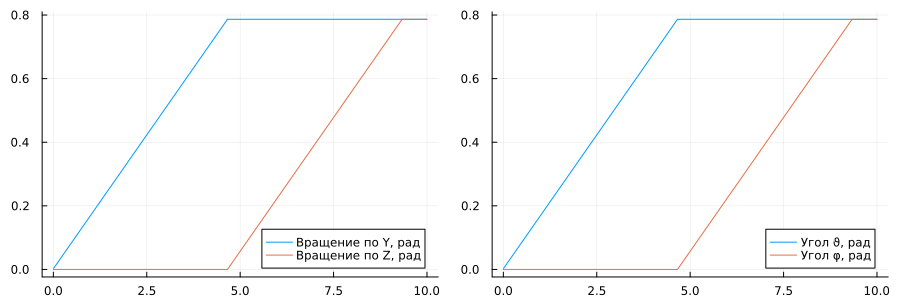
As can be seen from the graphs formed by the block C Function "I2C1_MPU6050_Kalman" the sensor rotation angles around the Y and Z axes are converted to angles without changing the values.
Code generation
We will generate the code from the model for subsequent loading of the control algorithm into the microcontroller.
engee.generate_code(путь_модели, путь_генератора_кода); # generating code from a model
Since the project in IDE VS Code + PlatformIO will continue to be built from C++ files, it is necessary to change the extension for a successful build. .c the generated file on .cpp. First, go to the folder of generated files and view its contents.:
cd(путь_генератора_кода);   # going to the directory
readdir()   # output of directory contents
Here: stm32_mpu6050.c - the C file generated by the code from the previous script cell. Let's change the extension of the newly generated C file. To overwrite a file with an existing name, apply the attribute force = true. After that, we will display the contents of the folder with the results of code generation again.
mv(имя_модели * ".c", имя_модели * ".cpp"; force=true); # changing the extension of the generated file
readdir()   # output of directory contents
The extension of the newly generated C file has been changed. Before adding the project files to the IDE, it remains to transfer the received files to folders. src and include for the PlatformIO project. It is convenient to use the library for this. FilePathsBase.jl
# # If necessary, uncomment the cell for downloading and installing the library
# import Pkg;
# Pkg.add("FilePathsBase")
using FilePathsBase

# transferring files by folder for the PlatformIO project
mv(AbstractPath(имя_модели * ".cpp"),
   AbstractPath(путь_platformIO_CPP * имя_модели * ".cpp");
   force = true);
mv(AbstractPath(имя_модели * ".h"),
   AbstractPath(путь_platformIO_H * имя_модели * ".h");
   force = true);
Generated main.c It will not be used in the project, you can delete the file and its directory.:
cd("..") # moving to a higher level in the file browser
rm(путь_генератора_кода; recursive=true) # delete the folder and main.c
Now you can proceed to configuring the hardware and working with the IDE.
Hardware part
The hardware part of the project, consisting of the previously mentioned elements, has the following connection scheme: The MPU6050 sensor is connected to the I2C_1 interface on the NUCLEO F446RE debugging board, push-button contacts for sending discrete signals to the GPIO10 and GPIO11 pins.
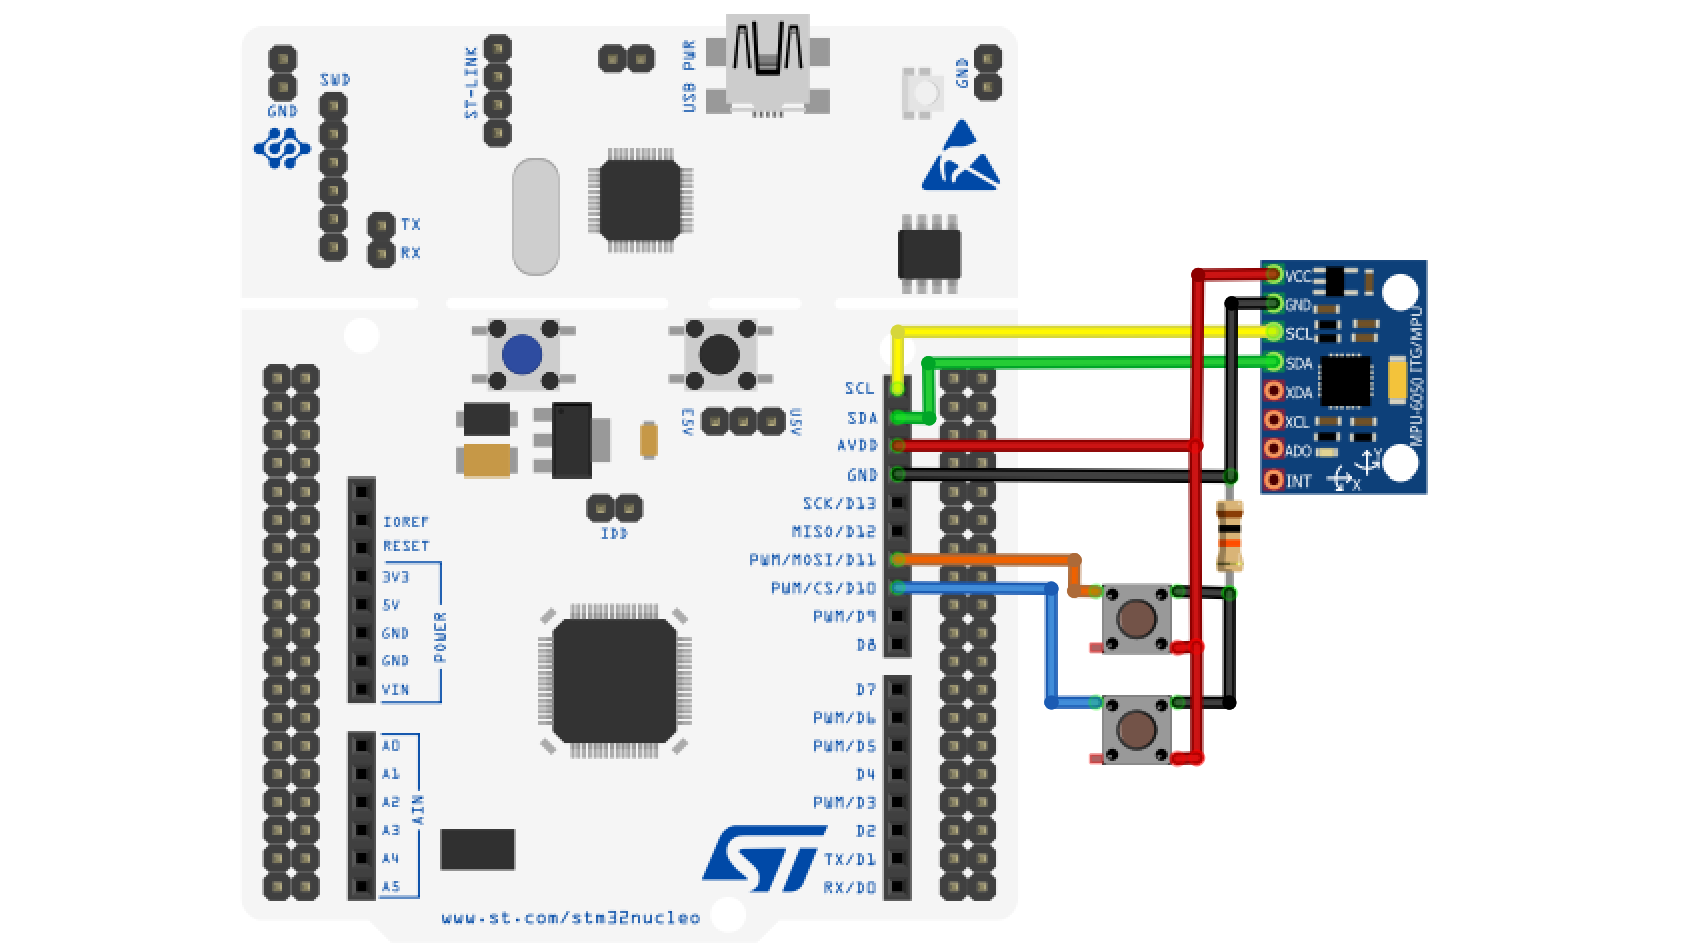
Programming of the controller and reading of data coming via the USART interface is carried out via USB.
Building a project
Let's create a project in the workspace of the VSCode+PlatformIO development environment with the following configuration file settings platformio.ini:
[env:nucleo_f446re]
platform = ststm32
board = nucleo_f446re
framework = arduino
In the directory include and src add files from the corresponding directories from the Engee file browser of the current project.
After that, we will run the build of the "Build" project and make sure that the build is successful.:

Executing code on STM32F4
We will connect the STM32F4 controller with a peripheral consisting of a sensor and two push-button contacts to the serial port, after which we will start uploading the compiled project code to the controller and make sure that the download is successful.:
.png)
The values of the variable tilt angles of the joystick normal and the locking and scale switching signals are transmitted to the serial port of the computer:
This project uses a program to display graphs of signals from the serial port. SerialPlot.
Conclusion
In this demo, the Engee model was developed to convert the rotation angles of the MPU6050 position sensor around the axes. The code generated from the model reproduces the built-in functions after loading into the STM32F446RE microcontroller.
In the Engee documentation, you can get additional help that will help you work with this project:
- the concept of Model-oriented design;
- code generator Engee;
- working with the [C Function] block(https://engee.com/helpcenter/stable/en/base-lib-user-defined-function/c-function.html );
- software control simulation of the model.