Generating code for Arduino (flashing LED)
The Arduino platform is today the most widely used platform for educational robotics and automation of simple processes. It is used for prototyping in a variety of application areas.
In this example, we will show how to generate software code for Arduino from a graphical model in Engee using the example of one of the simplest tasks in circuit engineering. Let's create a model that will flash the "on-board" LED of the Arduino platform with a certain preset frequency.
Introduction
Solving the problem of transferring the model to a hardware platform, described in this example, can be divided into several steps.:
- Creating or changing the Engee model
- Description of the interface model-Arduino
- Download the project folder and upload to the platform via the Arduino IDE
In the process of model-oriented design, we try to focus all efforts on the first stage – modeling the algorithm that will be transferred to Arduino. The interface configuration stage requires very rare intervention, and code generation and uploading to the target platform, although not automated, does not involve any complex operations.
Platform preparation
For this example, we only need an Arduino-compatible platform (Uno, Leonardo, Iskra, and others) and a suitable USB cable.
You will also need to install the [Arduino IDE] environment on your computer (https://www.arduino.cc/en/software ), find and supply additional драйверы (if necessary) and connect the existing board via the USB port.
Finding and installing drivers to connect to external hardware usually requires some effort. The above driver should allow you to work with Arduino Uno, Arduino Leonardo and many other similar boards, such as Iskra Neo. However, in case of any difficulties, we recommend that you consult the reference articles or the Engee community for help._
Description of the model
We will generate the code from the model. blink.engee.
At each step, it performs the calculations described in it and returns two values:
out_LED_BUILTIN– the state of the LED (initially equal to 1, changes to the "opposite" with each cycle),param_WAIT_MS– permanently returned value500(the number of milliseconds between two accesses to our model's code).
.png)
_ One of the conditions for code generation is the use of a constant-step solver**_ in the model.
It should also be borne in mind that it is not technically possible (or even advisable) to obtain a code from all blocks. The list of valid blocks is still very long, but it is always useful to check the documentation on the Engee code generator._
Code generation
You can get the code for this model by clicking in the upper-right corner of the workspace Engee (then you will need to move the folder blink_code inside the folder sketch_blink_custom).
In this demo, we suggest doing this using the following command:
engee.generate_code( "$(@__DIR__)/blink.engee",
                     "$(@__DIR__)/sketch_blink_custom/blink_code" )
As a result, in the catalog sketch_blink_custom The folder will open blink_code in which we find .c and .h files with the code of our system.
Project Files
There is only one model in our project. Of the generated files, we will need only the files with the code of this model: the source code blink.c and the header file blink.h.
It is worth paying attention to the structure of the project files and directories.:
.png)
- file
sketch_blink_custom.inocontains a description of the interface Model-Arduino, - Level catalog
sketch_blink_customIt should be named the same as the file.*.ino(Arduino IDE requirements), - catalog
blink_codeit contains files with the generated code, which we will include in the file.*.ino.
Interface Model-Arduino
The interface between the ports of our model and the entry points to various Arduino functions is described in the file sketch_blink_custom.ino. We suggest you open it directly in Engee and explore its contents.
This code implements an infinite loop in which the generated model code is run. the output values are placed in the structure blink_Y after that, we pass each value to the desired function from the Arduino standard library.
Transferring the model to Arduino
All that remains is to pack the demo catalog into an archive and download it from the Engee file manager to your local computer. Archiving and downloading can be done with a single action of the context menu.
.png)
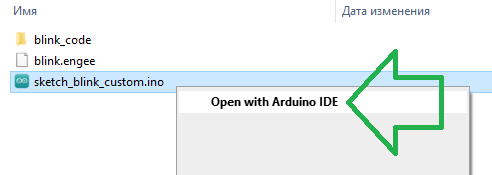
After unpacking the resulting archive, you will find a file in it. sketch_blink_custom.ino, which can be opened in the Arduino IDE.
.png)
You have received a ready-made project opened in the Arduino IDE, which remains to be sent to the target platform using the "Upload" button.
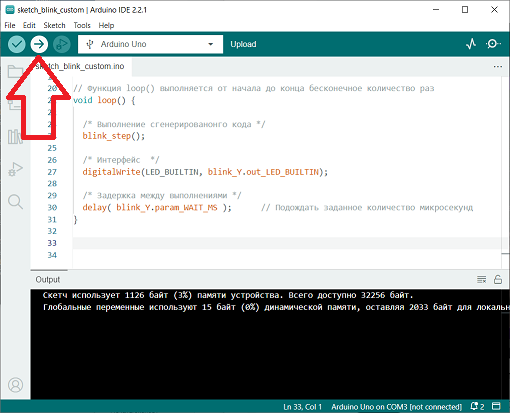
A typical result of running the example is shown in the following video:
Conclusion
Working with low-level code usually requires some technical skills and additional manipulation.
In addition to developing the model, you will need at least:
- create an interface between the Engee model and the Arduino functions,
- Download the project and run it on a local, target platform.
When implementing individual application tasks, more complex problems may arise, for example, correlating the speed of the model and the clock frequency of the Arduino processor.
However, the workflow you have optimized, built in Engee and suitable for your needs, will save a lot of effort in a complex project by automating many routine actions.:
- synchronization of the project code in accordance with mathematical models,
- creation of visual documentation – in Engee, you can automatically, using commands, add photos of diagrams and output graphs to scripts and generate a report in HTML or PDF,
- and significantly simplify semi-routine testing.