Creating a main function specific to the target platform
This example shows how to use Engee code generator templates to generate a function. main(). This allows you to generate a function main containing custom code (for example, platform-dependent code with MC timer settings, etc.). This approach also allows you to embed the model code in the RTOS.
An example is a counter model on a finite state machine
As an example, let's take a counter implemented using finite state machines. The implementation is contained in the Counter_PWM model:
demoroot = @__DIR__
mdl = engee.load(joinpath(demoroot,"Counter_PWM.engee"); force = true)
engee.open(mdl)
Suppose you need to call this counter with a frequency of 20 Hz and implement it on different hardware platforms: STM32F4 and Arduino.
How the counter works

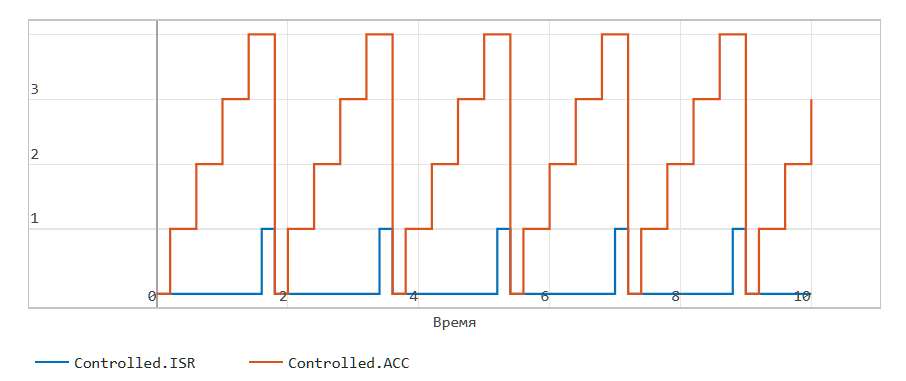
The principle of operation of the meter is that the battery is incremented at each step of the simulation. If the battery value reaches the threshold THRSHLD set by the input constant, the battery is reset and the ISR flag is raised. For THRSHLD equal to 4, the result looks like this:
To make sure that the system is working correctly, we will turn on or off the LED using the ISR flag.
Templates for main
We already know that the code for the blocks can be customized using the source code generator templates. The same can be done for main. The main difference is that the amount of target code in the main templates will be significantly larger than the amount of code in the host language. Also, the main template can only be used when using command control for source code generation.
As an example, let's look at the simplest template for Arduino:
run(`cat "arduino_main.jl"`)
As you can see, the template is almost pure C code, with special directives like $model_<>
В отличии от обычных функций, применяемых в шаблонах, эти директивы раскрываются как вызовы соответствующих функций API модели. Например, вызов $model_step for the Counter_PWM model, it will open as Counter_PWM_step();
To generate the main for each of the test platforms, use the switch:
.png)
and run the code cells below:
target = "Arduino" # @param ["STM","Arduino"]
hw = lowercase(target);
engee.generate_code(joinpath(demoroot,"Counter_PWM.engee"),
                    joinpath(demoroot,"$(hw)_code"),
                    target = "c",
                    template_path = "$demoroot/$(hw)_main.jl");
You can view the generated code using the command below:
src = "$(hw)_code/main.c";
run(`cat $src`)
Assembling the resulting code
Assembly for STM
The steps for assembly are described in the Flashing LED example on the STM32F4 in the section Executing the model on STM32
Assembly for Arduino
The steps for assembly are described in the example Code Generation for Arduino (PWM signal generation) in the section Transferring the model to Arduino. The only improvement is that we will immediately rename main.c to arduino_code.ino.
mv("./arduino_code/main.c", "./arduino_code/arduino_code.ino";force=true)
Demonstration of operation (STM32)
Finally, let's make sure that the example works. To do this, we will use the STM32F4 Discovery card. We will assemble the project and upload it to the board. It can be seen that the LED starts flashing:
.gif)
Conclusion
Templates for the main function allow you to generate a binding for the model code that is specific to the hardware platform. This ensures full portability of the algorithms.