Masked Callbacks
This example focuses on using callbacks in masked blocks.
Masks in the simulation environment
Mask is a customizable user interface that simplifies the use of the block, as well as its reuse. The masked block has its own settings window where you can change various parameters.
Using a mask, you can:
-
Create a settings window for quickly changing subsystem or block parameters.
-
Hide the contents of the subsystem and protect it from accidental changes.
-
Change the appearance of the block by adjusting its icon.
In addition, masks are very often used in conjunction with user libraries.
Creating a subsystem
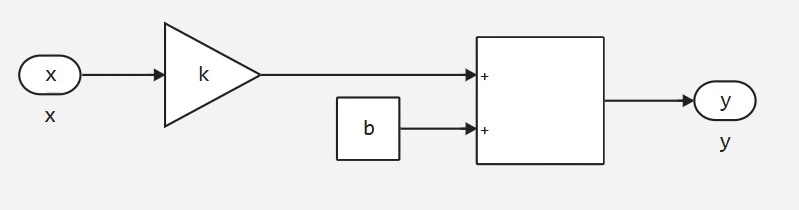
Let's create a subsystem, go into it and add three blocks - "Gain Factor", "Addition" and "Constant". We'll call the entrances x and y, multiply the input signal by the coefficient k and add a constant to it. b:
Let's call the subsystem a "Linear function", input the current simulation time, and record the output and add it to the Signal Visualization module:
.png)
If we try to run this model, then of course we will see a simulation error. After all, variables k and b not defined in the workspace.
Subsystem masking
Instead of assigning them on the command line, in a script, or in model callbacks, let's right-click on the subsystem and click "Add Mask" in the Mask section.
.png)
As a result, a tool for configuring masks opens in a new browser window - the Mask Editor. It consists of an interface editor and a code editor.
The interface editor allows you to add various controls, structural elements, and actions to the block settings window.
.png)
By default, a tab named "Main tab" and a section for hiding the "Main group" have been created in the interface editor.
You can rename them.:
-
Or double-click on the tab name, change it, and press Enter.
-
Alternatively, select a section and change the Section Name parameter in the Settings panel.
Clicking on the "+" button will create another tab.
Adding controls
The controls include:
-
Input fields;
-
Checkboxes;
-
Drop-down lists.
You can drag items from the Library panel to the settings window in the same way as you do when adding blocks to the canvas.
If an item needs to be deleted, select it and press the Delete key.
If you select a control, such as the input field, you can change its parameters in the Settings panel.
The parameter name is the name of the variable you are accessing in the block. In our case, there are two such variables. - k and b.
Let's set the name of the first parameter and write k. change the "Field name" to "Angular coefficient" and set the default value to 5.
.png)
Add another input field. We will set the parameter name as b, we indicate that this is a free member and define the default value:
.png)
If you run the simulation now, it will complete without errors, despite the absence of variables. k and b in the workspace, because now they are defined in the mask.
You, in turn, can easily adjust the parameter values, because for this you do not have to open the command line or switch to the subsystem.
Mask Callbacks
After clicking on the "Code Editor" tab, the mask callback editor opens.:
.png)
Callbacks are divided into global and local ones.
Global callbacks apply to the entire mask:
iconDrawCallback- called when you need to redraw the block icon based on the current parameter values.blockChangedCallback- it is executed after one or more mask parameters have been changed.
.png)
Local callbacks are bound to a specific mask parameter, and are triggered after its value changes.
Select the parameter k In the panel on the left, we will see that we can set two local callback functions.:
valueChangedCallback- performed when the parameter value is changed;validateCallback- validates the parameter (i.e. checks the correctness of the entered value).
.png)
Validation of parameters
Callback validateCallback it must necessarily start with a macro @assert. You can specify the logical expression and the error text after it. For example, compare the parameter value with zero:
.png)
@assert value > 0 "Значение должно быть больше нуля"
If you now try to change the value of the angular coefficient to negative, an error will be displayed.:
.png)
Hiding parameters
Let's remove the validation and add another control in the interface editor - a checkbox. Let's name the variable is_direct in the name, we will write "Direct proportionality", and indicate that the checkbox should be activated by default.
.png)
Let's go back to the code editor and write a callback function. When changing the value of the checkbox, we will either hide the parameter. b from the mask, or show it.
To do this, let's turn to a special object. mask.parameters, which stores the mask parameters. We are interested in the parameter b so let's write down his name after the dot.
If we wanted to change the value of b, we would need to refer to the property value. For example, we could write mask.parameters.b.value = 42. After that, each time the status of the checkbox changes, the parameter b the specified value would be assigned:
.png)
mask.parameters.b.value = 42
But we don't want to assign a value, but hide the parameter from the mask. Therefore, we must refer to the property hidden and assign it a boolean value. If the checkbox is_direct takes the value true, parameter b should not be displayed:
.png)
mask.parameters.b.hidden = is_direct
Let's save the mask and make sure that now the display of the free member depends on the value of the checkbox. But if we run the model, we will see that the parameter b it simply disappears from the mask, but its value continues to be taken into account during the simulation.
Let's fix this.:
-
Define a variable with the name
constant_pathand save the path to the "Constant" block in it. -
And also write down the following condition. If the checkbox is active, set the value of the constant to zero. Otherwise, we will assign a parameter to it.
b.
.png)
mask.parameters.b.hidden = is_direct

constant_path = joinpath(engee.gcb(), "Константа")

if is_direct
    engee.set_param!(constant_path, "Value" => "0.0")
else
    engee.set_param!(constant_path, "Value" => "b")
end
On the one hand, this example shows that you can use programmatic control methods in mask callbacks. On the other hand, it demonstrates one of the ways to apply the "Hidden" attribute.
.png)
Let's save the mask and make sure that now when the checkbox is activated, the parameter value is b it has no effect on the simulation result. And when the checkbox is deactivated, the "Free member" parameter will save the last entered value.
.png)
Customize the appearance
And finally, I would like to show you how to use a callback. iconDrawCallback. To customize the appearance of the mask, use the function engee.show.
In the documentation You will find many examples of customizing the block's appearance. You can output text, LaTeX formulas, graphs, and images. In addition, you can adjust the horizontal and vertical alignment, display several layers of images on the block, and change the port signatures.
Let's put a line on the block y = kx + b and we will insert the parameter values into it. We will display the value of the free term only if the "Direct proportionality" checkbox is deactivated.:
.png)
text = "y = $(k)x"

if !is_direct
    text = text * " + $(b)"
end

engee.show(text)
Let's save the mask and make sure that the block icon is updated when the parameters are changed.:
.png)
.png)
Conclusion
In this example, we looked at masking blocks, and also got acquainted with various types of callbacks. We learned how to validate parameters, hide them, and customize the appearance of a block.