Creating a custom physical component
Engee has a huge library of physical modeling. But there is always something missing or you want to simulate a physical object using your own equations.
The task of this small project is to make your own resistor, in which the resistance depends on the temperature.
Setting the task
There is a Resistor component in the basic library of physical modeling. It simulates the resistance in a circuit, and has only one parameter, Resistance. However, this is an idealized resistor - the effect of temperature is not taken into account. Therefore, we will need to create our own more "realistic" resistor.
Creating a resistor component
To create a custom physical component, we will use a specialized physical modeling language included in Engee. But before we start writing code, let's remember how temperature and resistance are related.:
where:
- reference temperature
- resistance at reference temperature
- a certain constant, depends on the resistance material
Now you can proceed to writing your own component. The code for the component must be contained in a file with the *.ngpc extension. I have already written my own implementation of the resistor, let's look at it.:
@engeemodel MyResistorHeat begin

    @nodes begin
        p = EngeePhysicalFoundation.Electrical.Pin(), [view = ("+", "left")]
        n = EngeePhysicalFoundation.Electrical.Pin(), [view = ("-", "right")]
    end

   @variables begin
        v = 0, [unit="V",description = "Voltage"]
        i = 0, [unit="A",description = "Current"]
    end

    @parameters begin
        R = 200.0, [unit="Ohm"]
        a = 0.1, [unit="1/K"]
        T0 = 300, [unit="K"]
        T = 300, [unit="K"]
    end

    @branches begin
        i:(p.i, n.i)
    end

    @equations begin
        v~p.v-n.v
        v ~ R*(1+a*(T-T0))*i
    end

end
It can be seen that the component is enclosed in the @engeemodel region. Let's look at the most interesting code structures.:
@nodes - describes the component's physical non-directional ports. Each such port belongs to a domain - a field of physics (mechanics, electricity, magnetism, etc.)
@parameters - the parameters of the component that the user sets
@equations - equations describing the behavior of the component. This is where our equation is written.
How do I work with the component code?
To use your own physical block, it is not enough to write the component code, it needs to be embedded in the model. The Physical Component block is used for this. The file with the component code is specified in its settings. In order for the model to work, the code file must be in the Engee path.
It's time to apply our new component.:
demoroot = @__DIR__
engee.addpath(demoroot);
To begin with, let's look at the model of an amplifier assembled on conventional, non-modified components.:
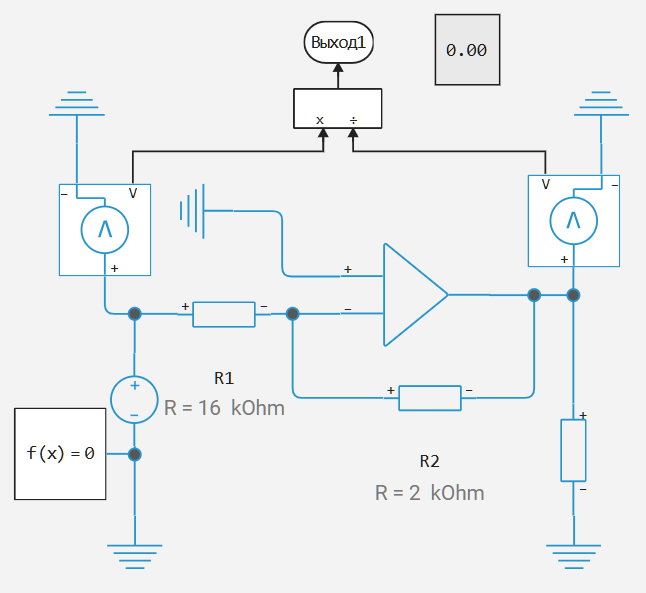
Let's run this model and get a gain factor of -8:
engee.open(joinpath("OpAmp_Stock.engee"))
Rs = engee.run(joinpath("OpAmp_Stock"))
collect(Rs["Division.1"])
Now let's open the OpAmp_Custom model:
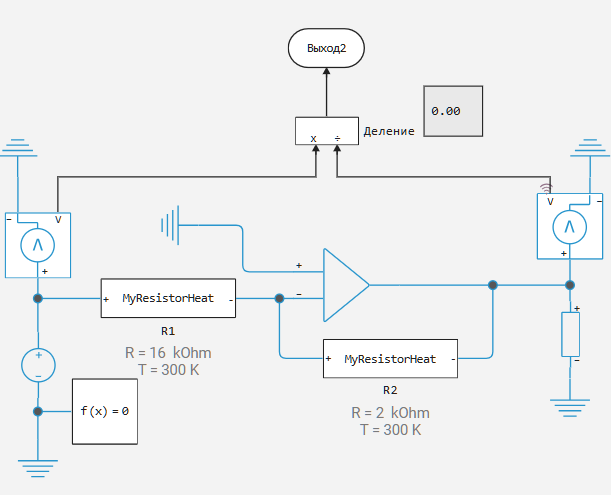
As you can see, the resistor blocks have changed. Because these are not resistor blocks, but Physical Component blocks. Let's take a look at them:
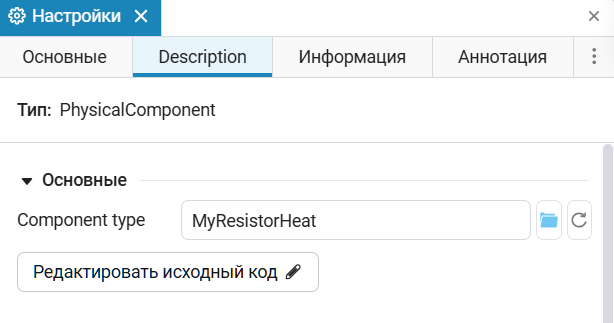
In the Description tab, we see the name of our component, MyResistorHeat, and in the Main tab, we see the parameters that we specified in the region. @parameters:

The target values appeared because we specified them in @variables.
For clarity, we take the coefficient equal to 0.001, and let's take it equal to 300 Kelvin (which corresponds to the temperature under normal conditions). Let's simulate the model at temperature equal :
.png)
It can be seen that the component worked correctly, and the resulting gain is -8. Now let's raise the temperature at R1 and look at the simulation results.:
.png)
It can be seen that the gain has changed! This means that our component is working.
Conclusions
The Engee physical modeling language is a necessary tool for describing its physical components. In the context of the current project, it can be imagined that the component could be expanded in terms of modeling the heating of the resistor, which again is convenient to do using the language of physical modeling.